
Custom Web Forms in Sprinklr Advanced
Updated
Learn how to generate a ticket into the Sprinklr Advanced ticket queue and corresponds with the agents on that ticket via Email.
Sprinklr Advanced, by default, provides you with the facility of ticket forms on the Knowledge Base portal and has the flexibility to configure it as per the business requirement.
However, if the business wants to expose a ticket form to its end users on one or more websites other than the Knowledge Base, they need to follow some simple steps, following which the end user can:
Generate a ticket into the Sprinklr Advanced ticket queue via Sprinklr Advanced API.
Correspond with the agents on that ticket via Email.
Table of Contents
Building a ticket form as a Proof of Concept (POC):
To enable the ticket form in a website, you need to build an end-to-end functioning using a defined technology stack. For the same reason, we have chosen the following tech-stack for a proof of concept:
Front End: HTML, CSS
Back End: Python (Bottle & Requests)
Front End: Create the Ticket Form interface
The web interface needs to perform the following actions:
Ask for the user's email address for further email correspondence with the support team.
Ask for the ticket subject and description of the problem from the user.
Submit the ticket form data to a web application that’ll be built later to create tickets with the Sprinklr Advanced API.
You, as a business, can start creating a working directory/folder in your system where your ticket creation project will reside.Here are the steps below:
Create a folder name as form_project.
Create a file named ticket_form.html inside the folder, form_project.
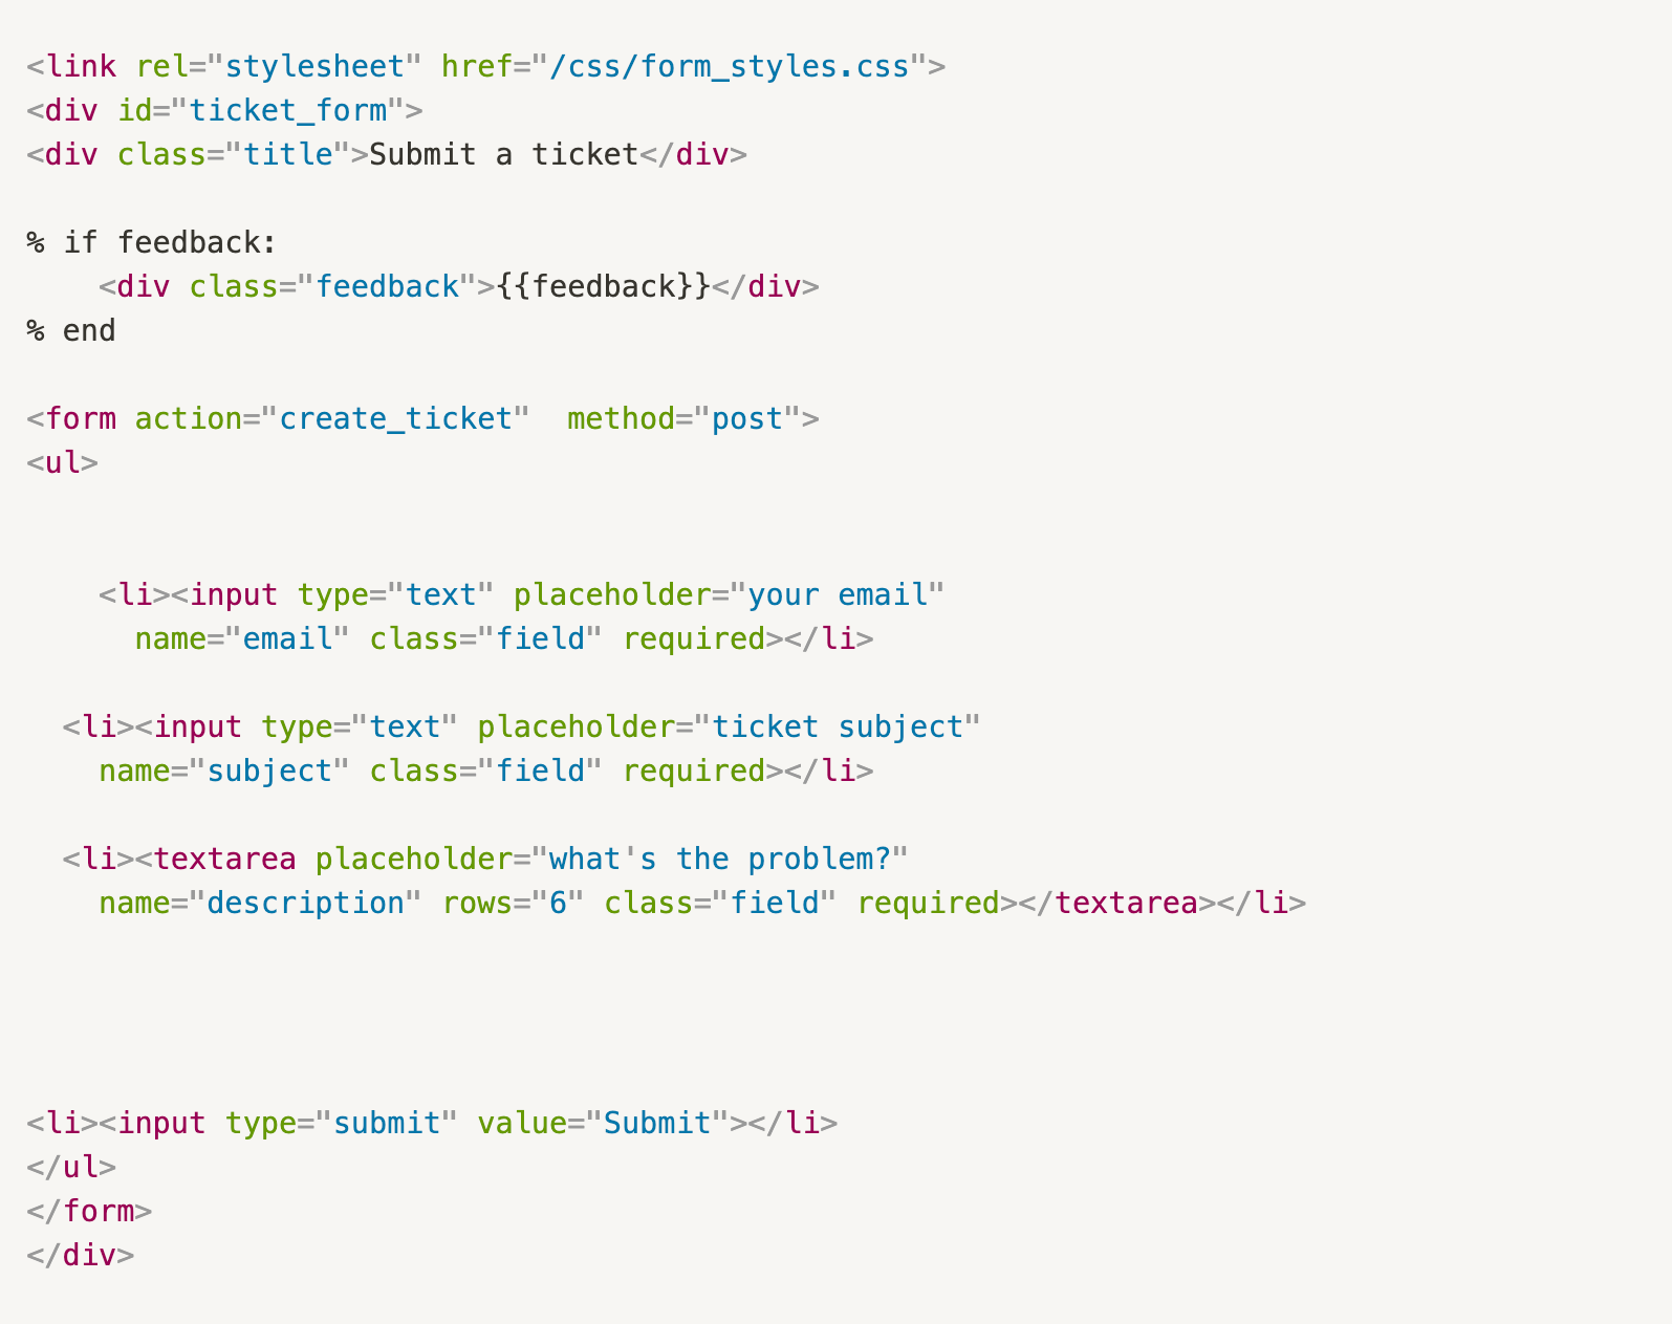
Type the following code inside the ticket form to create a ticket form backbone of text boxes to input Email, Subject, Description & a Submit button at the bottom. Save the file.
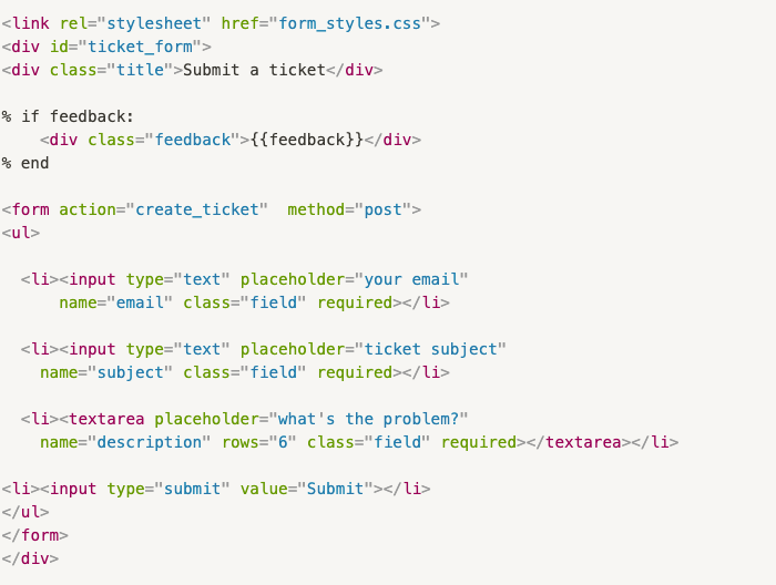
Components of the code:
The first line of the code defines the path to the CSS Stylesheet that’ll help to create a nice box around the form and define their visual characteristics.

We want to capture whether or not the information that we submitted got converted into a ticket. We do that by capturing the feedback using the snippet that handles incoming feedback from the API.

The following piece of code indicates what exactly would the action of sending out a POST request (submitting the data captured in the form) be called. Here, we call the action as create_ticket.

The tags <li> & </li> encloses the line items (components) of the form like a Text Box or a Submit button. These line items may have some customisations eg. placeholders that’ll appear before the customers enter anything in a text box.

Next we will build a CSS Stylesheet that we have mentioned in the HTML code above:
Create a file called form_styles.css in the working directory and type the following code inside it and save the file
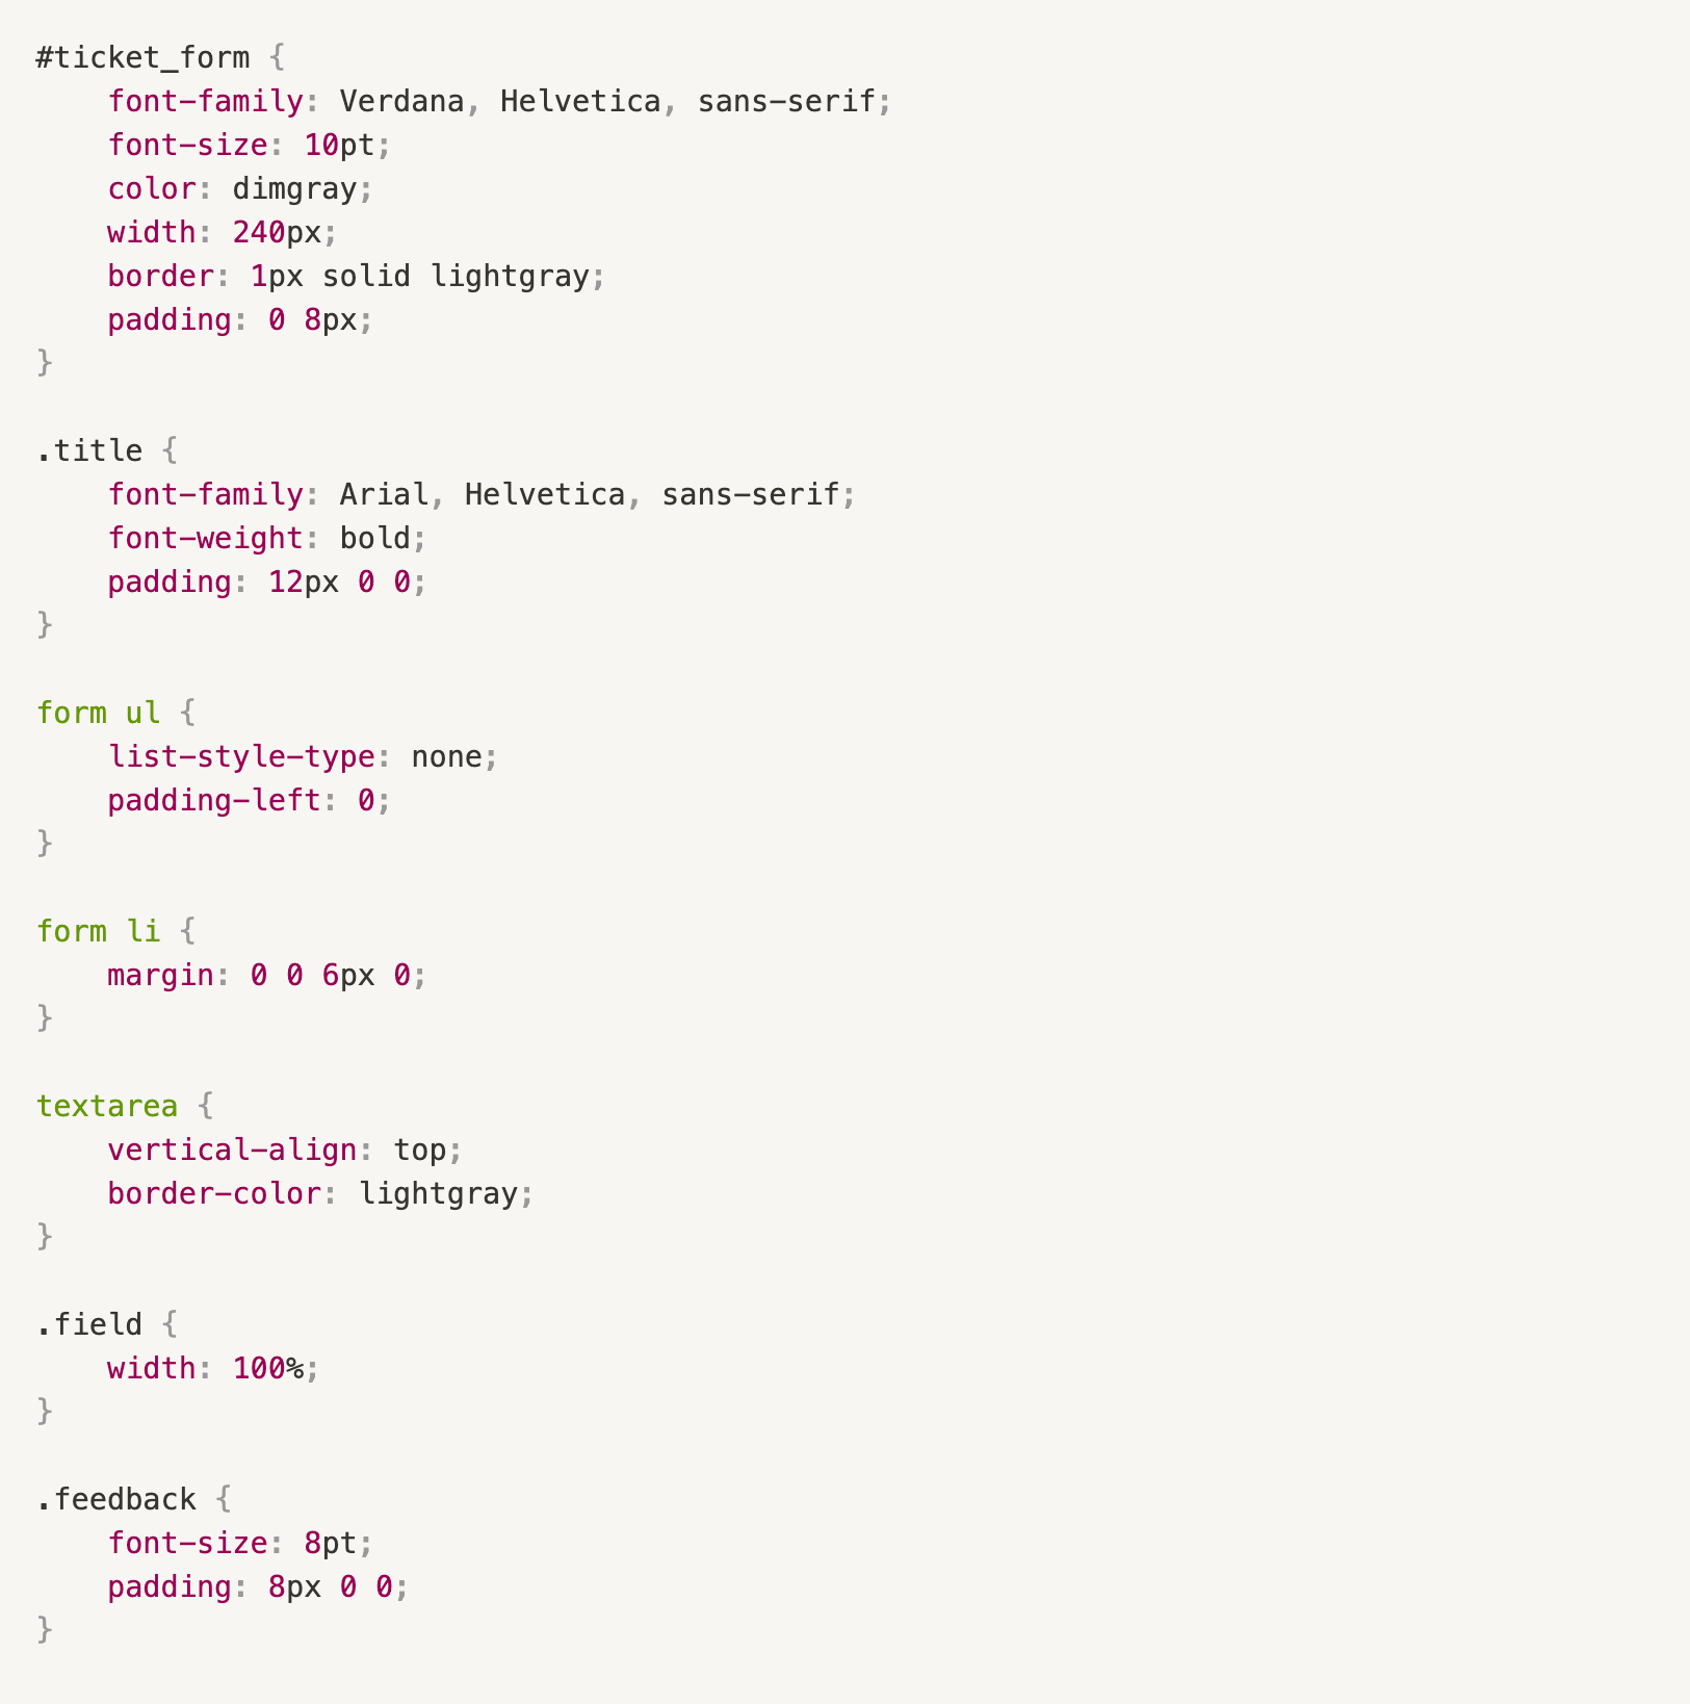
Components of the code:
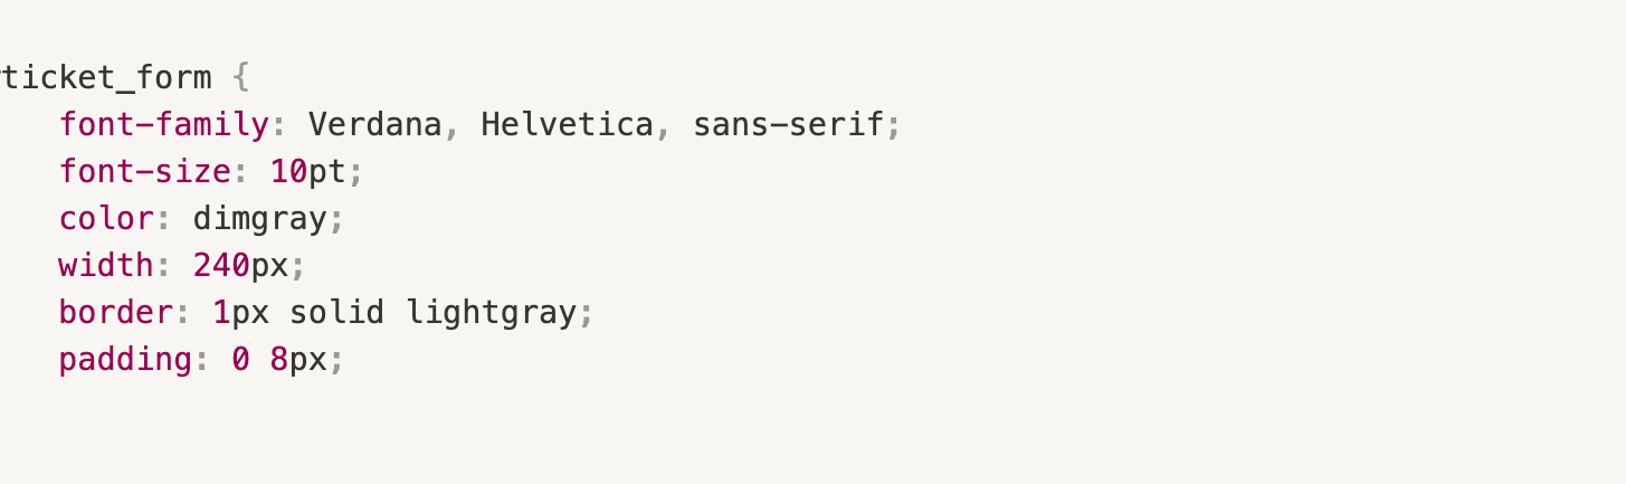
The following code defines a general style of the ticket form with border styling etc.
Similarly, the codes that define individual components of the HTML subsections are styled in the corresponding manner:

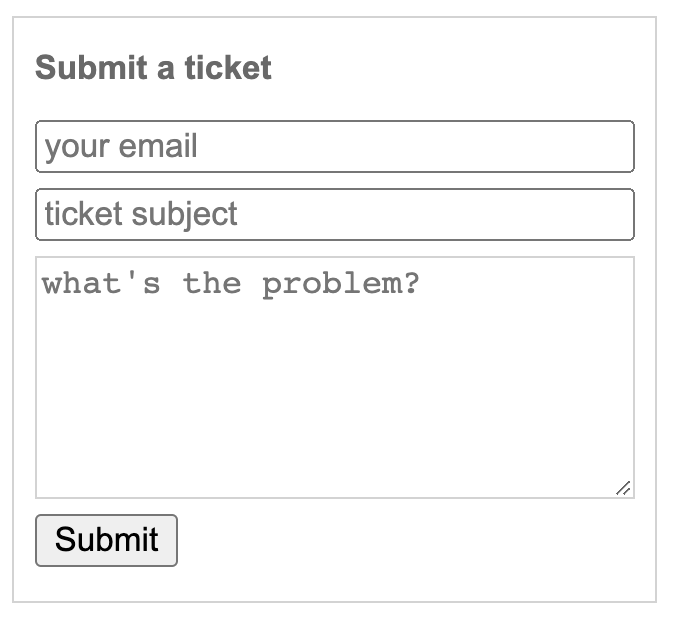
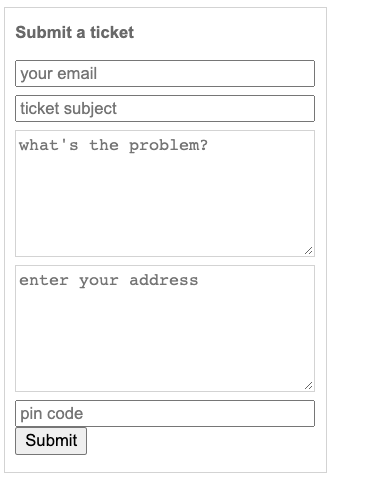
After this, if you wish to see the interface, you can open the ticket_form.html file in the Chrome browser. You should see something like this:
Back End: Create a Ticket Form handling engine
As defined earlier in the tech stack, here, we will use a Python framework to implement a simple engine that fetches the data from the interface created above. The data is then packaged and sent out to Sprinklr Advanced with the intent to create a ticket in the Sprinklr Advanced Platform.
Setup for the environment:
Before we can implement the engine logic, we need to set up our systems to boot up a dummy server on our local systems, as an emulation of servers where actual websites are hosted. We would assume that you are using a Mac/Linux device so that we can use the CLI terminal for installations. (We can emulate similarly, but with a change in syntax, on Windows systems as well).
Install the latest version of Python3 in your systems, if you don’t have it installed already.
Make sure you have pip installed in your system (check the response to the following command on your terminal). Open the terminal by searching for it in your system and type the command excluding the $ sign.
If you receive an appropriate version number (see below) from the terminal, that means pip3 is installed in your system. Else, go aheads and install pip3.

Install requests in your systems by running the following command.

Install bottle in your systems by running the following command.

Bottle is a python framework that enables you to host an application built locally on your system without the need to go hosting services to see how the application and the changes you make to an application looks to the end user.
Set up your folder according to the Bottle framework:
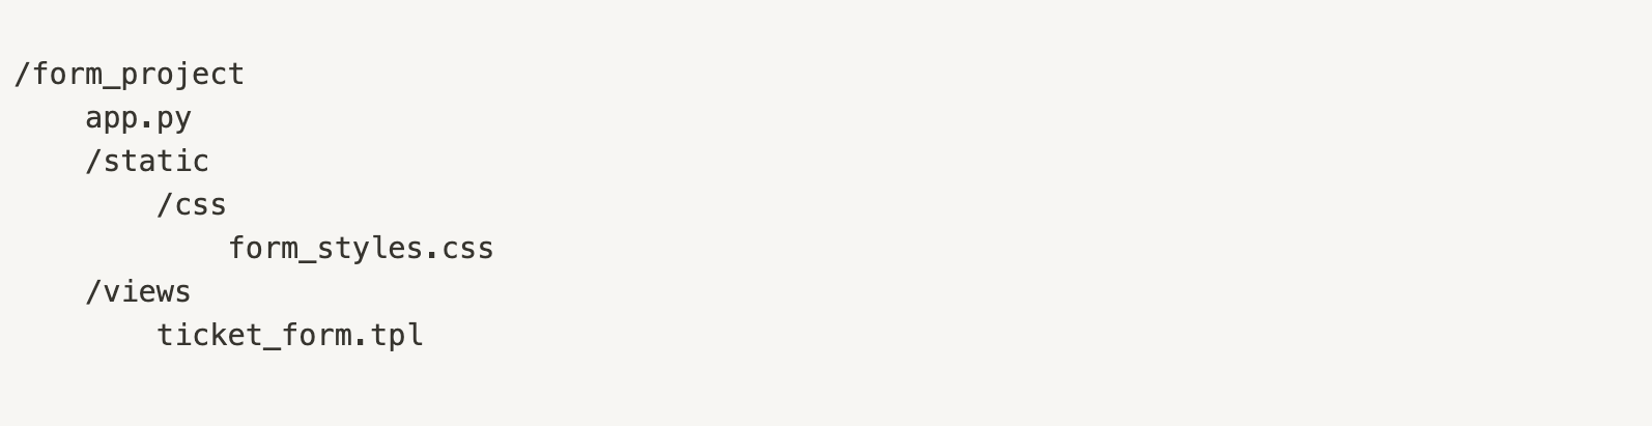
Create two subfolders /static and /views in your working directory i.e form_project.
Create a file called app.py in the working directory form_project.
Create a folder called css inside the static folder and move the form_styles.css file inside this /static/css folder.
Next, move the ticket_form.html file inside the /views folder and rename it to ticket_form.tpl (a template file that Bottle can read).
Hence, your folder structure should look like this:
Finally, modify the ticket_form.tpl file inside /views folder and adjust the link to the CSS Stylesheet, as we have restructured the file directory above. The modified code would look as follows:
Now, open the app.py file in a text editor and type the following code in the file. The components of the code have been identified in the comments above each code snippet. (Note that Python is an indentation sensitive language, so please maintain the tabs and spaces exactly as suggested below:)
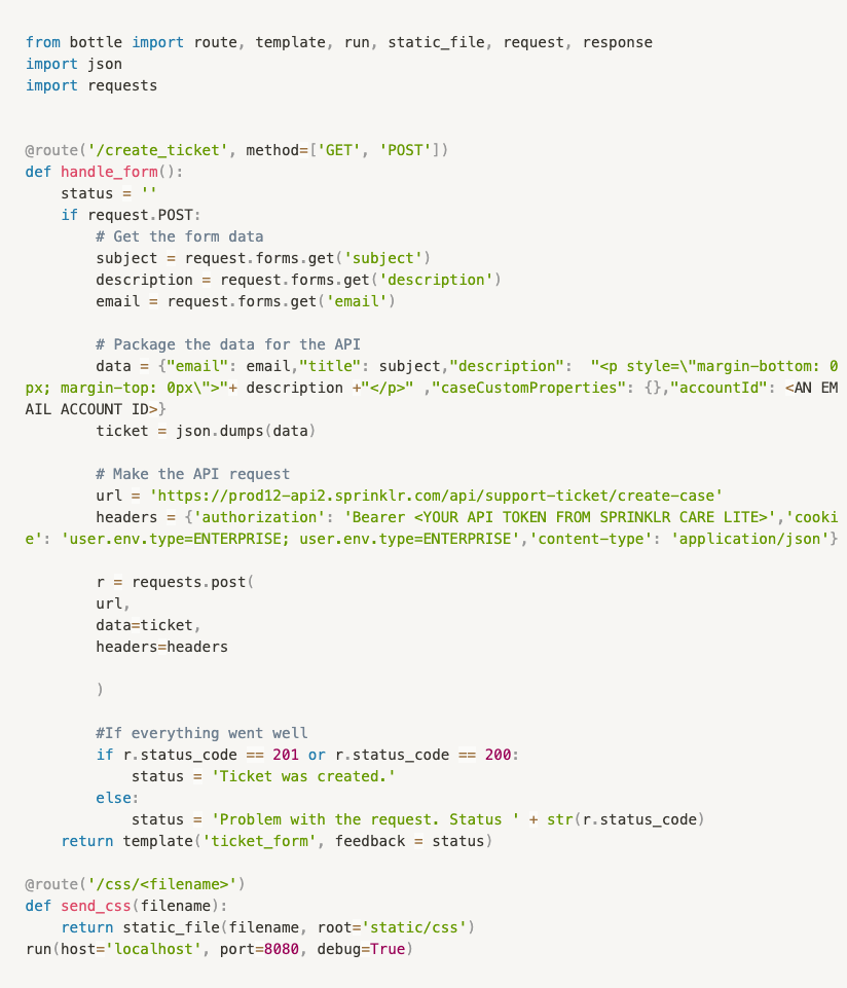
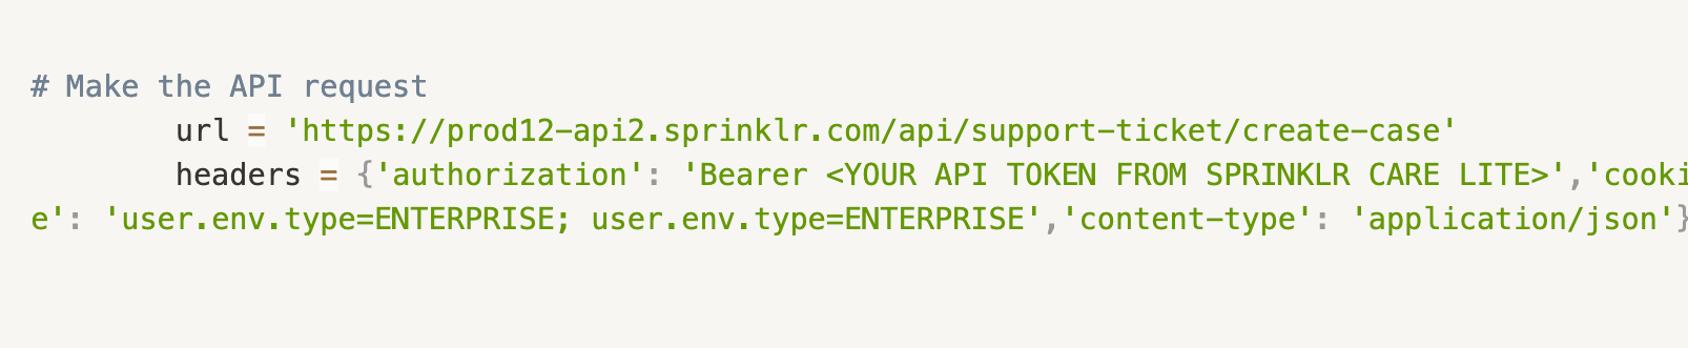
NB: If you are using https://eu.lite.sprinklr.com/ rather than https://lite.sprinklr.com/ to access Sprinklr Advanced, then replace 'https://prod12-api2.sprinklr.com/api/support-ticket/create-case' with 'https://prod3-api2.sprinklr.com/api/support-ticket/create-case' in the url above.
The above code needs two customisation to personalise the request sent to your Sprinklr Advanced Dashboard:
Generate your Sprinklr Advanced API token by reaching out to the Sprinklr team via email.
Replace “<YOUR API TOKEN FROM SPRINKLR SPRINKLR ADAVANCED>” with the API token that you have got as a response. The token should look like zLr**********************4Yw==
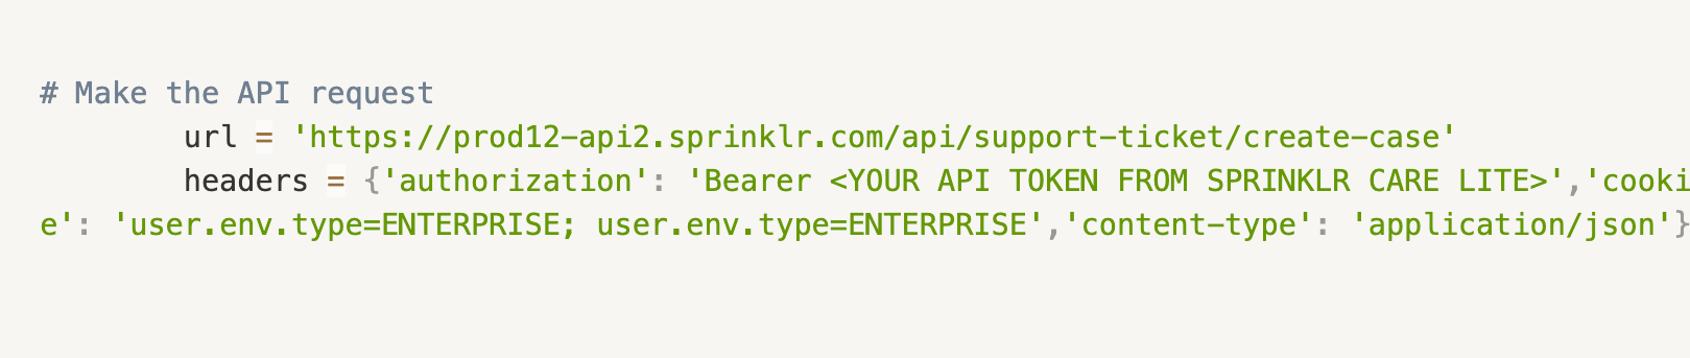
Replace <AN EMAIL ACCOUNT ID> in the code above with an account id that can be fetched from Sprinklr Advanced.
Go to https://lite.sprinklr.com/care/settings/channels/email and choose the email id that you want to route all your Ticket Form requests to and edit that email using the three dots next to it. Then, in the URL of the browser https://lite.sprinklr.com/care/settings/channels/email/edit/12345, copy the last 4 digits (here 12345) and replace <AN EMAIL ACCOUNT ID> with it.
Run your web app - ticket form
Go to terminal and traverse to the working directory and then, run the following command:

This should boot up the app and you should see the following response on the terminal:

Now, go to the browser and type the following url : http://localhost:8080/create_ticket
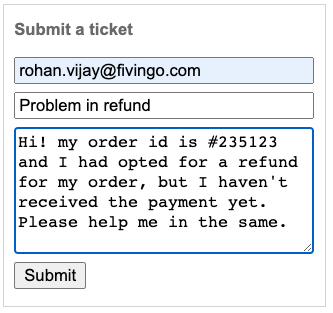
Your ticket form should be booted up and ready to generate tickets. Fill up the form and hit submit.
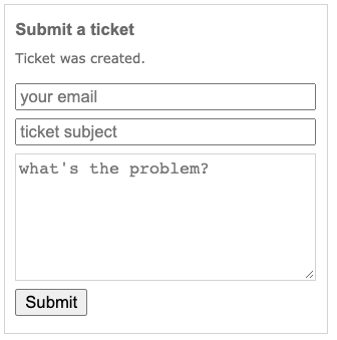
If successful, the following response should be visible to you on your form:
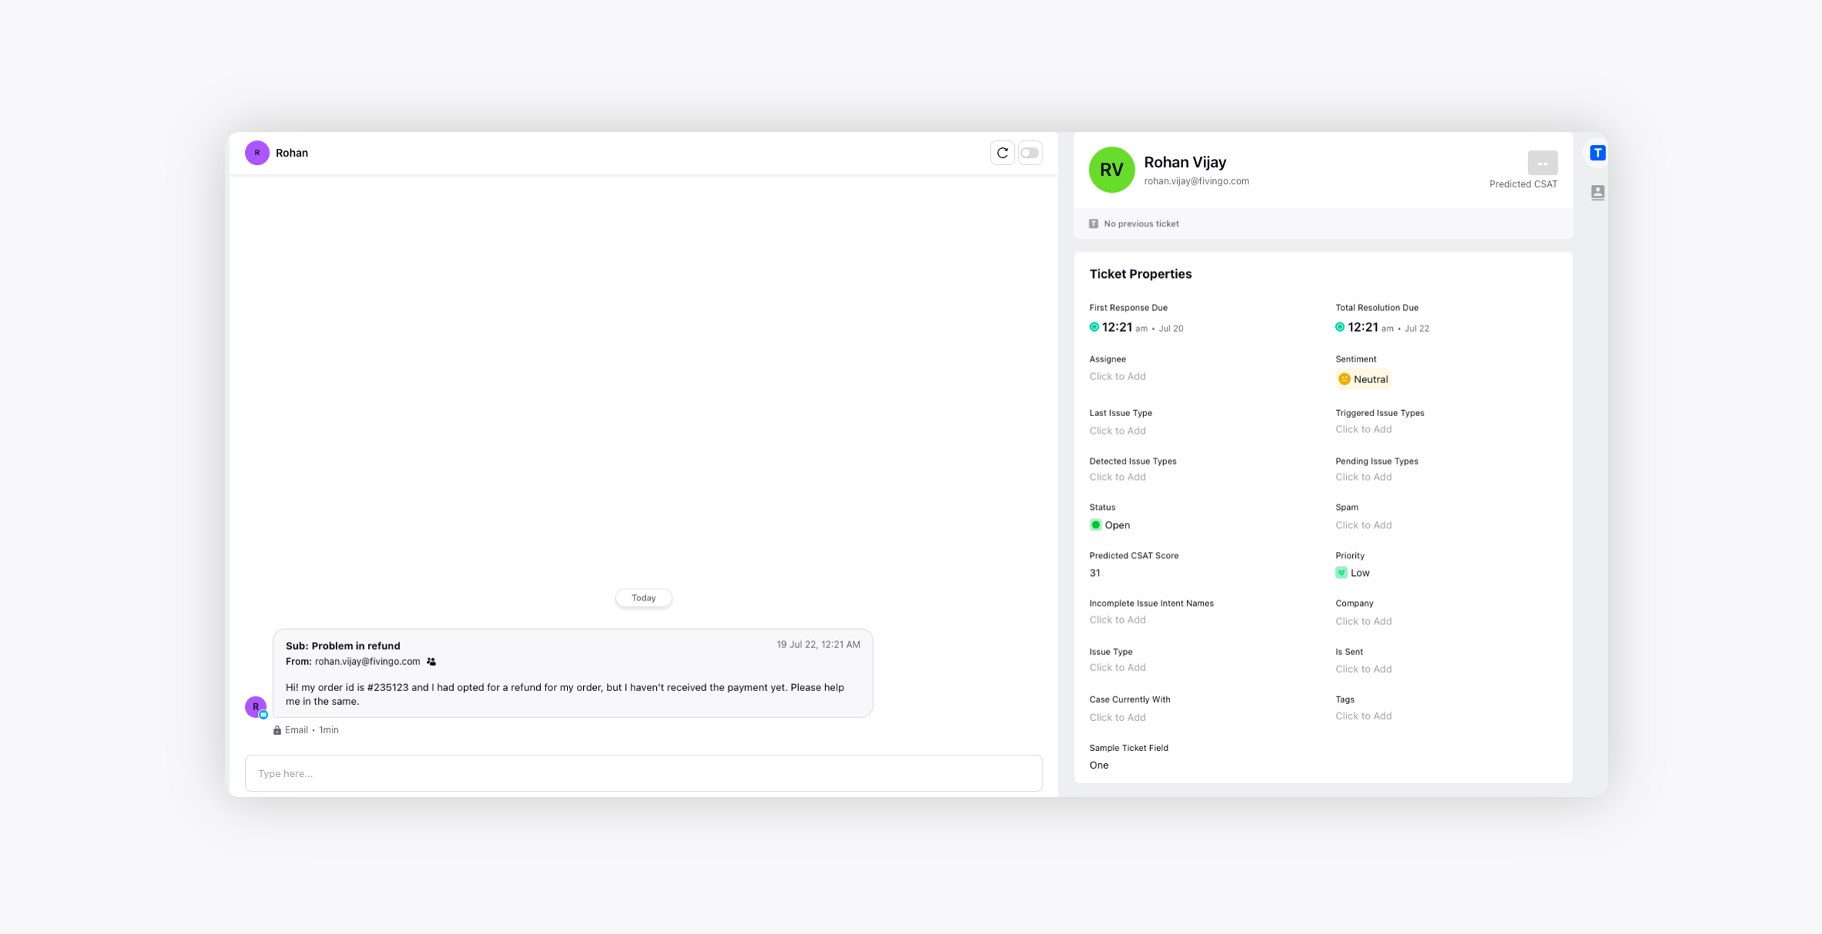
Now, go to your Sprinklr Advanced and navigate to tickets. You will view the ticket generated in your console with the details entered in the ticket form above:
Minimum viable product
At this point, we can conclude the proof of concept of a ticket form which will generate tickets in Sprinklr Advanced. This ticket form performs the basic task of fetching the user’s request and throwing back the success or failure of the attempt to create the ticket from the web app hosting the ticket form.
Incorporating Custom Fields
We can enhance the ticket form further by creating fields that are more personalised with your business. The first step is to create a custom field inside Sprinklr Advanced. This can be achieved by going to Settings and searching for Ticket Fields and then proceeding to Create a new Ticket Field.
Fetching Custom Fields via Curl
Once this is done, we can fetch the Custom Fields attributes of the fields in your Sprinklr Advanced platform by running the following command on the terminal:

NB: If you are using https://eu.lite.sprinklr.com/ rather than https://lite.sprinklr.com/ to access Sprinklr Advanced, then replace 'https://prod12-api2.sprinklr.com/api/support-ticket/create-case' with 'https://prod3-api2.sprinklr.com/api/support-ticket/create-case' in the url above. Replace “<YOUR API TOKEN FROM SPRINKLR ADVANCED>” with the API token that you get from Sprinklr Team. The token should look like zLr**********************4Yw==
This should fetch the custom fields that have been configured in the Sprinklr Advanced and would look like this (condensed form):

If you see the second last line of the response, you’d realise that there are three Custom Ticket Fields configured in the Sprinklr Advanced. If you expand each of these “entities” you would find the relevant information relating to those entities/custom-fields which would help you to configure the ticket form code.
Extracting Field Name from Curl response
Now, if you expand the second entity in the above JSON response, you would get the following result::
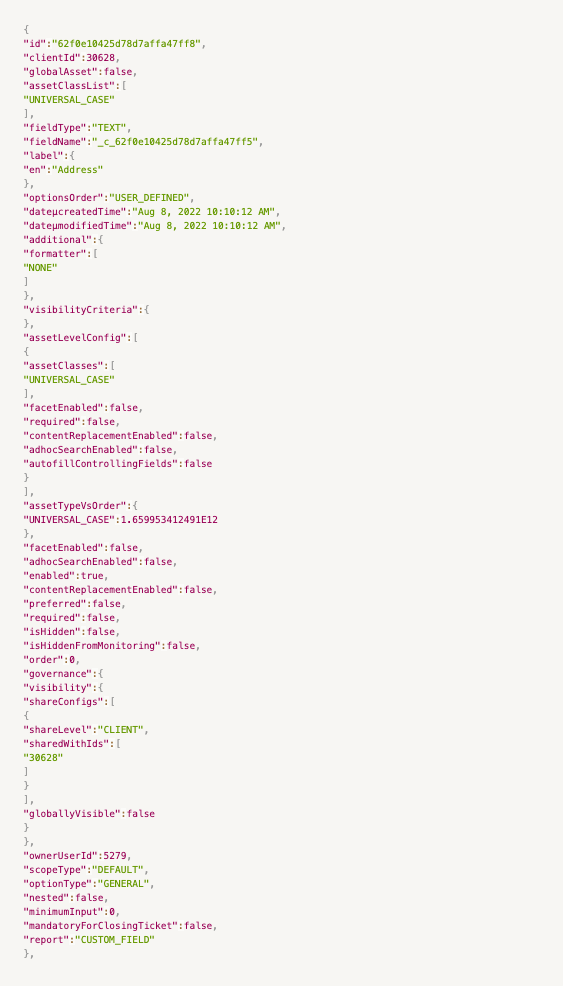
So from the above response, if you focus solely on the snippet below, you'd find some useful information regarding this custom field:
This information tells you that you have configured a custom field called “Address” in your Sprinklr Advanced Platform which is a simple Text Input field. The most important information that you get from the snippet above is the attribute "fieldName" . This attribute tells you the exact name by which Sprinklr Advanced would understand the information coming in from the Ticket Form. Hence, whatever value you map to the Custom Field variable (underscore)c(underscore)62f0e10425d78d7affa47ff5 in your code would be mapped to the Address Ticket Field in the Sprinklr Advanced platform.
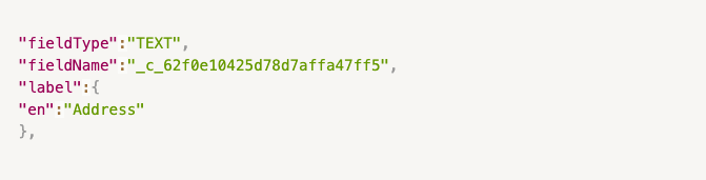
Similarly, if you expand the third “entity” you can again find out the "fieldName" attribute from there as well.
So you can see that this field is of Numerical type and the "fieldName" attribute is (underscore)c(underscore)62f0e7c925d78d7affa494e4.
Handling the Custom Fields in code
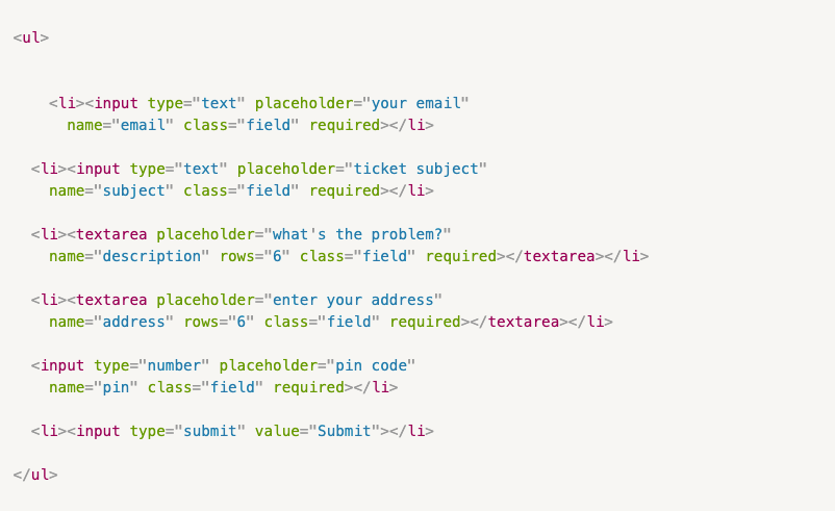
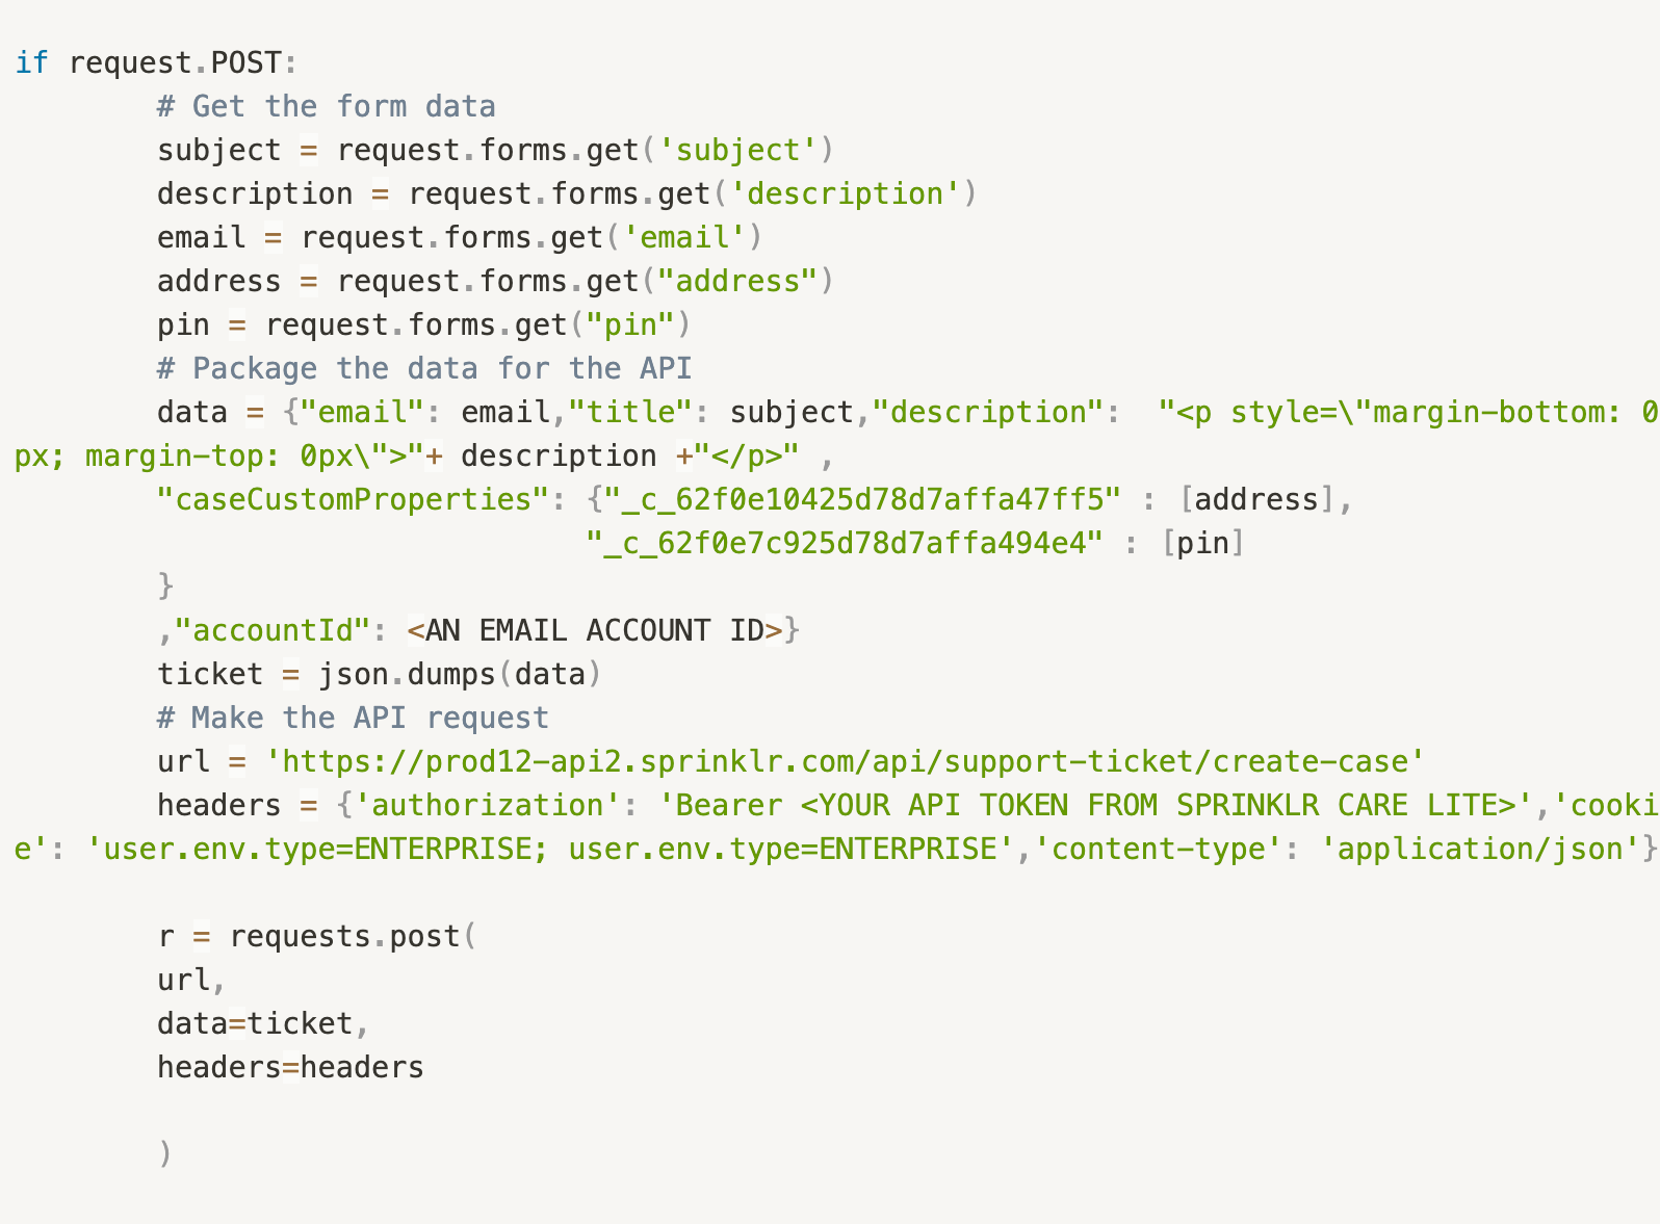
Now we encode the fields in the form as well.
For the ticket_form.tpl file make the following form and add the address and pin-code field:
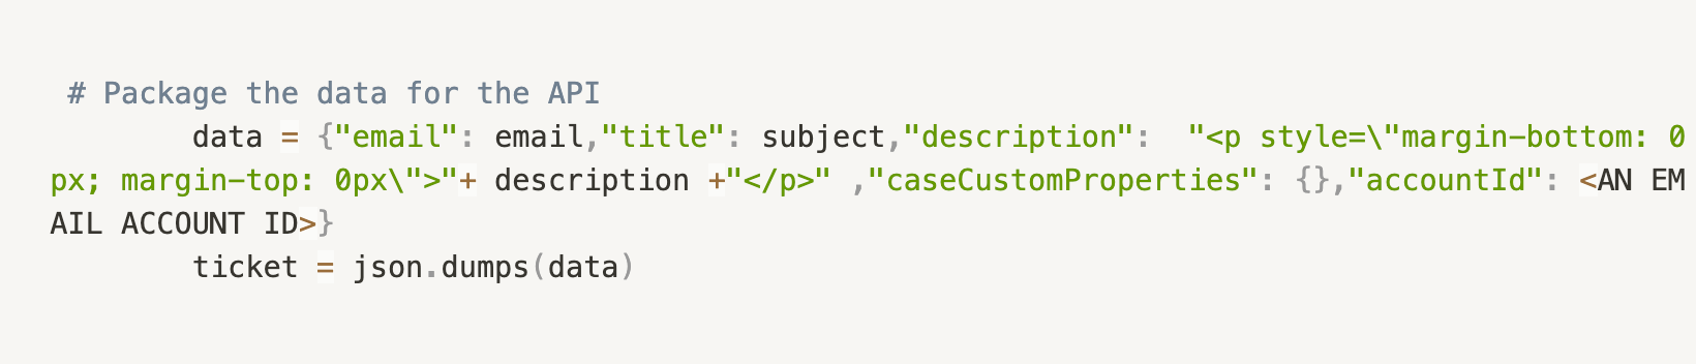
And finally to the app.py file edit the relevant piece of code and use the following data-packaging to send to Sprinklr Sprinklr Advanced platform. The rest of the code remains the same:
NB: If you are using https://eu.lite.sprinklr.com/ rather than https://lite.sprinklr.com/ to access Sprinklr Advanced, then replace 'https://prod12-api2.sprinklr.com/api/support-ticket/create-case' with 'https://prod3-api2.sprinklr.com/api/support-ticket/create-case' in the url above.
The above code needs two customisation to personalize the request sent to your Sprinklr Advanced Dashboard:
Generate your Sprinklr Advanced API token by reaching out to the Sprinklr team via email.
Replace “<YOUR API TOKEN FROM SPRINKLR ADVANCED” with the API token that you have got as a response. The token should look like zLr**********************4Yw==
Replace <AN EMAIL ACCOUNT ID> in the code above with an account id that can be fetched from Sprinklr Advanced
Go to https://lite.sprinklr.com/care/settings/channels/email and choose the email id that you want to route all your Ticket Form requests to and edit that email using the three dots next to it. Then in the URL of the browser that looks somewhat like this https://lite.sprinklr.com/care/settings/channels/email/edit/12345 copy the last 4 digits (here 12345) and replace <AN EMAIL ACCOUNT ID> with it.
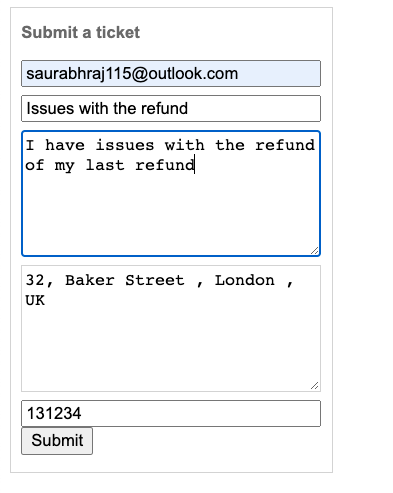
Finally the ticket form should look like this:
We fill up some dummy data:
And it should create a ticket on Sprinklr Advanced with the custom fields populated like this:

The ticket field. named “Sample Ticket Field” was the first entity in the curl command we used earlier to fetch the Custom Fields, and you can see, that field is left untouched as we did not fetch data into it via your ticket form.
Hence, similarly, many complex Ticket Forms can be configured and mapped to your Sprinklr Advanced Ticket Fields.