
Custom Fields: Inbox, Post, Assets, Campaign
Updated
What are custom fields?
In the dynamic realm of the Sprinklr Social platform, the integration of Custom Fields provides an agile solution to tailor and optimise your workflow. Custom Fields empower users to define unique properties at various feature levels, including Inbox, Post, Assets, and Campaigns. This versatile capability serves as a robust organisational tool, enabling efficient categorisation, management, and multifaceted functionalities across the platform.
Benefits
The introduction of Custom Fields enhances precision, offering a tailored approach to handle diverse information associated with messages, posts, assets, and campaigns. It not only streamlines processes but also elevates your platform experience by delivering contextual relevance and targeted insights.
Let's explore the diverse realms where Custom Fields play a pivotal role.
Creating and using inbox fields
Custom Inbox Fields elevate your data management capabilities, enabling the seamless incorporation of contextual insights. This empowers you to precisely categorise and manage information, thereby enhancing your overall message management efficiency.
Exploring Inbox Fields: A Step-by-Step Guide:
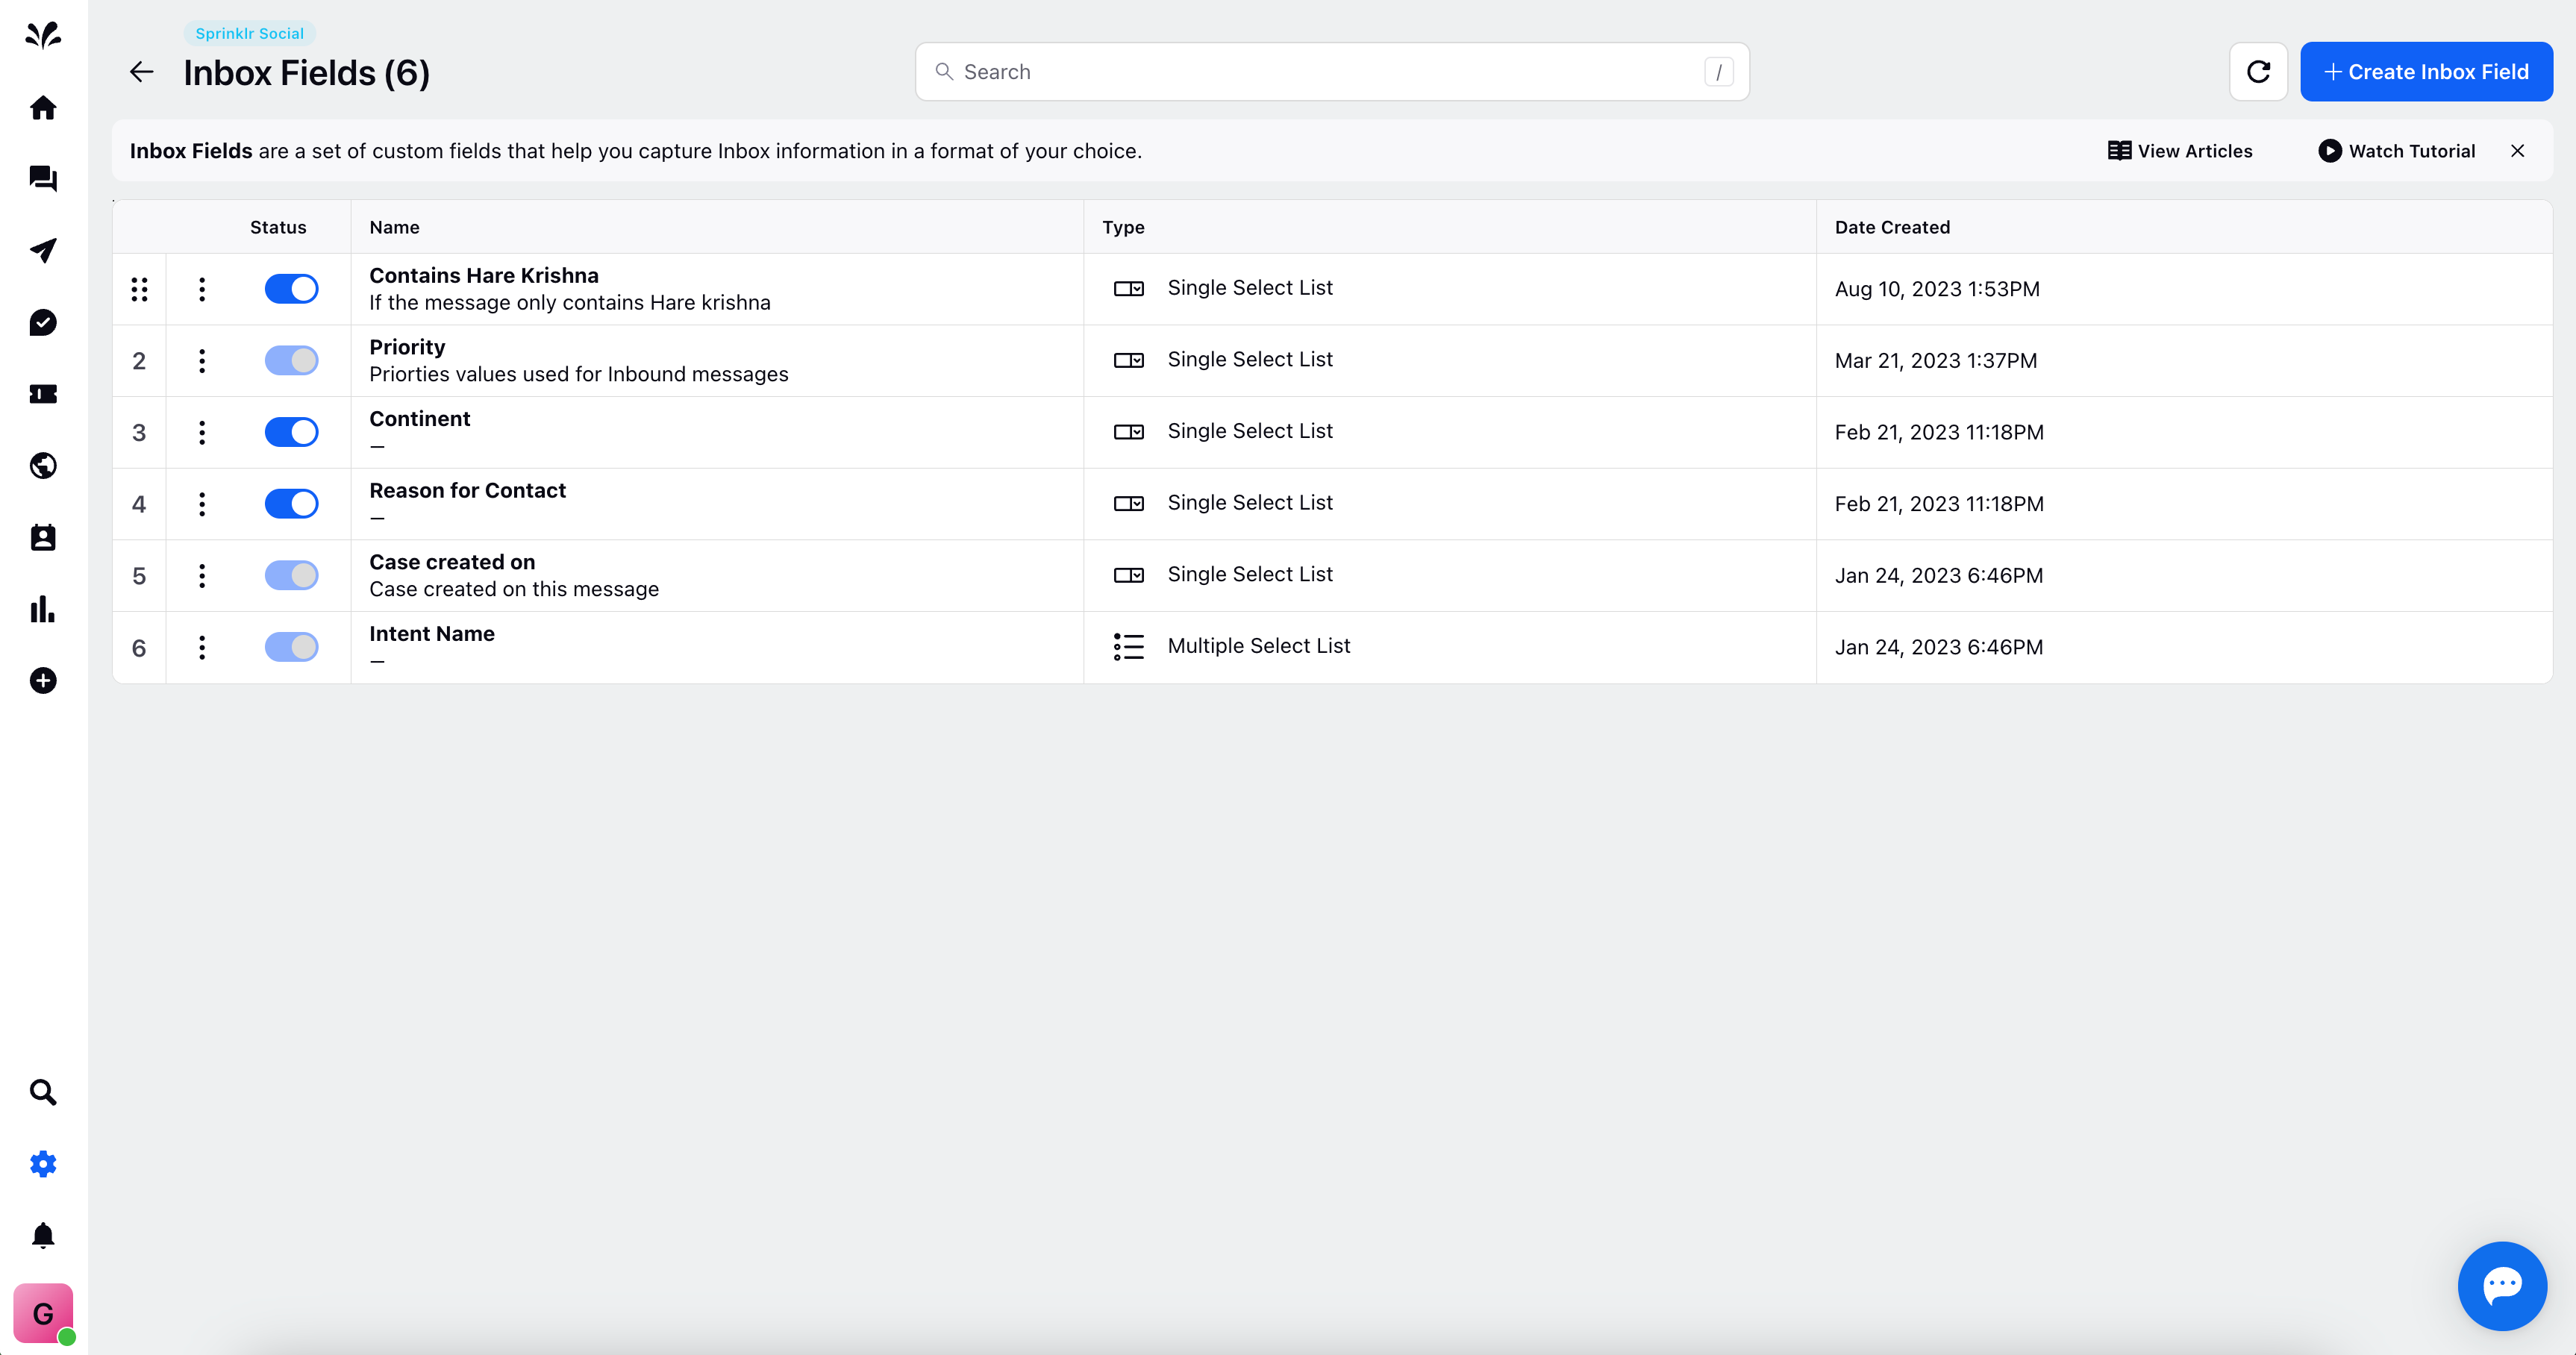
1. Accessing Inbox Fields: Initiate the process by navigating to Settings via the left pane of Sprinklr platform. From "Sprinklr Social" tab and choose "Inbox Fields" under the "Inbox and Publishing" section.

2. Creating a New Inbox Field: Upon entering the Inbox Fields section, a comprehensive record manager page is unveiled, presenting a status overview of your post fields. To craft a new Inbox Field, click the "Create Inbox Field" option in the upper right corner.
3. Providing Field Details: Furnish essential particulars for the new inbox field:
Name: Assign a distinctive name to your Inbox Field.
Description: Offer an optional concise description that encapsulates the purpose of the custom field.
Field Type: Choose from a range of field types such as multi-select, single, text, date, number, and pencil.
Enable Colour Coding: Opt for color coding to enhance visual differentiation.
Mark as Required: Designate the field as mandatory for comprehensive data collection.
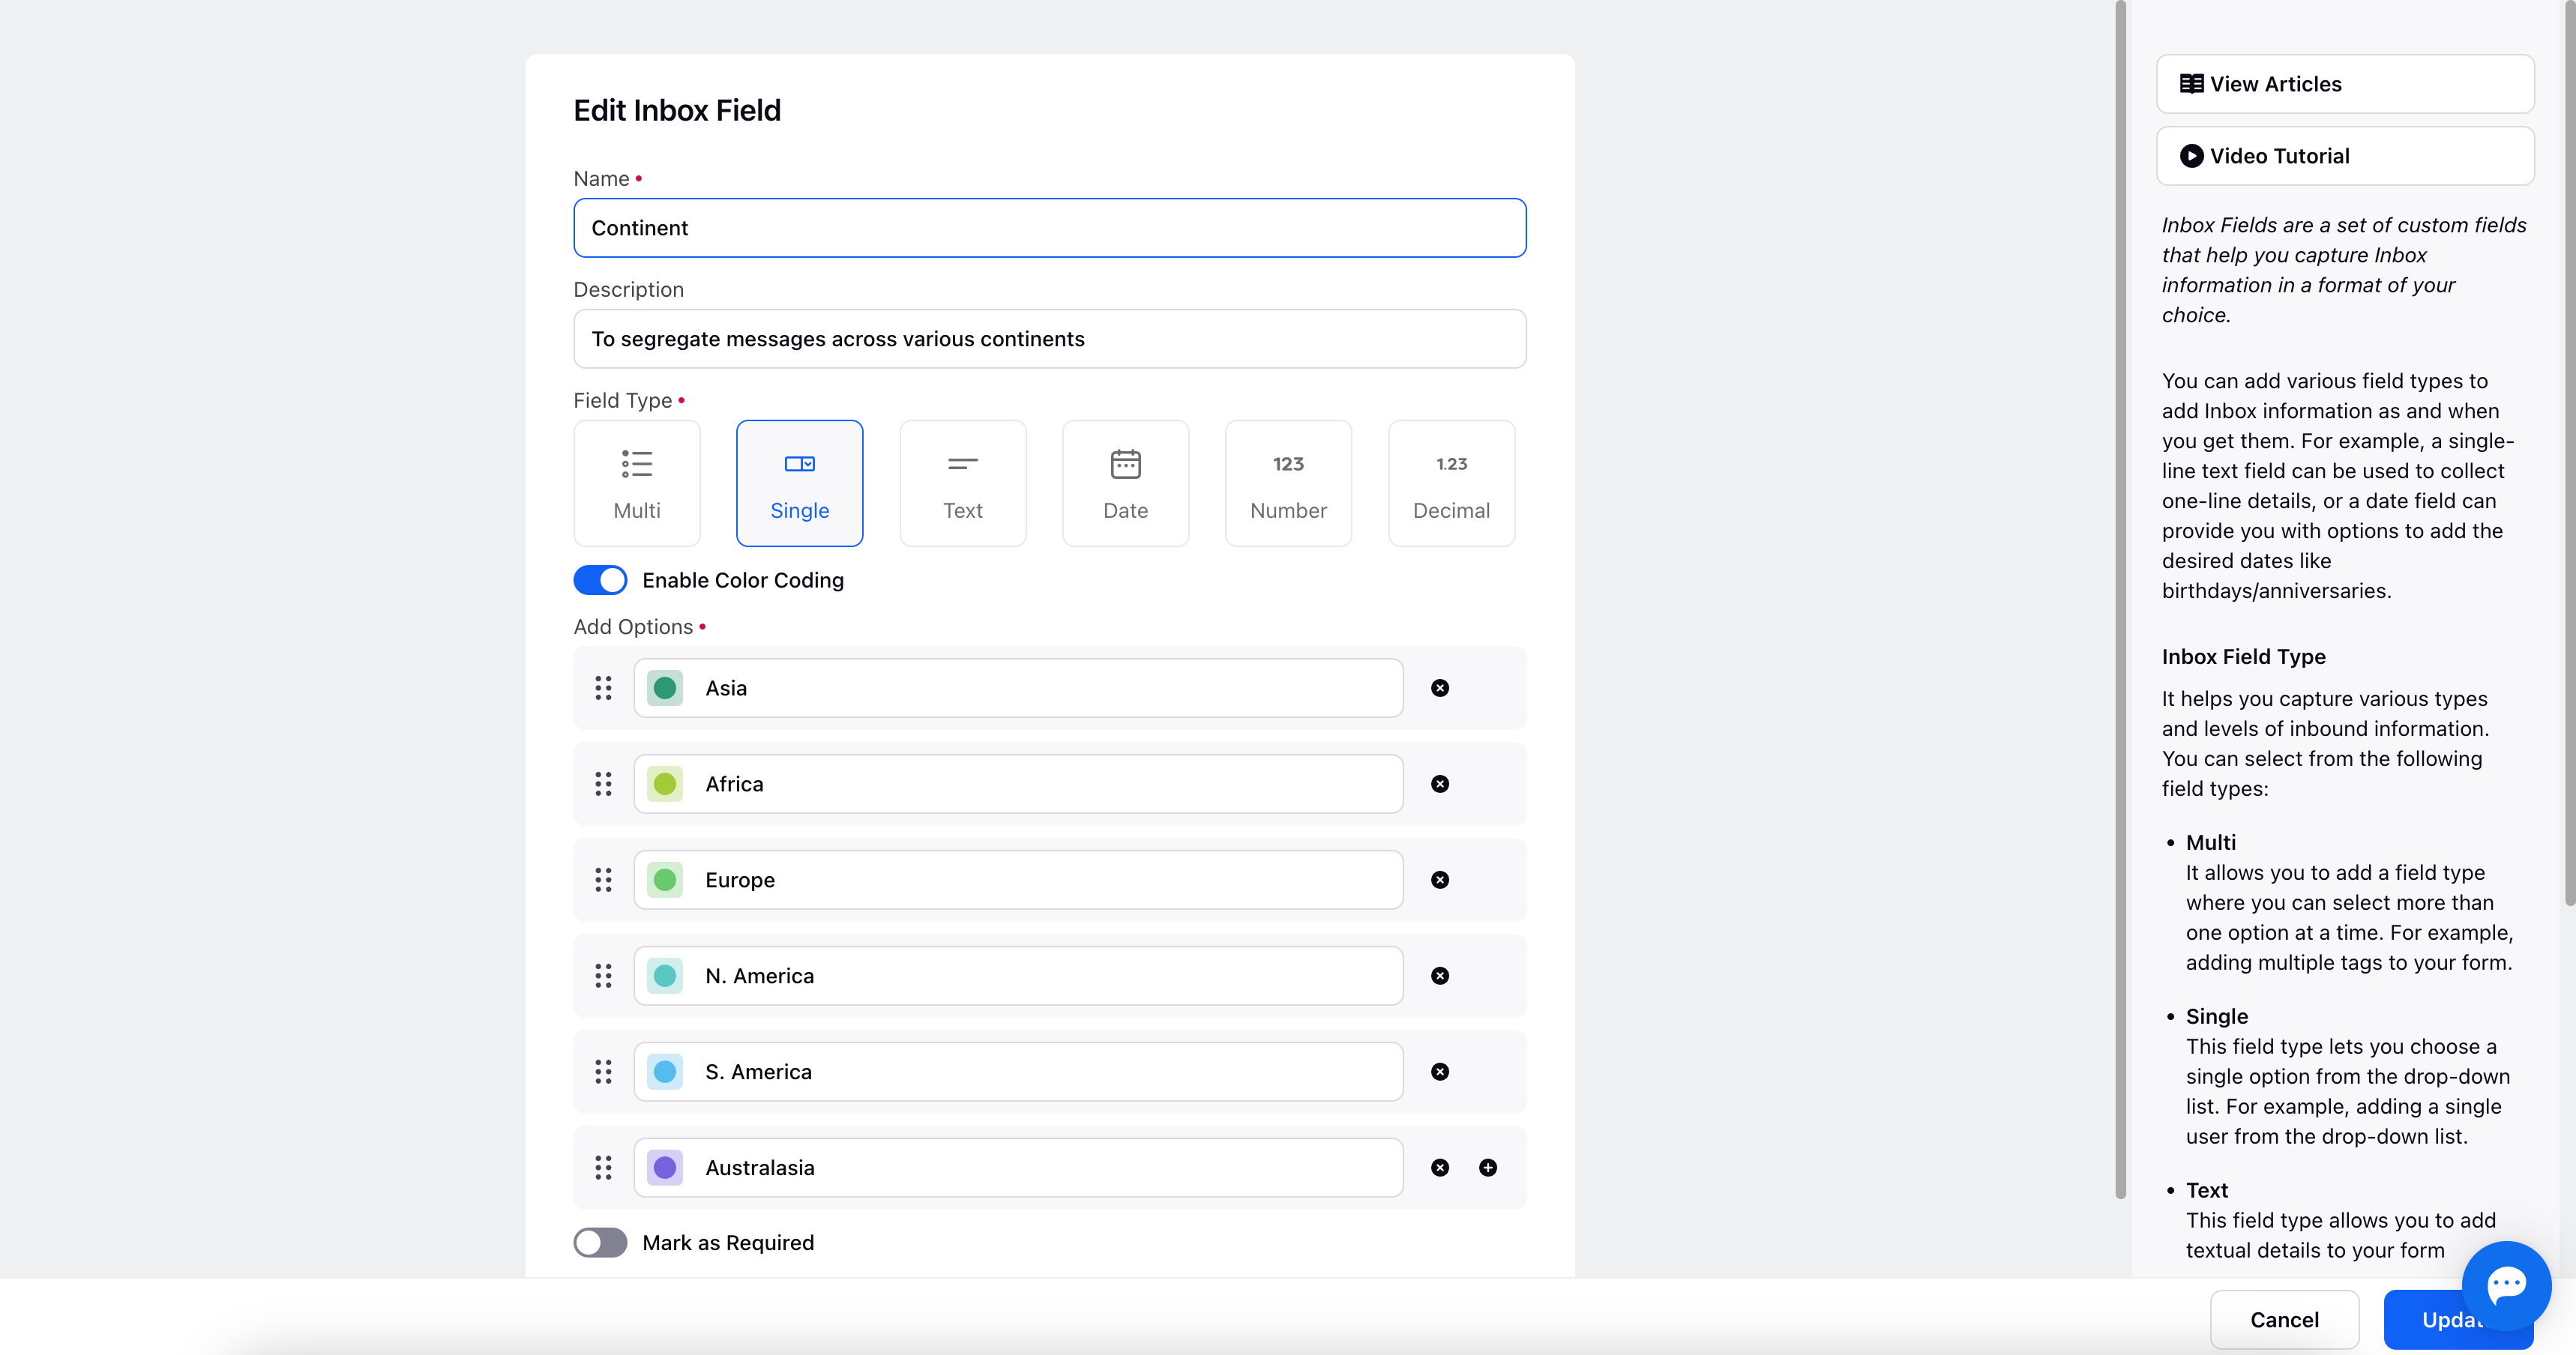
4. Finalising the Custom Inbox Field: Conclude the creation process by clicking the "Create" icon located in the lower right corner. Once the field is created, you can enable/disable it via toggling it's status from the record manager page.
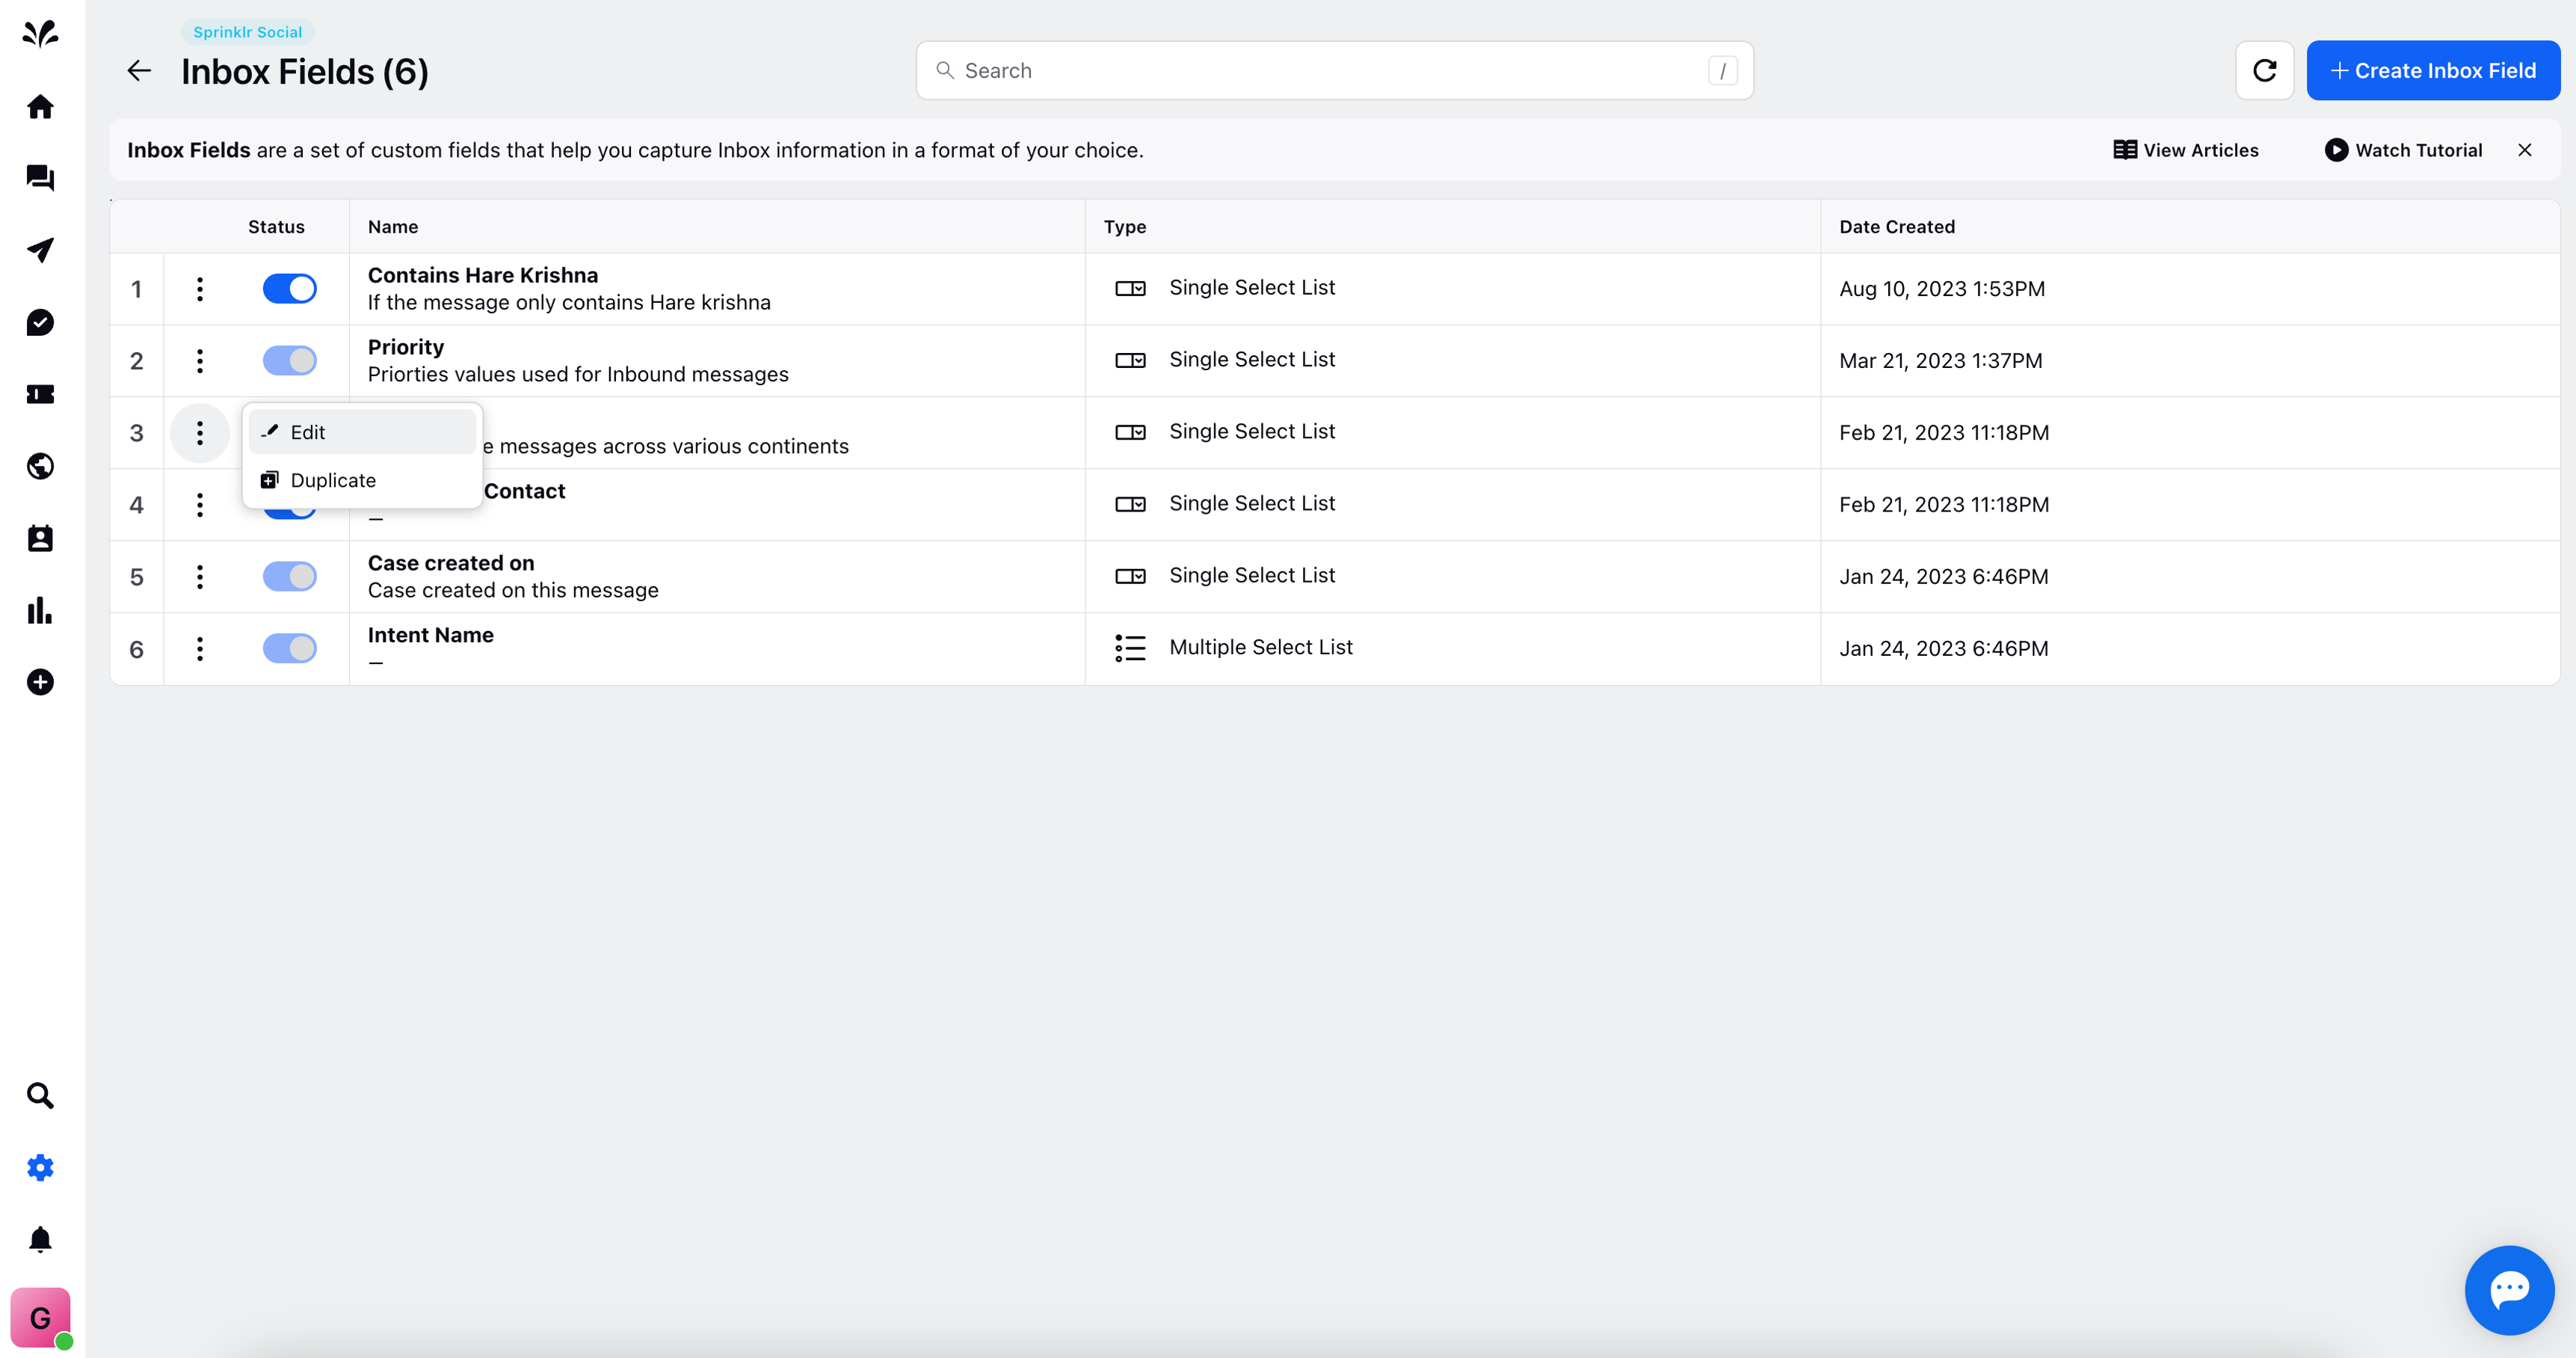
For added flexibility, you can perform actions such as editing or duplicating the custom field. Access these options via the three dots icon adjacent to any inbox fields.
5. Managing Inbox Fields in the Inbox: Navigating back to the Inbox module, click the Inbox icon from the left pane of Sprinklr. For any inbound message, locate the Overview Section on the right pane. There you will find a list of custom fields including those you've crafted and existing inbox custom fields.
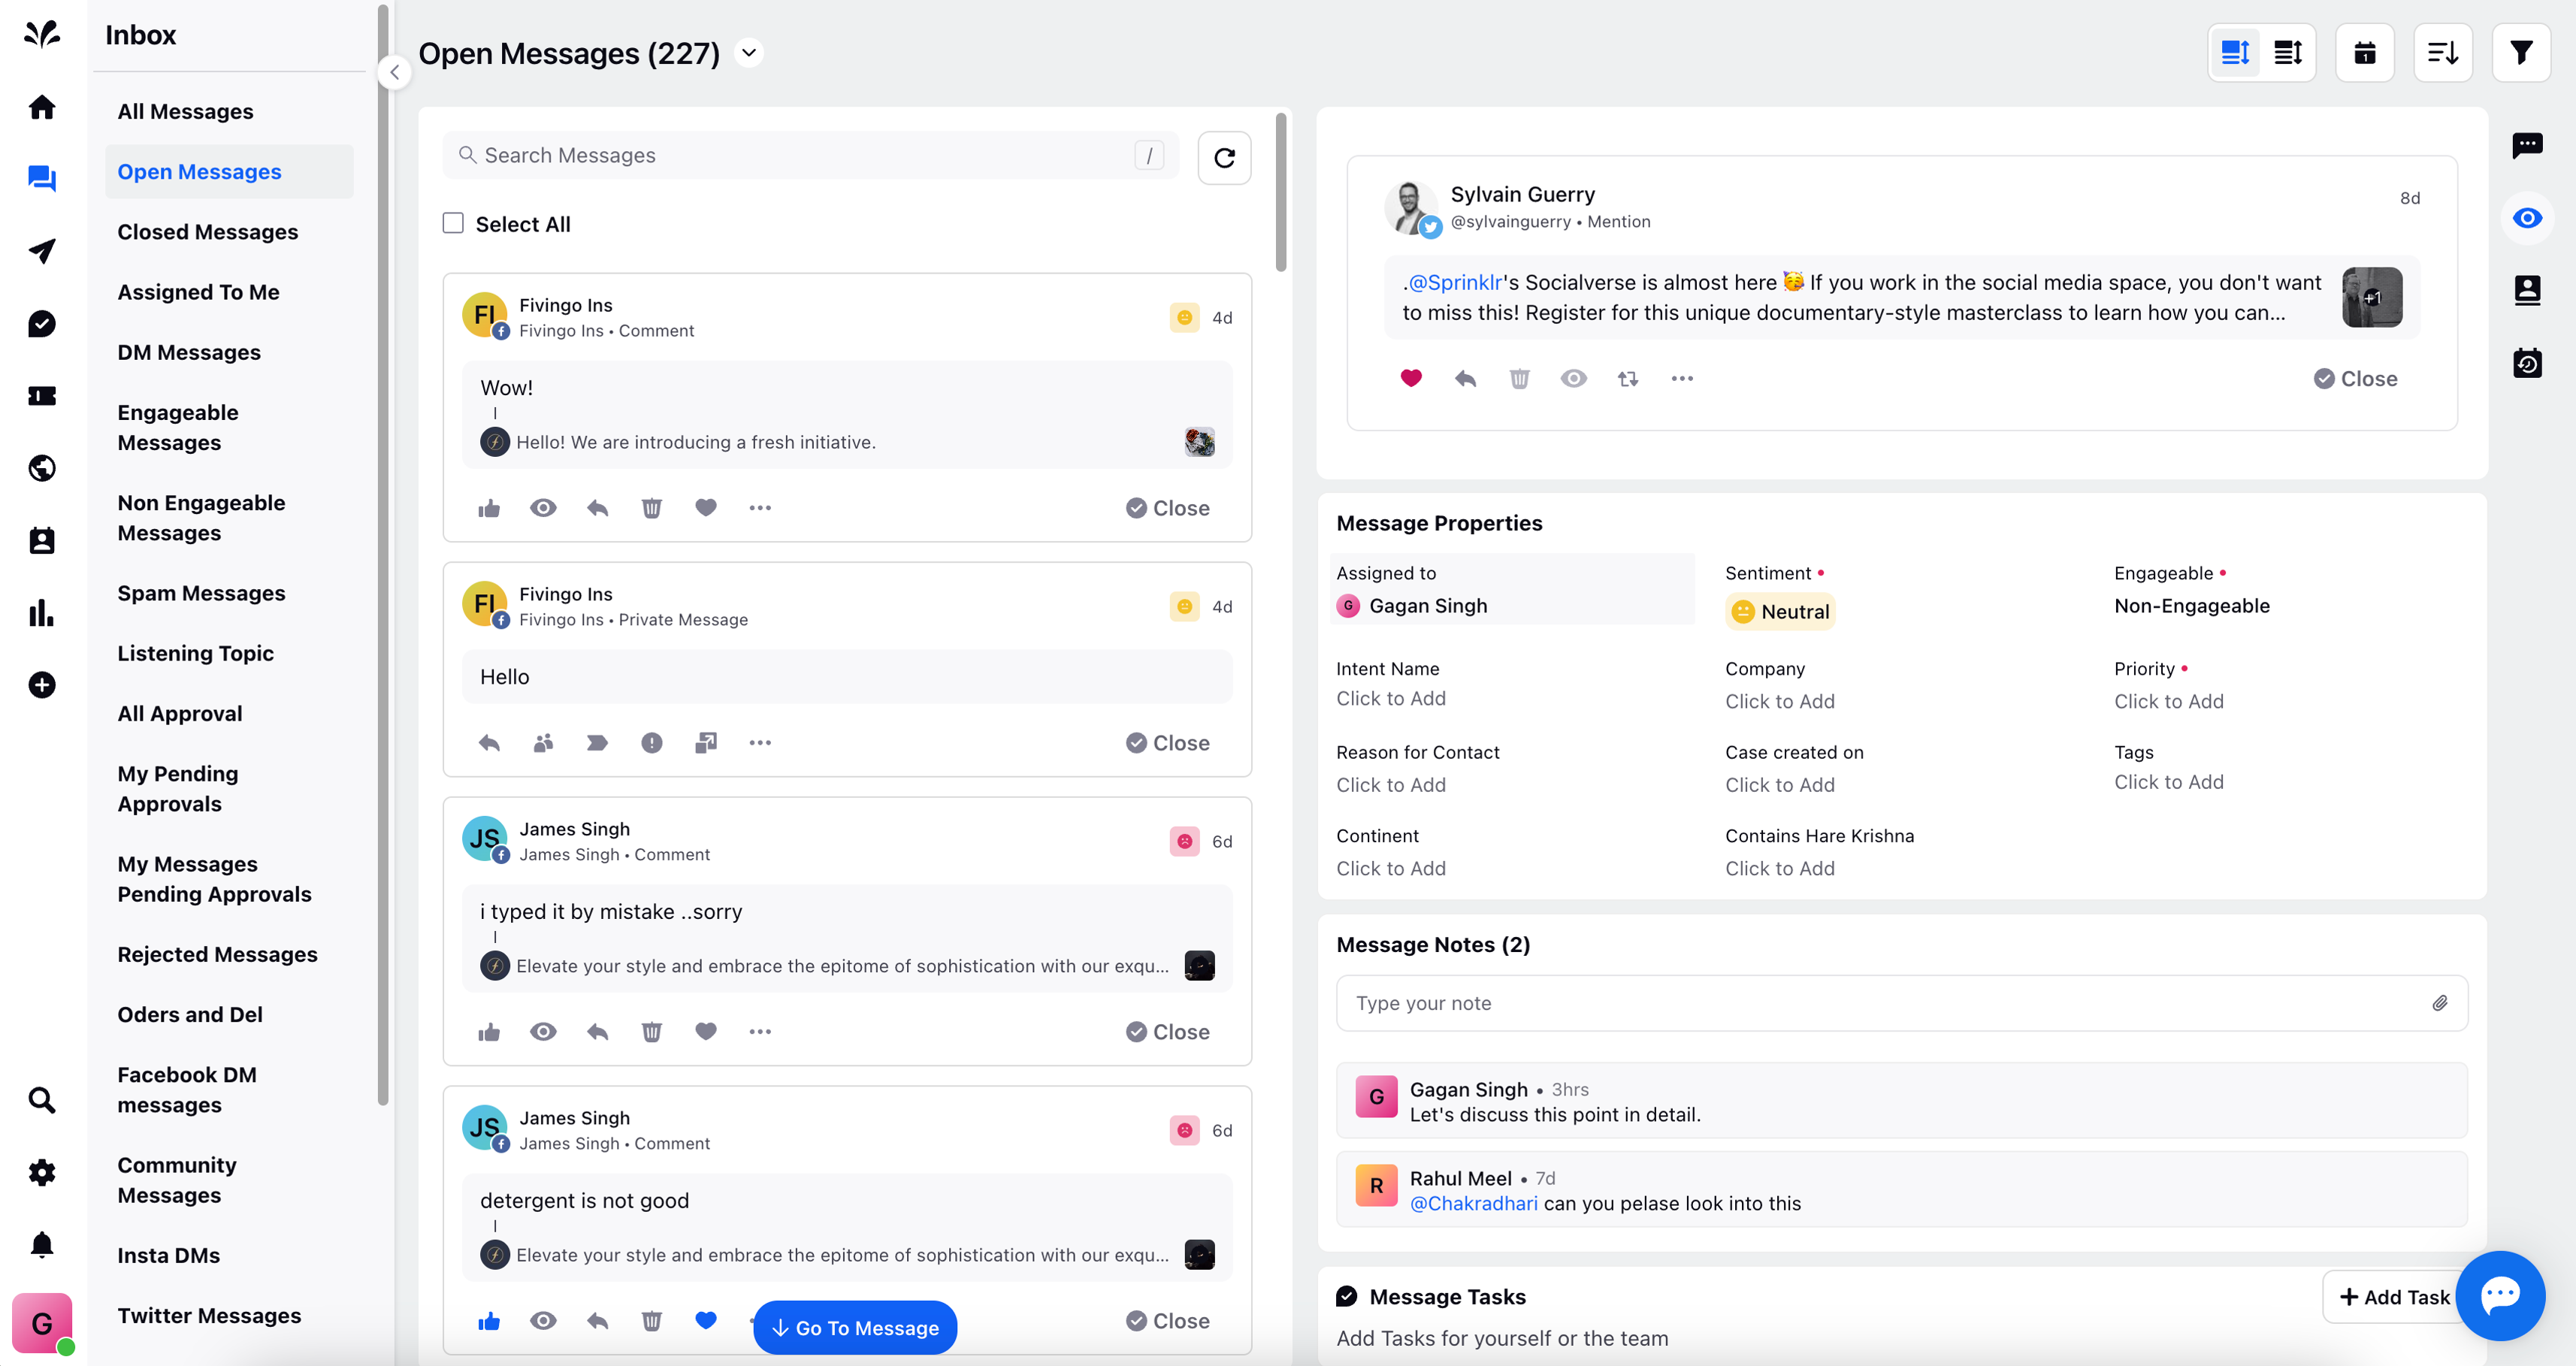
By harnessing the power of Custom Inbox Fields, you establish a structured and efficient approach to manage and interpret messages within the Sprinklr Social platform. This dynamic tool streamlines your data management process, facilitating optimal insights for better decision-making and enhanced engagement strategies.
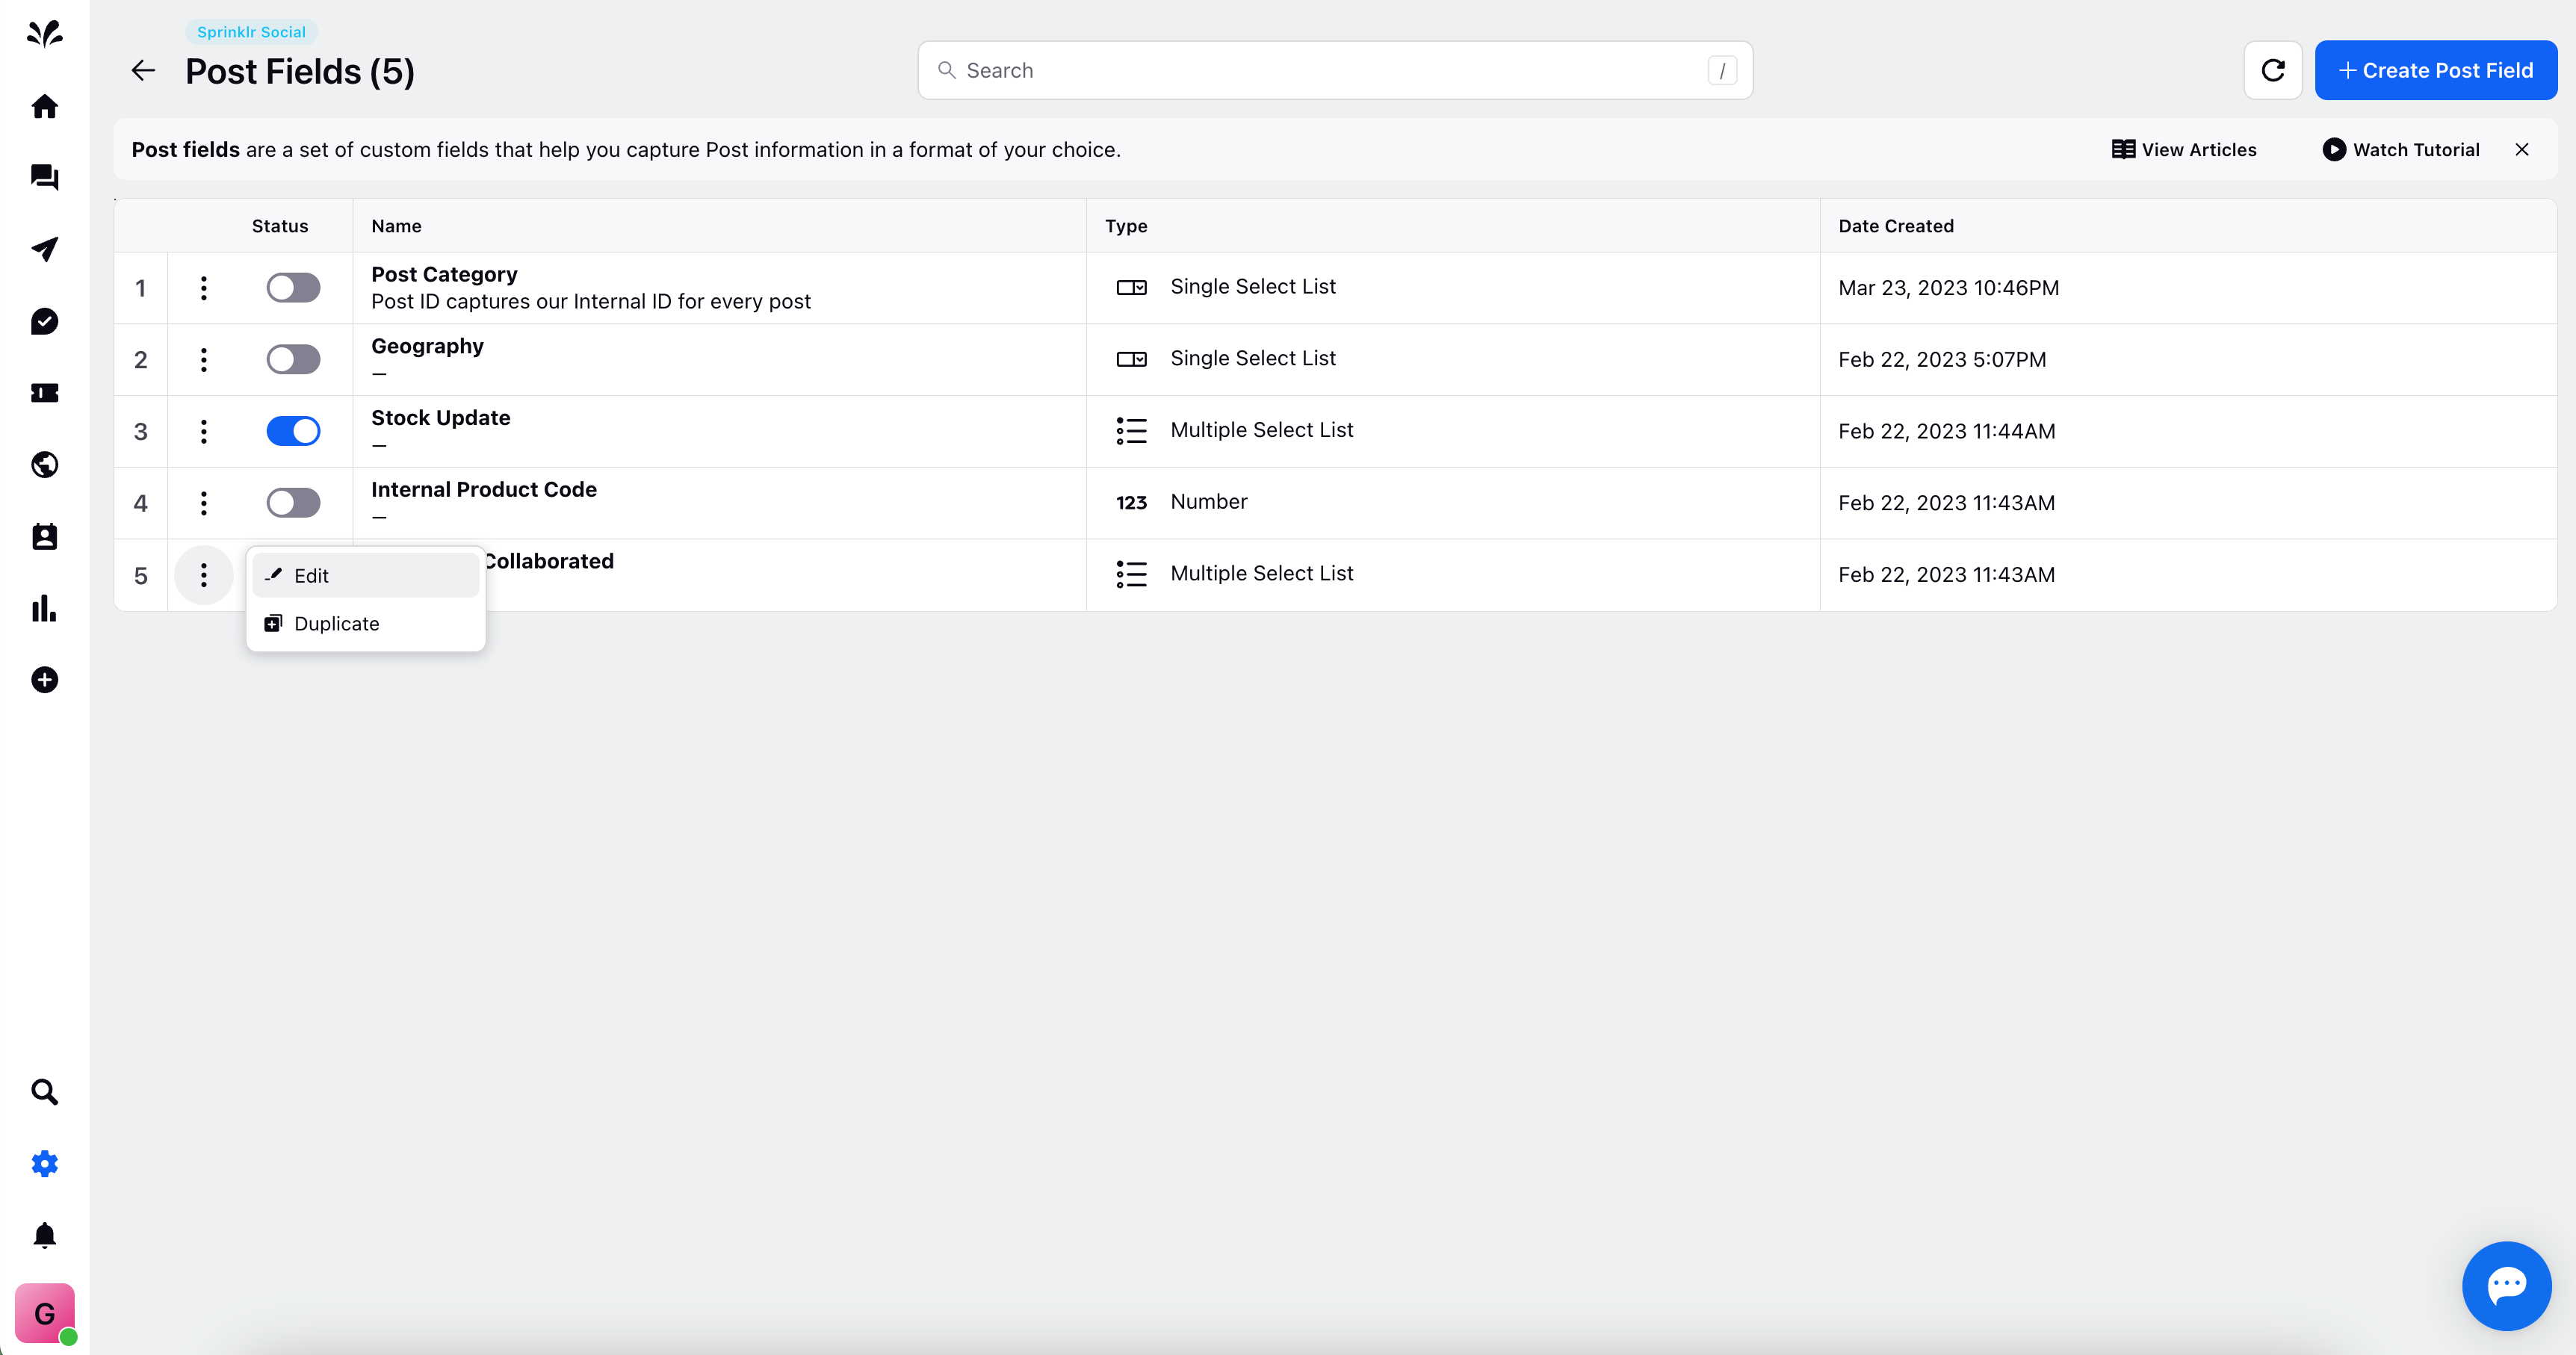
Creating and using post fields
Custom Post Fields empower you to expand your data collection capabilities, enabling you to capture nuanced details that provide a holistic view of your posts. This meticulous approach streamlines your ability to analyze, categorise, and optimise your content strategy.
Exploring Custom Post Fields: A Step-by-Step Guide:
1. Navigating to Post Fields: Initiate the process by navigating to Settings via the left pane of Sprinklr platform. Choose "Sprinklr Social" and navigate to "Post Fields" under the "Inbox and Publishing" section.
2. Creating a Custom Post Field: As you enter the Post Fields section, you'll encounter the record manager page showcasing the status of your post fields. Initiate the creation process by clicking "Create Post Field" situated in the upper right corner.

3. Providing Field Details: Furnish essential particulars for the new post field:
Name: Assign a clear and distinct name to the post field.
Description: Offer a succinct description that encapsulates the field's purpose.
Field Type: Choose from an array of field types, including multi-select, single, text, date, number, and pencil.
Enable Colour Coding: Opt for color coding to facilitate visual differentiation.
Mark as Required: Designate the field as mandatory, enhancing data integrity during the post creation process.

4. Finalising the Custom Post Field: Conclude the creation process by clicking the "Create" icon located in the lower right corner. Once the field is created, you can enable/disable it via toggling it's status from the record manager page.
For added flexibility, you can perform actions such as editing or duplicating the custom field. Access these options via the three dots icon adjacent to any post fields.
5. Leveraging Post Fields in Publisher: While publishing a post, navigate to the Publisher module. Here, you'll find the custom post fields you've created and existing ones under "Publishing Properties." Enhance your posts with nuanced details by inputting information within the custom post fields.
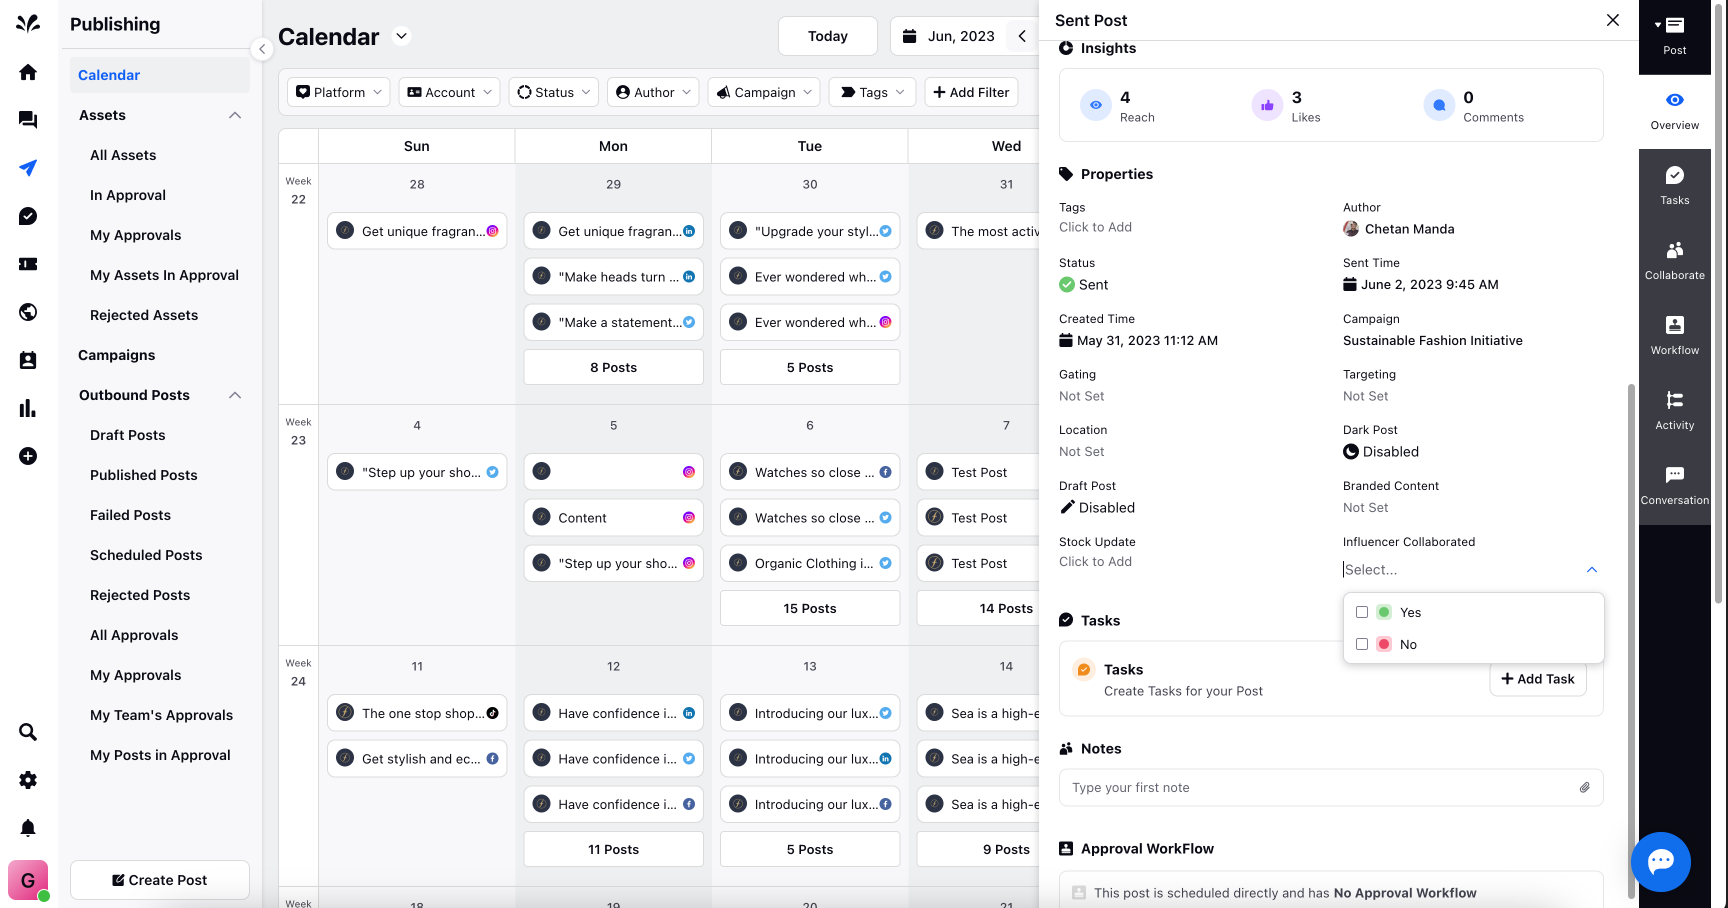
By harnessing the potential of Custom Post Fields within the Sprinklr Social platform, you amplify your ability to curate insightful, well-structured posts. This tool not only enhances your content management but also contributes to a more cohesive and data-driven content strategy, facilitating a deeper engagement with your audience.
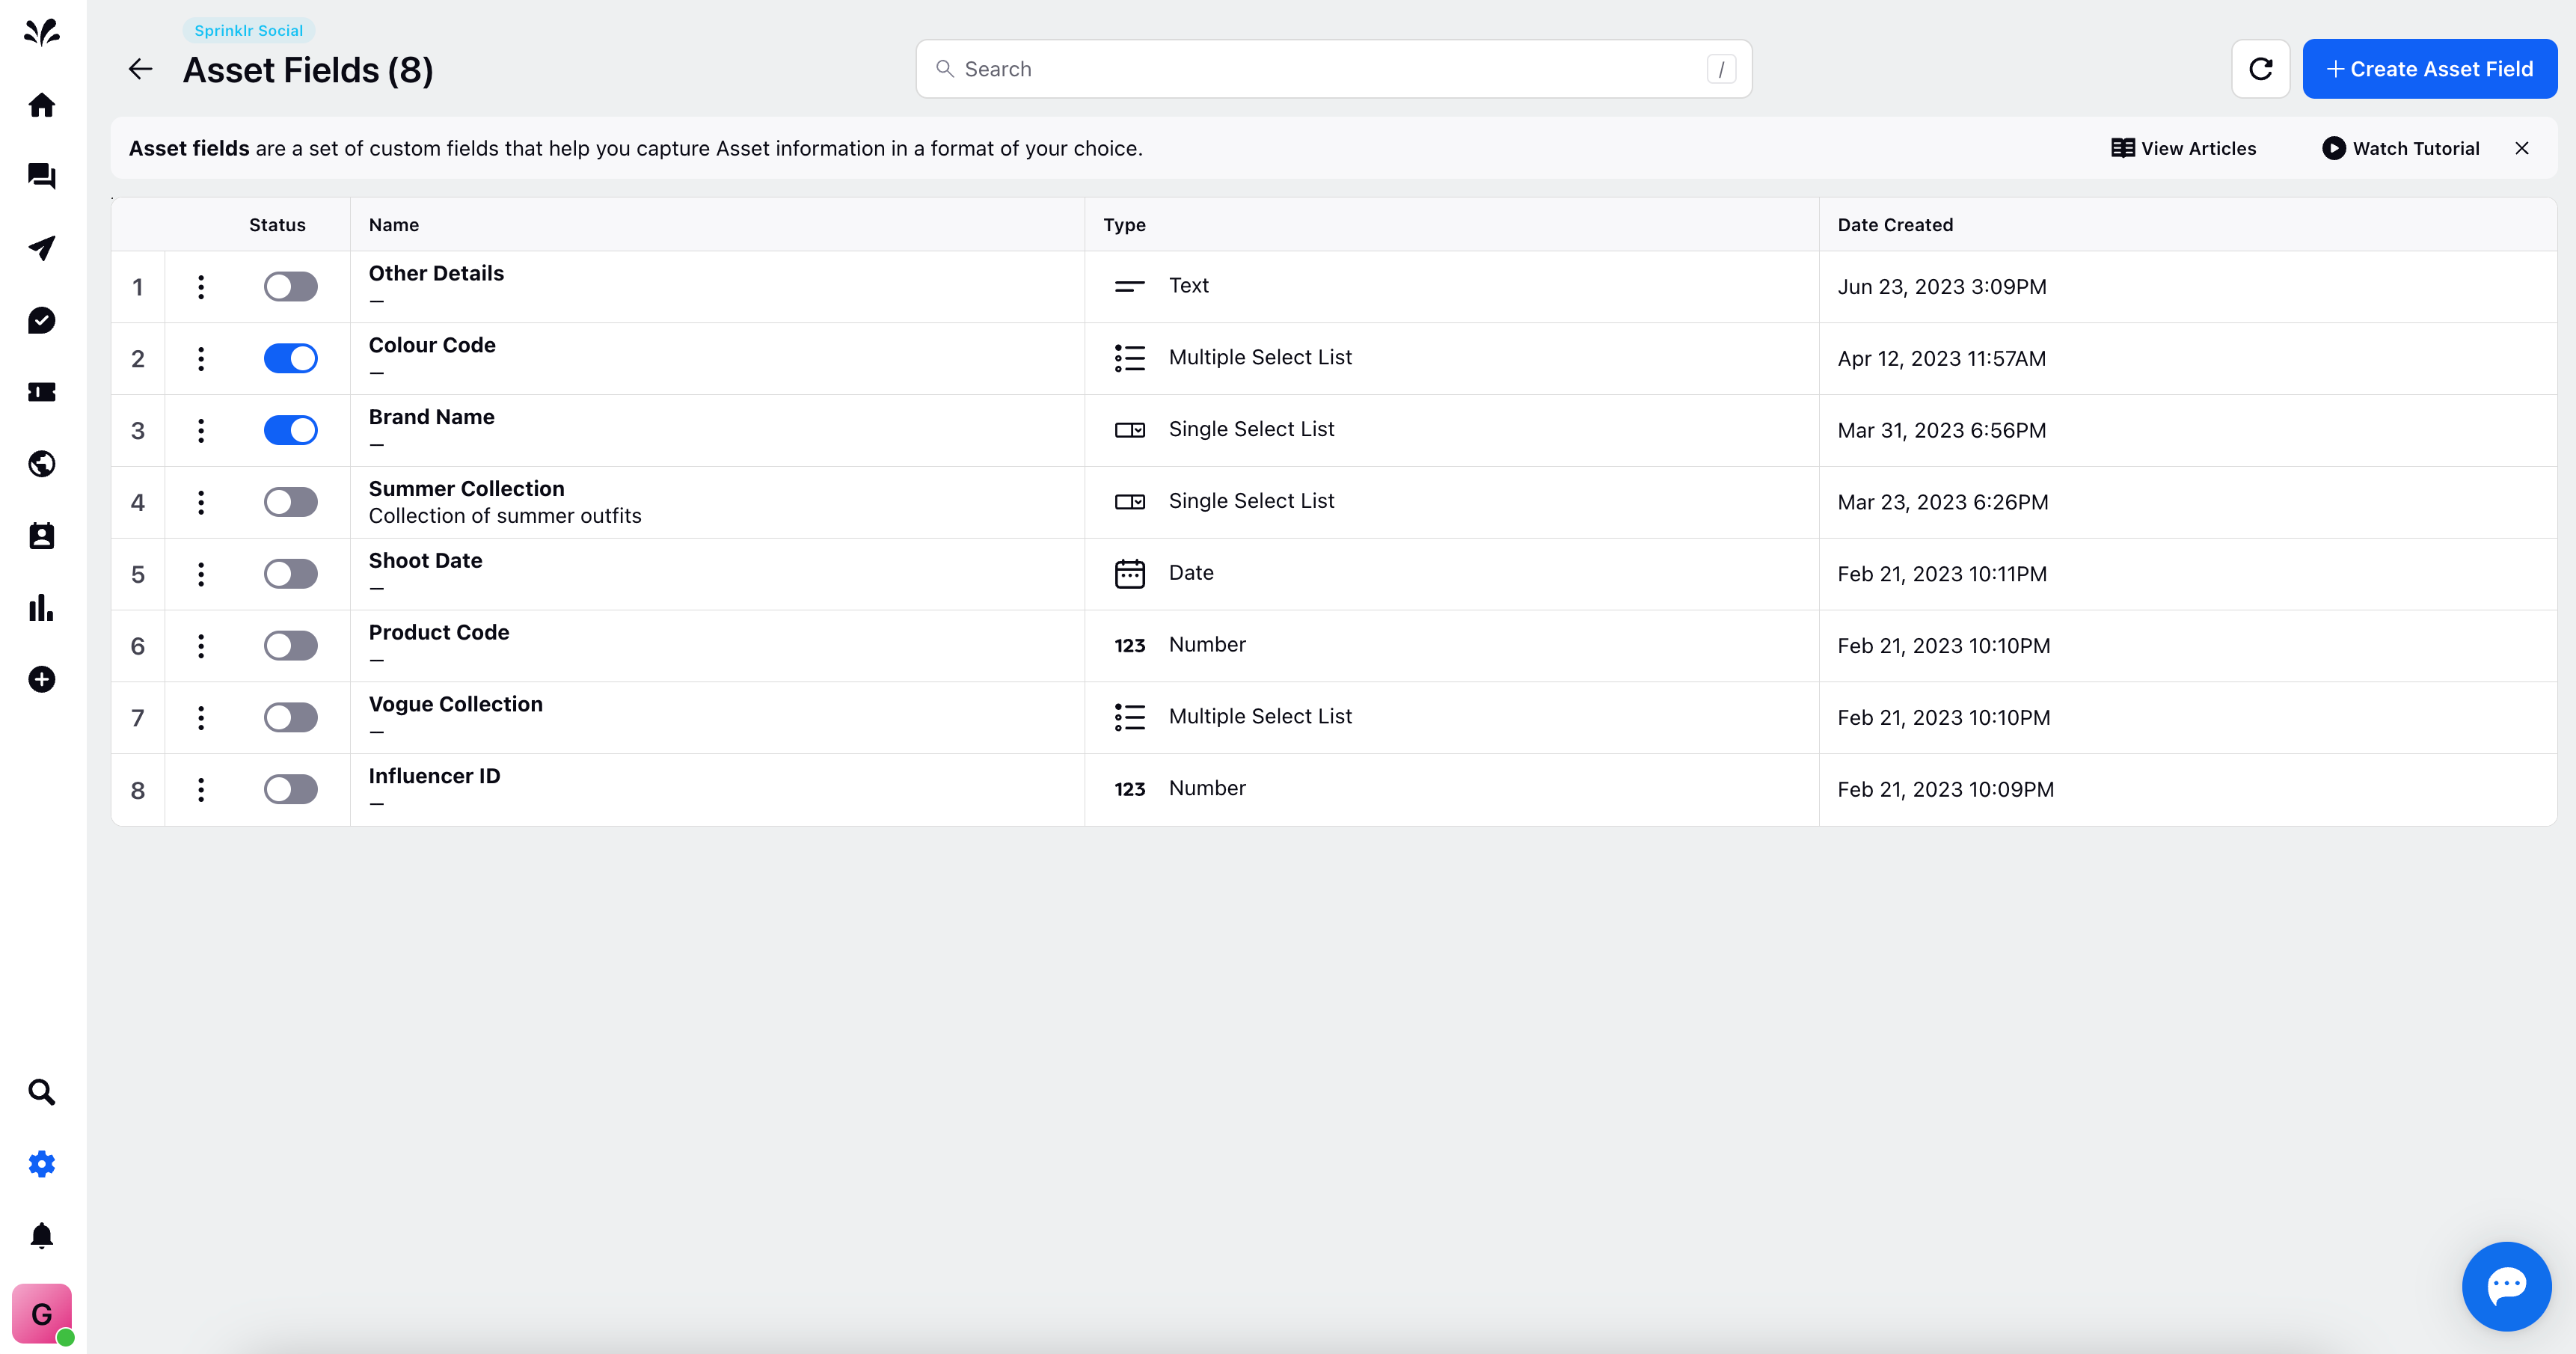
Creating and using asset fields
Custom Asset Fields offer an avenue for you to expand your data collection capabilities, enabling you to gather nuanced details that contribute to a comprehensive understanding of your assets. This meticulous approach streamlines your ability to categorise, manage, and optimise your asset management strategy.
Exploring Custom Asset Fields: A Step-by-Step Guide:
1. Navigating to Asset Fields: Initiate the process by navigating to Settings via the left pane of Sprinklr platform. Choose "Sprinklr Social" and navigate to "Asset Fields" under the "Inbox and Publishing" section.
2. Creating a Custom Asset Field: As you enter the Asset Fields section, you'll be presented with the record manager page displaying the status of your asset fields. Initiate the creation process by clicking "Create Asset Fields" located in the upper right corner.
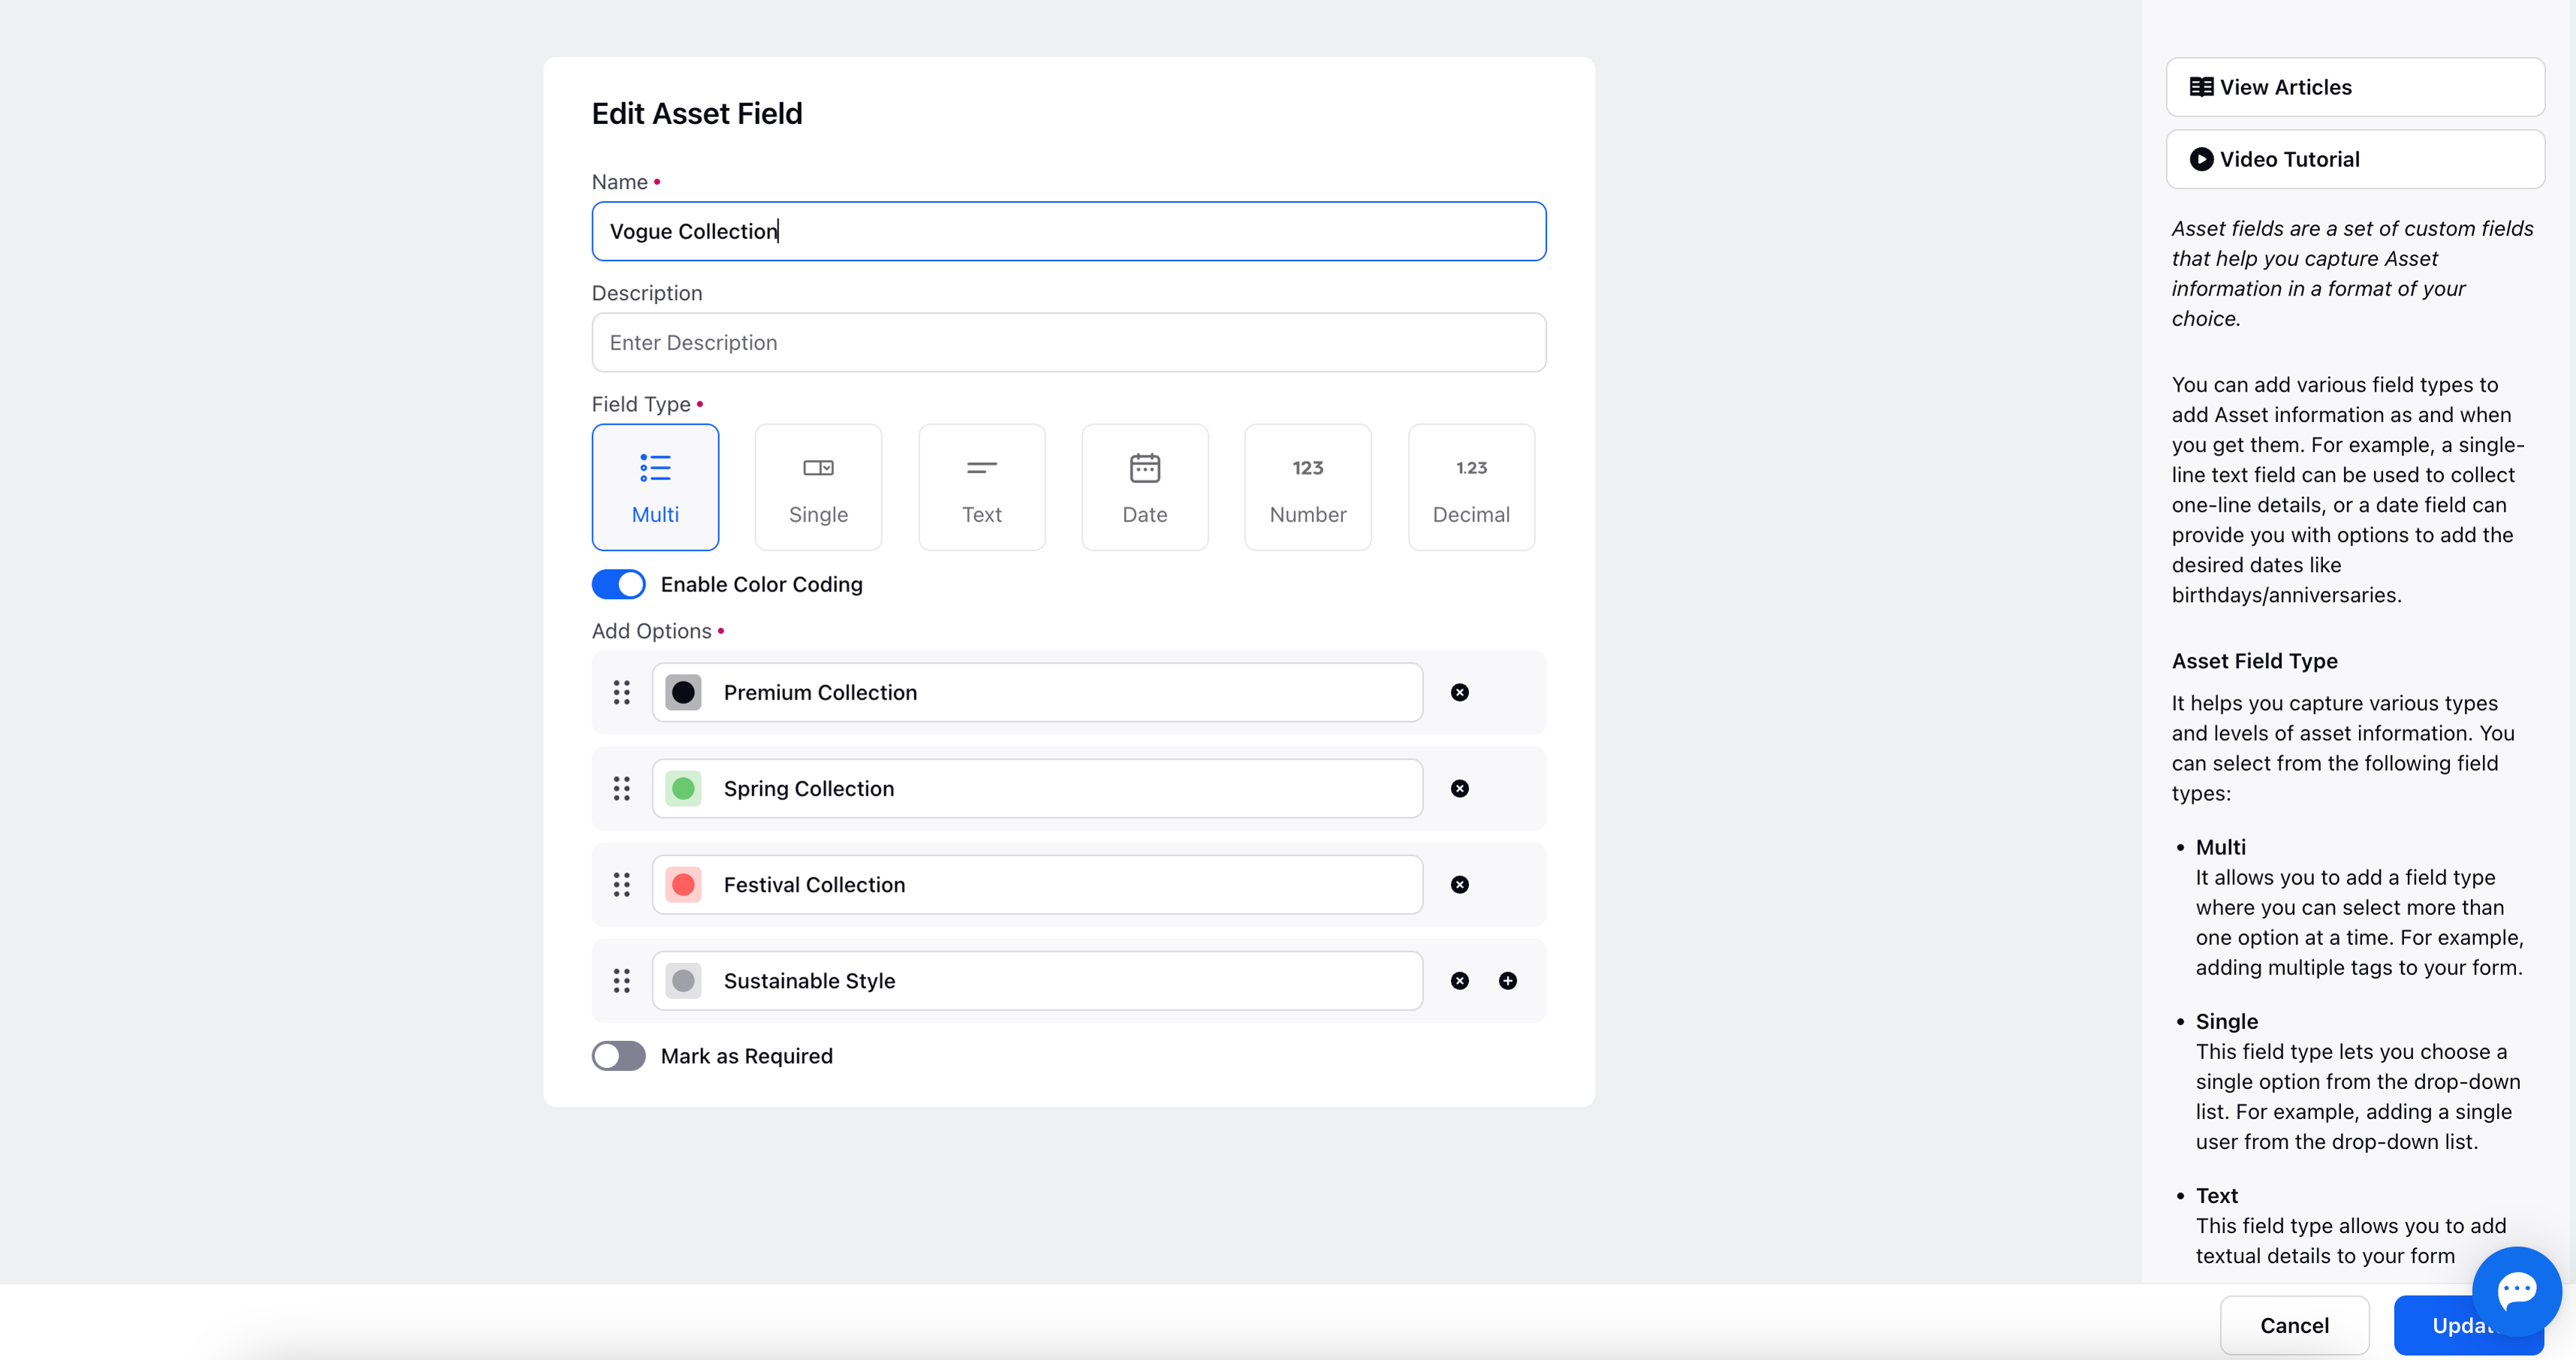
3. Providing Field Details: Furnish essential particulars for the new asset field:
Name: Assign a descriptive name to the asset field.
Description: Provide a concise yet informative description of the asset custom field's purpose.
Field Type: Choose from a range of field types such as multi-select, single, text, date, number, and pencil.
Enable Colour Coding: Opt for color coding to enhance visual distinction.
Mark as Required: Indicate whether the field is mandatory, ensuring its completion during asset information collection.
4. Finalising the Custom Asset Field: Conclude the creation process by clicking the "Create" icon located in the lower right corner. Once the field is created, you can enable/disable it via toggling it's status from the record manager page.
For added flexibility, you can perform actions such as editing or duplicating the custom field. Access these options via the three dots icon adjacent to any asset fields.

5. Leveraging Asset Fields in Asset Management: While managing your assets within the Publisher module, access the "Assets" category from the left pane. Choose the desired asset or apply filters on the All Assets page to streamline your search. Under the Overview section in the right pane, you'll find the list of asset custom fields, both those you've recently created and existing ones.

By harnessing the potential of Custom Asset Fields within the Sprinklr Social platform, you not only refine your asset management but also contribute to a more structured and data-informed asset strategy. This tool facilitates effective asset organisation and enhances your capacity to deliver compelling content to your audience.
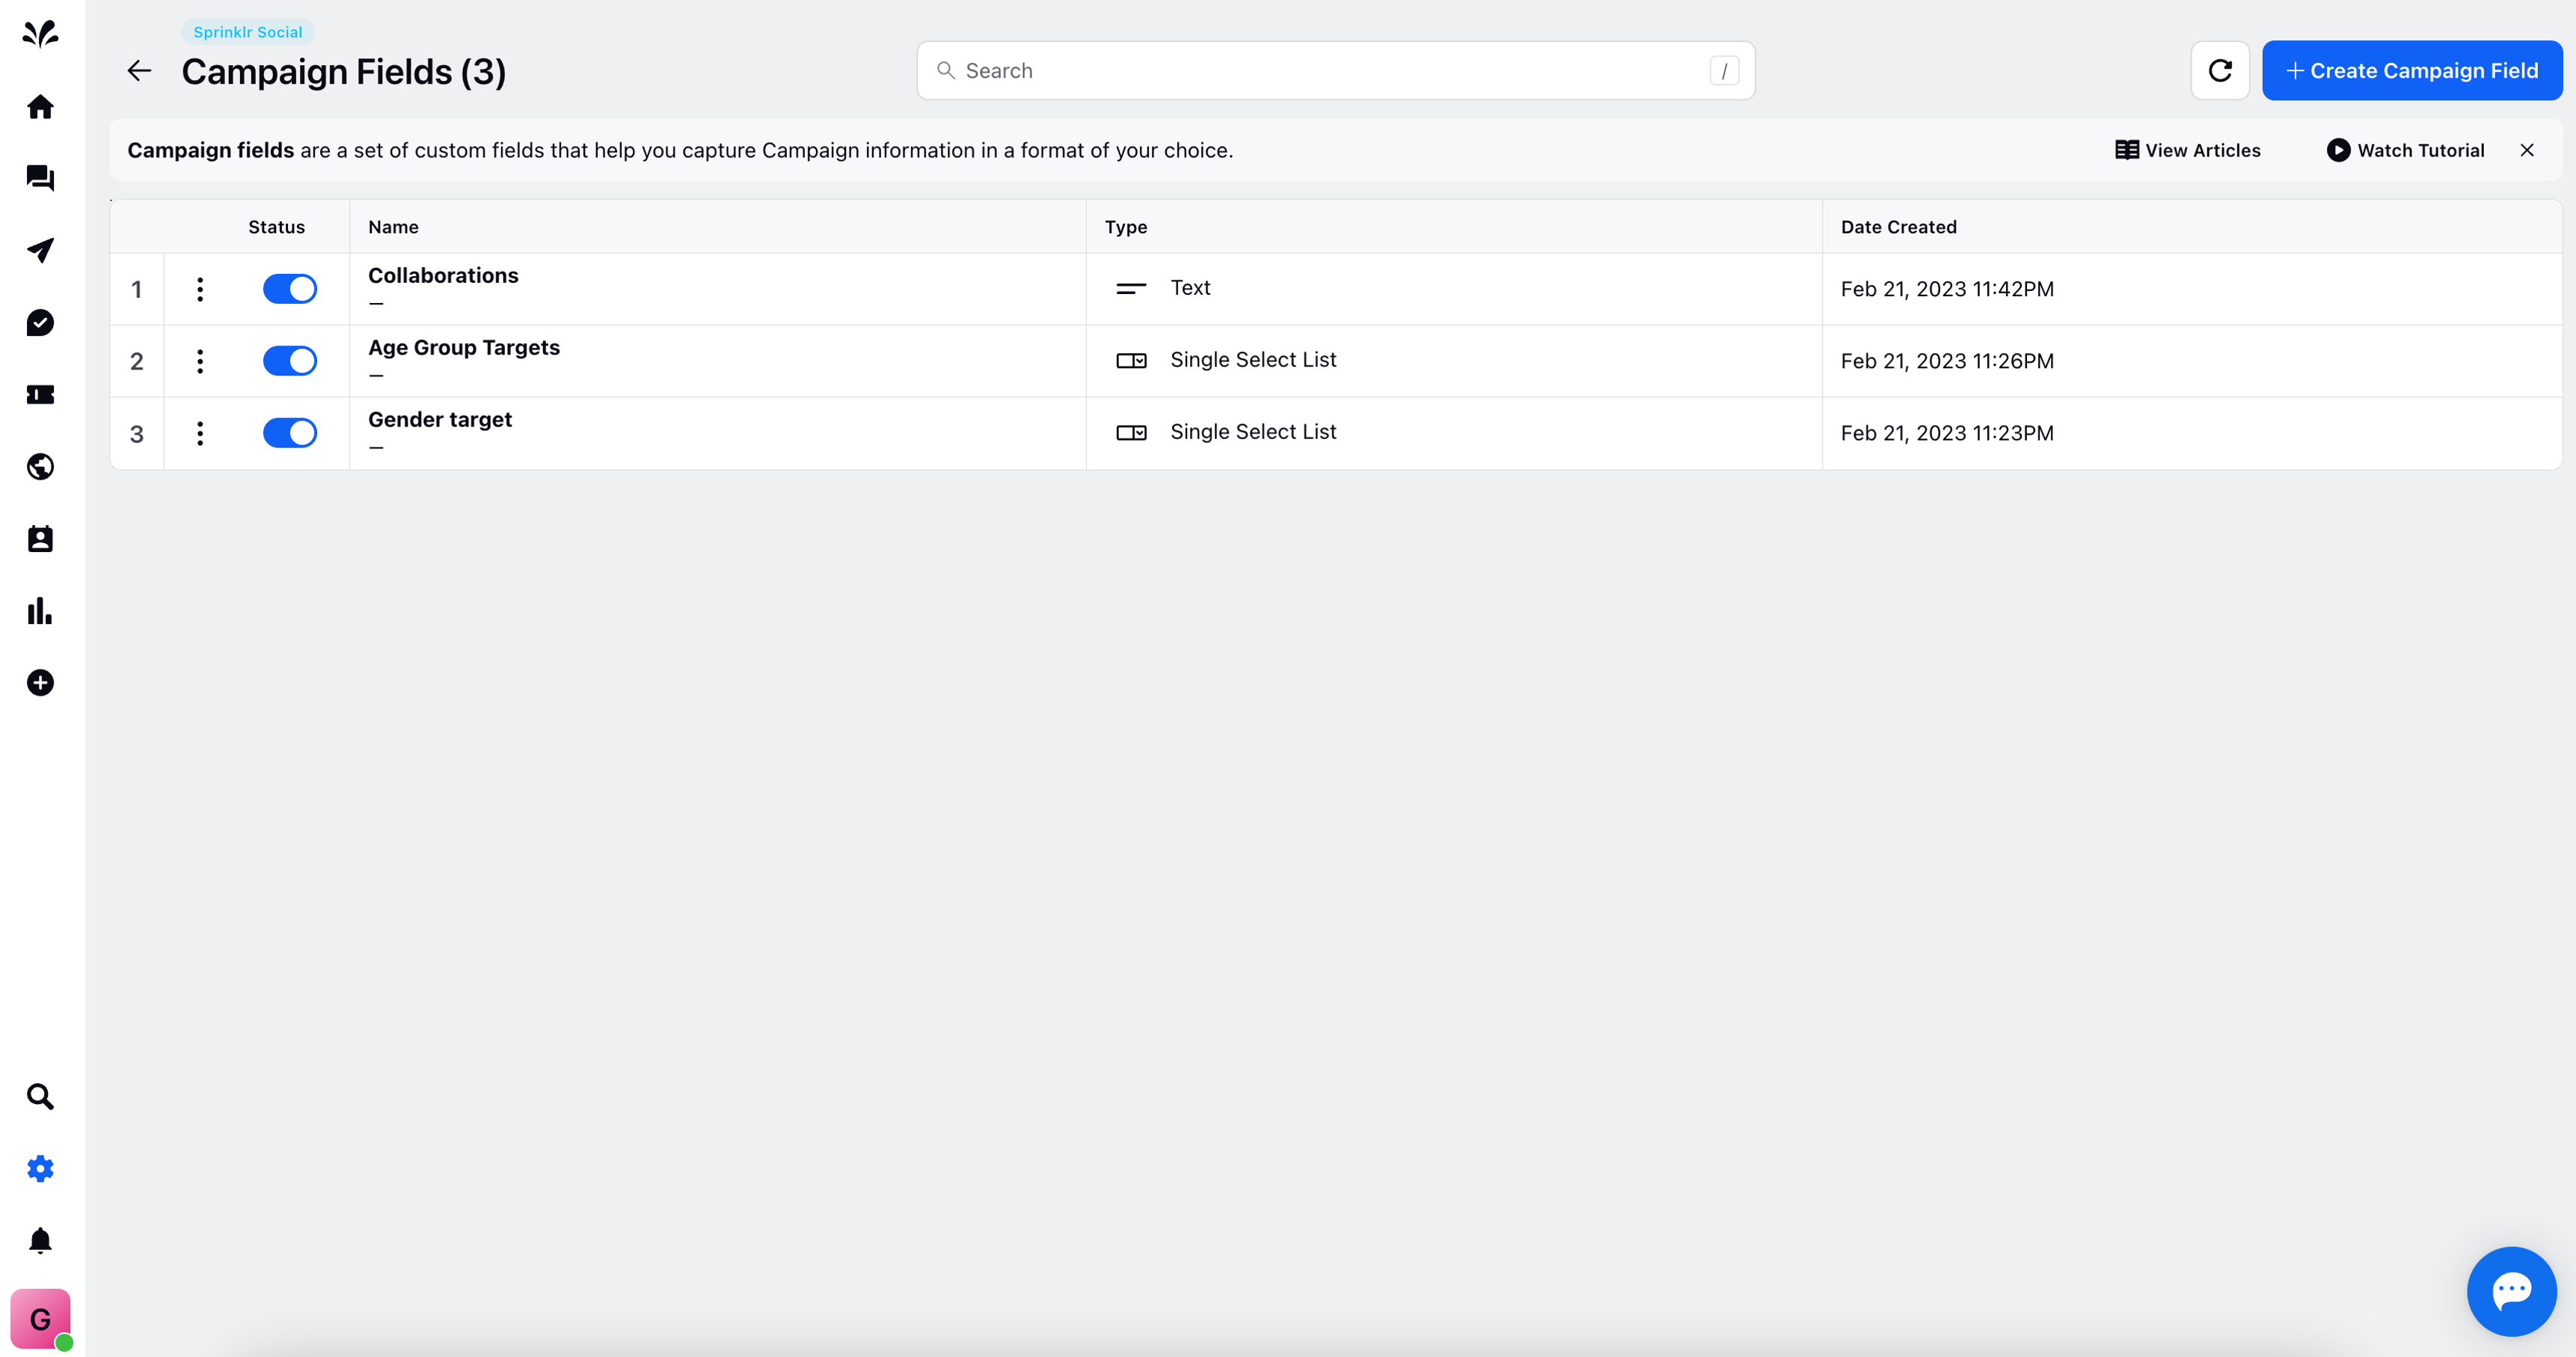
Creating and using Campaign fields
Custom Campaign Fields extend your capacity to gather granular insights, empowering you to create well-organised and targeted campaigns. By customising the data collection process, you enhance your ability to segment, analyse, and refine your campaigns for maximum impact.
Exploring Custom Campaign Fields: A Comprehensive Guide:
1. Navigating to Campaign Fields: Initiate the process by navigating to Settings via the left pane of Sprinklr platform. Choose "Sprinklr Social" and navigate to "Campaign Fields" under the "Inbox and Publishing" section.
2. Creating a Custom Campaign Field: Upon entering the Campaign Fields section, the record manager page will display the current status of your campaign fields. To initiate the creation process, click "Create Campaign Fields" located at the upper right corner.
3. Providing Field Details: Furnish essential particulars for the new campaign field:
Name: Assign a descriptive name to the campaign field.
Description: Provide a succinct description outlining the purpose and context of the campaign custom field.
Field Type: Select from various field types such as multi-select, single, text, date, number, and pencil.
Enable Colour Coding: Opt to apply color coding for visual distinction.
Mark as Required: Designate whether the field is mandatory, ensuring its completion during campaign data collection.
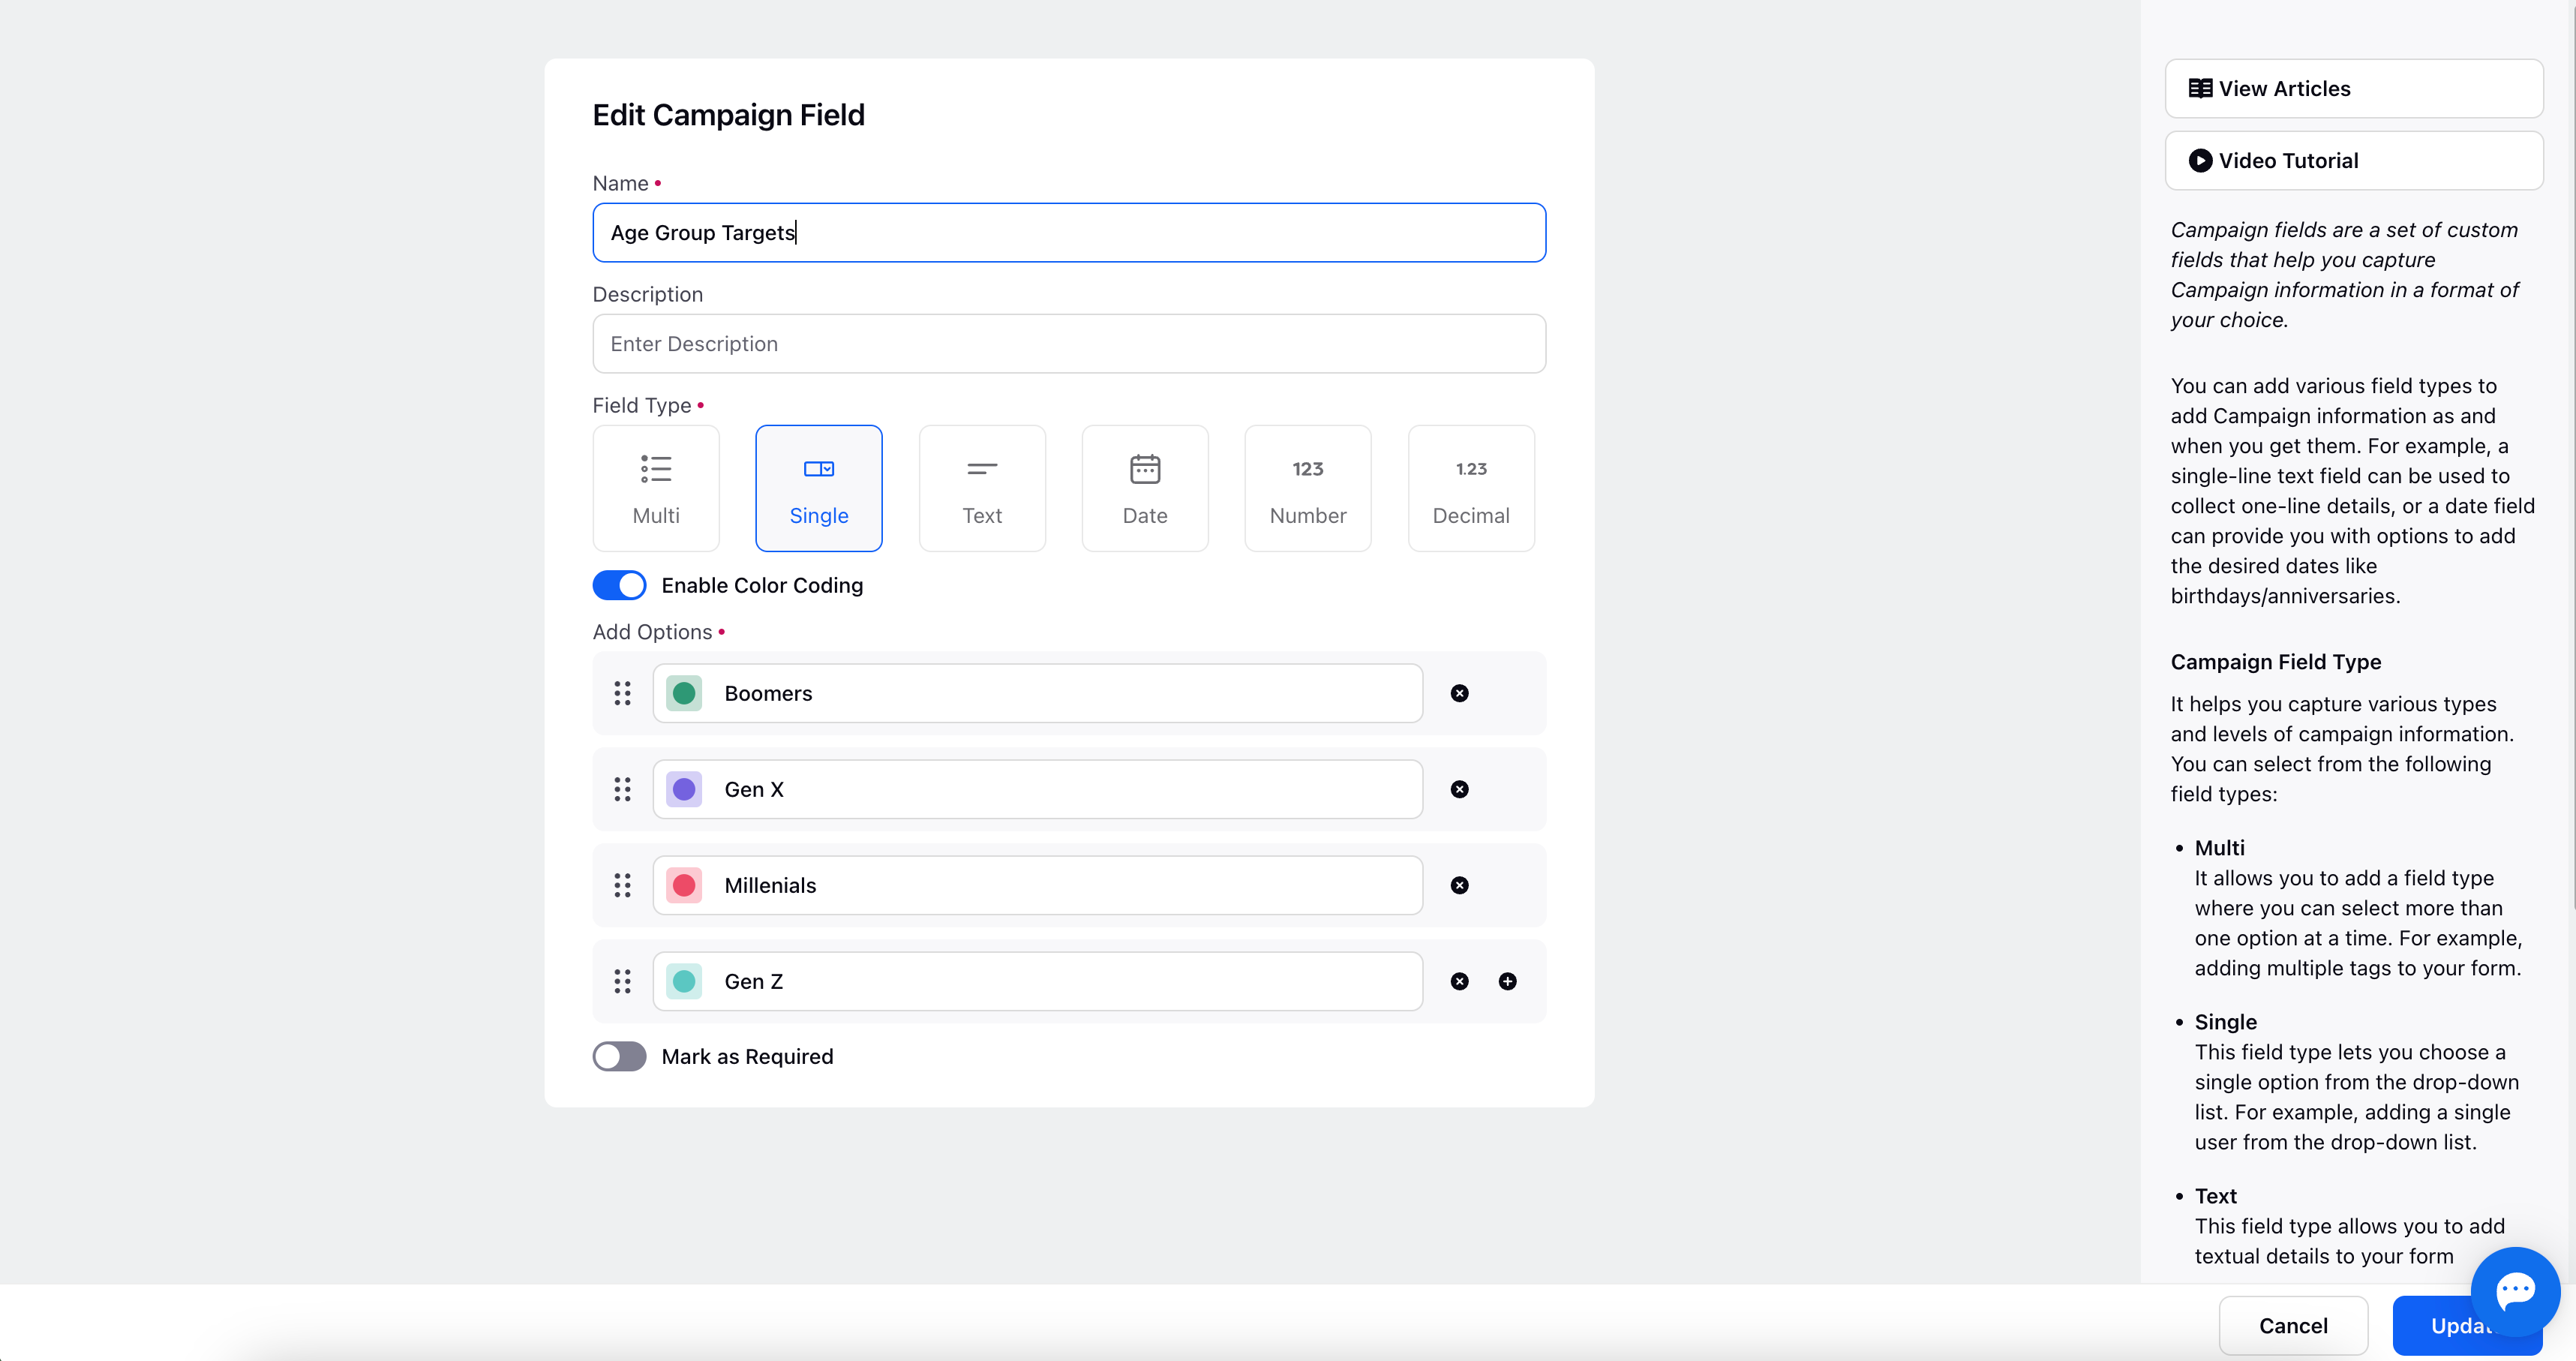
4. Finalising the Custom Campaign Field: Conclude the creation process by clicking the "Create" icon located in the lower right corner. Once the field is created, you can enable/disable it via toggling it's status from the record manager page.
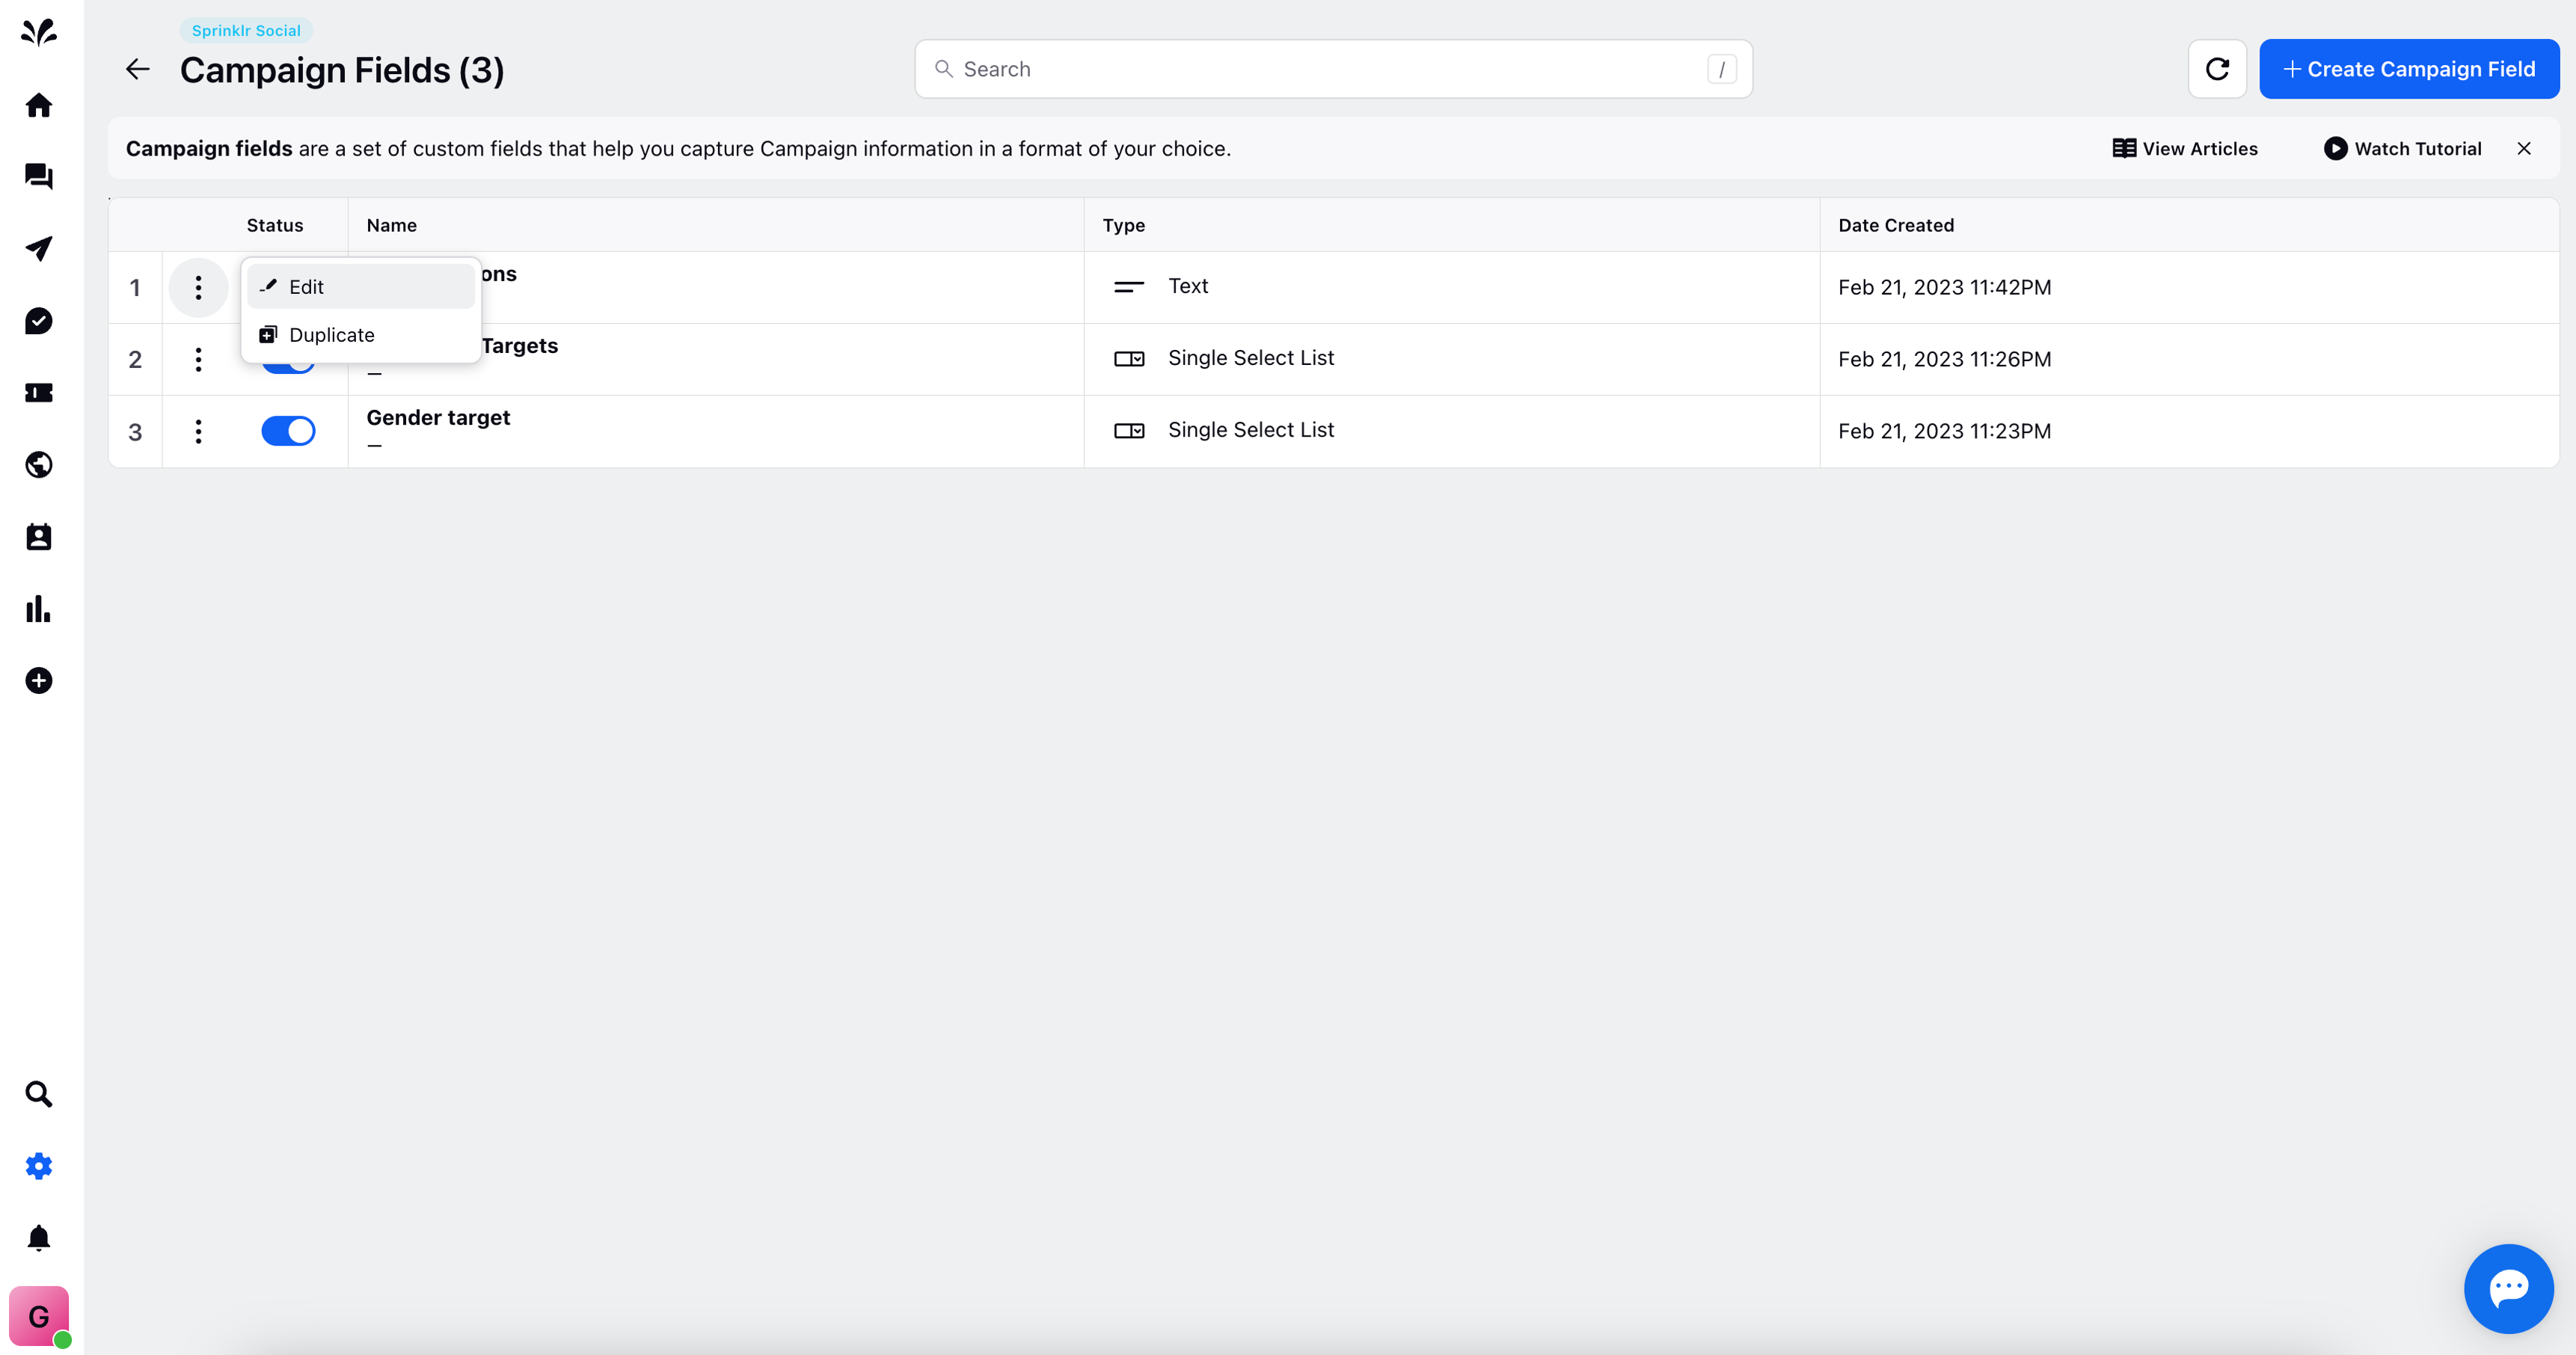
For added flexibility, you can perform actions such as editing or duplicating the custom field. Access these options via the three dots icon adjacent to any campaign fields.
5. Utilising Campaign Fields in Campaign Management: While managing your campaigns within the relevant section, access the "Campaigns" category from the left pane. Choose the desired campaign or apply filters on the Campaign Overview page to refine your search. In the right pane, you'll find the list of campaign custom fields, encompassing both recently created and existing fields.
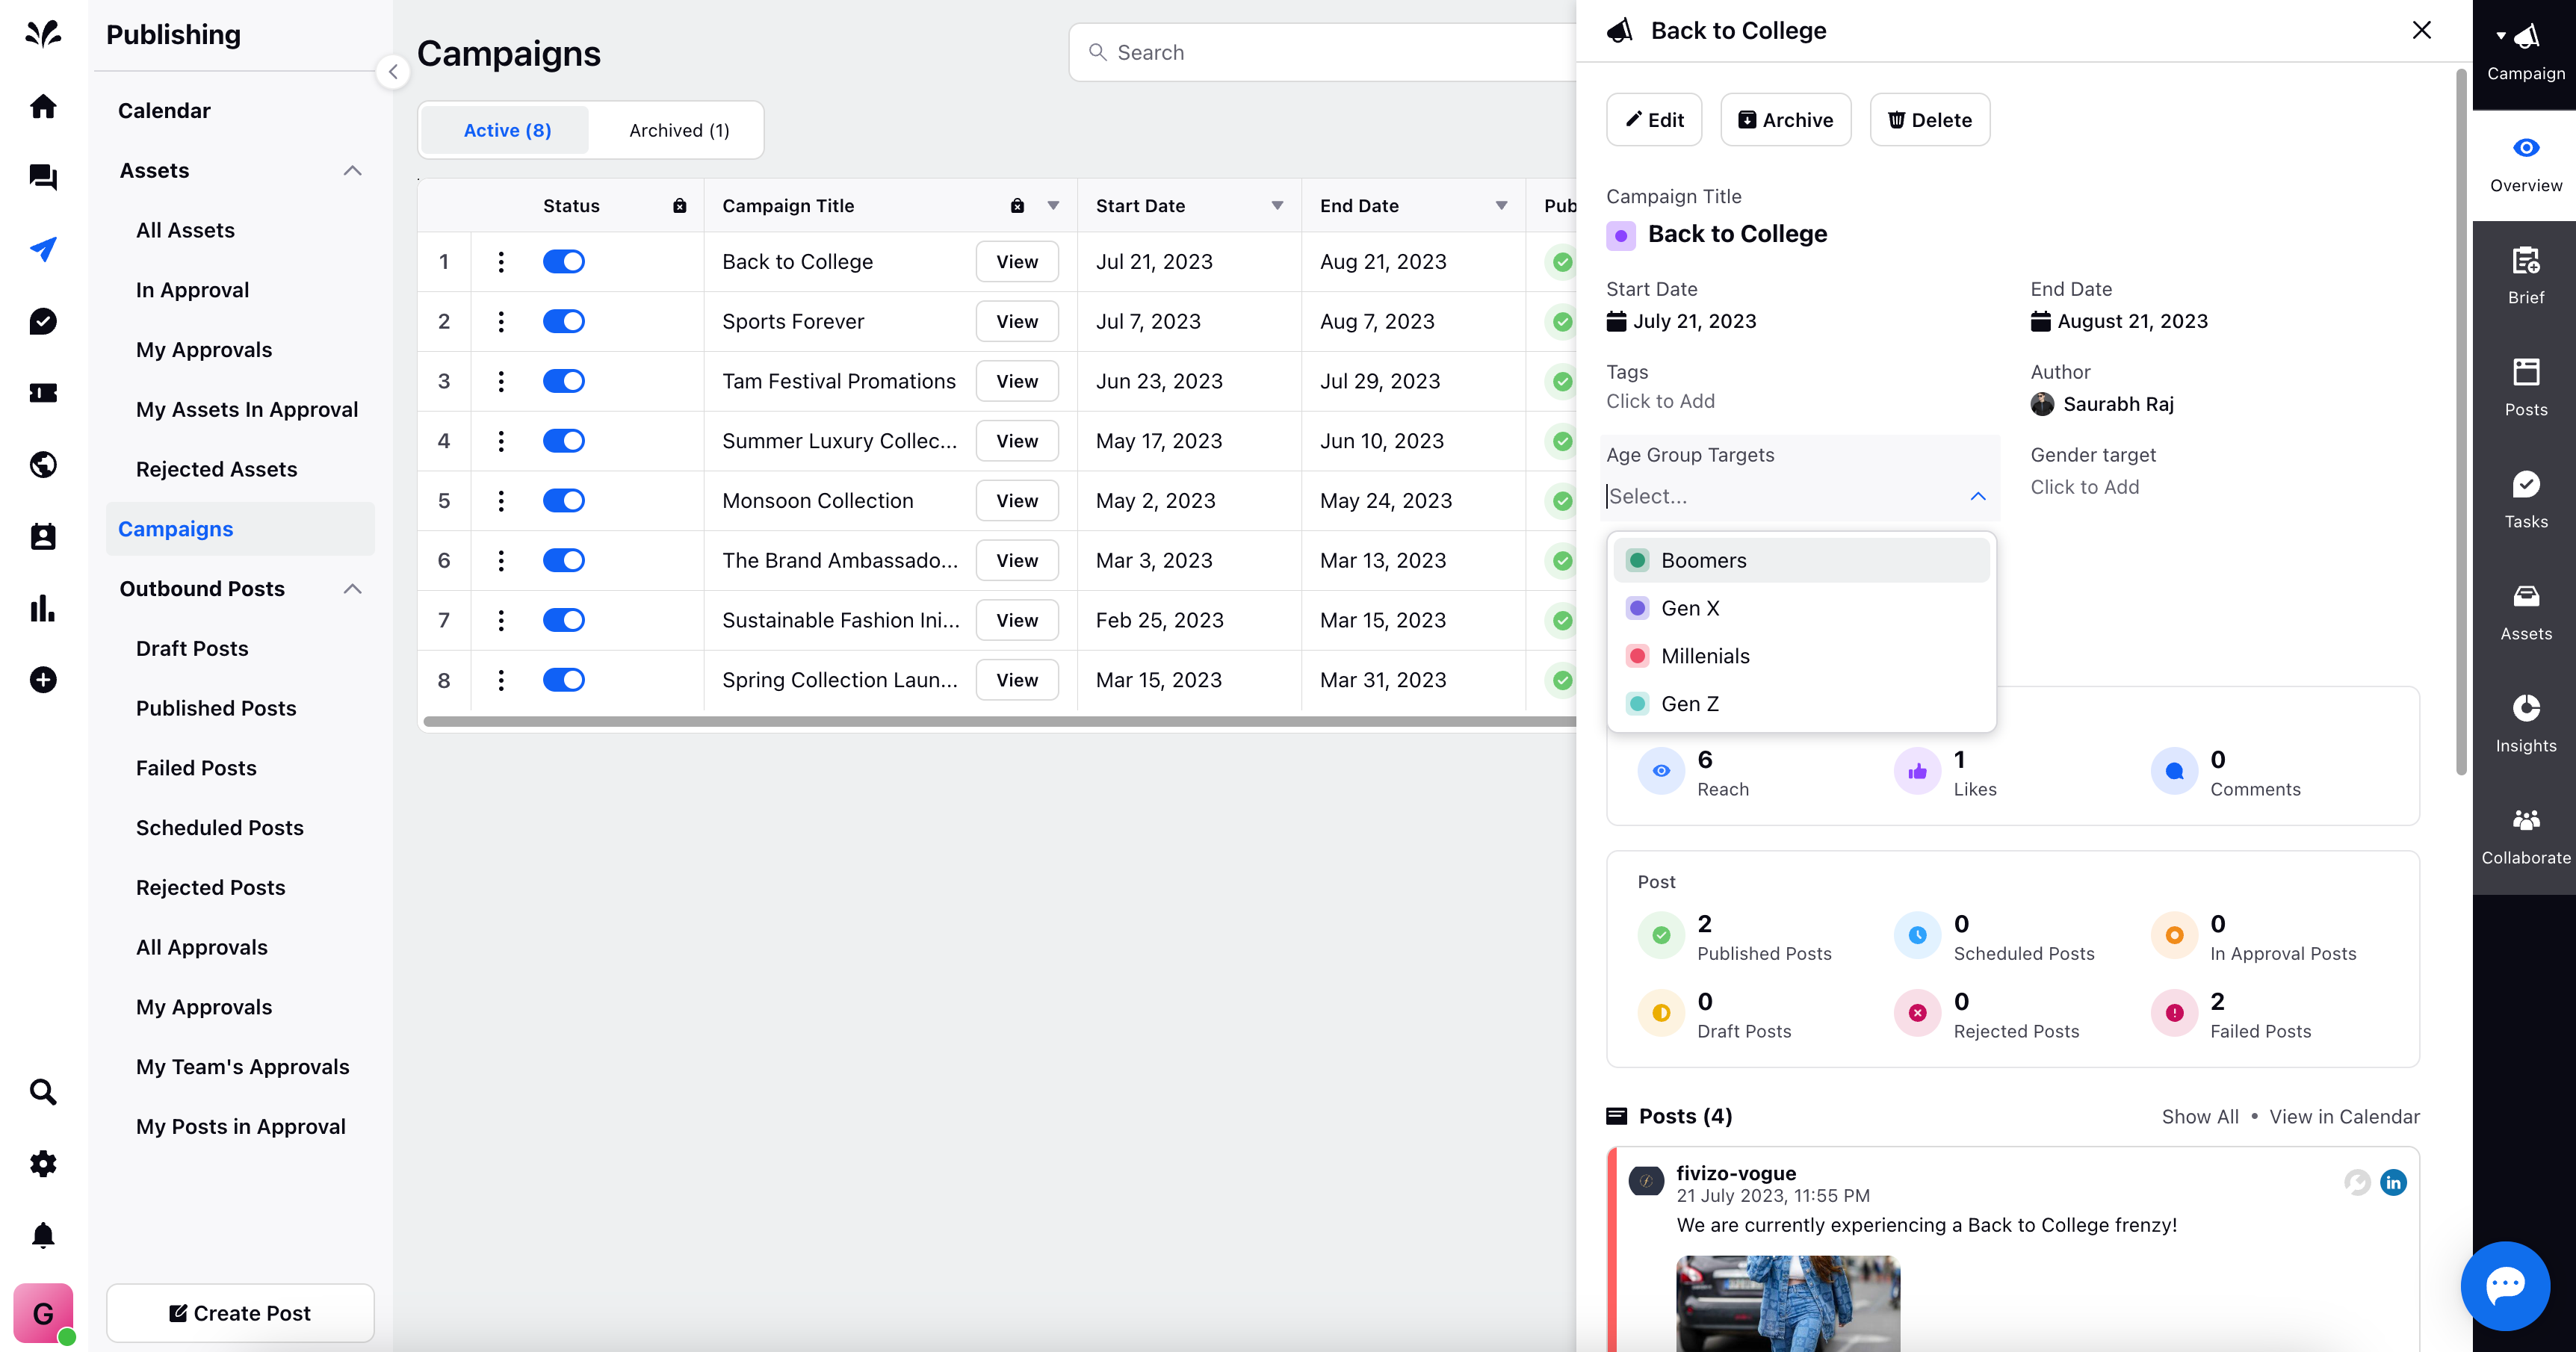
By harnessing the potential of Custom Campaign Fields within the Sprinklr Social platform, you gain a competitive edge in campaign management. This feature streamlines the campaign planning process, facilitates informed decision-making, and enhances your ability to execute targeted, impactful campaigns that resonate with your audience.