
Using Live Chat to connect with customers instantly
Updated
Learn how Sprinklr Live Chat can give your customers a way to reach you at the exact moment when they have questions or problems they can't solve.
Sprinklr Live Chat, a customer service capability, helps brands provide immediate support to visitors on their website and mobile applications. It allows end customers to interact with brands via a messaging interface in real-time. It empowers businesses to interact with customers when they visit their media properties. Using Live Chat, contact centers can provide immediate customer support, resolve customer requests instantly, and improve customer relationships.
Live Chat is typically implemented via code inserted on selected pages on your company's website, allowing you to choose which pages to make Live Chat available.
Benefits of Live Chat support
Quick Response - Customers reaching out to the live chat mode of the channel for customer support gets quick responses to their queries. They don't have to hop from one website to another to find solutions.
Boost Customer Satisfaction - If the user's queries are resolved instantly on live chat, it ultimately improves customer experience.
24*7 Support - When the team is busy or unavailable, the customer service agent can engage with customers around the clock to respond to common user requests or queries.
To create a Live Chat widget
On the Sprinklr Self-Serve window, click the Settings icon on the left-hand side. Under the Platform category, click Live Chat within Messaging.
Click Create Live Chat Widget in the top right corner of the Live Chat window.
You will have three different sections on the Live Chat Editor window to configure and personalize your widget:
Create your Live Chat
In this section, you will need to provide a Name for your Live Chat widget to distinguish it from other Live Chat within Sprinklr Self-Serve.
Enter Domain(s) to use this Live Chat widget. You can leave the field blank if you want to use this widget at any domain.

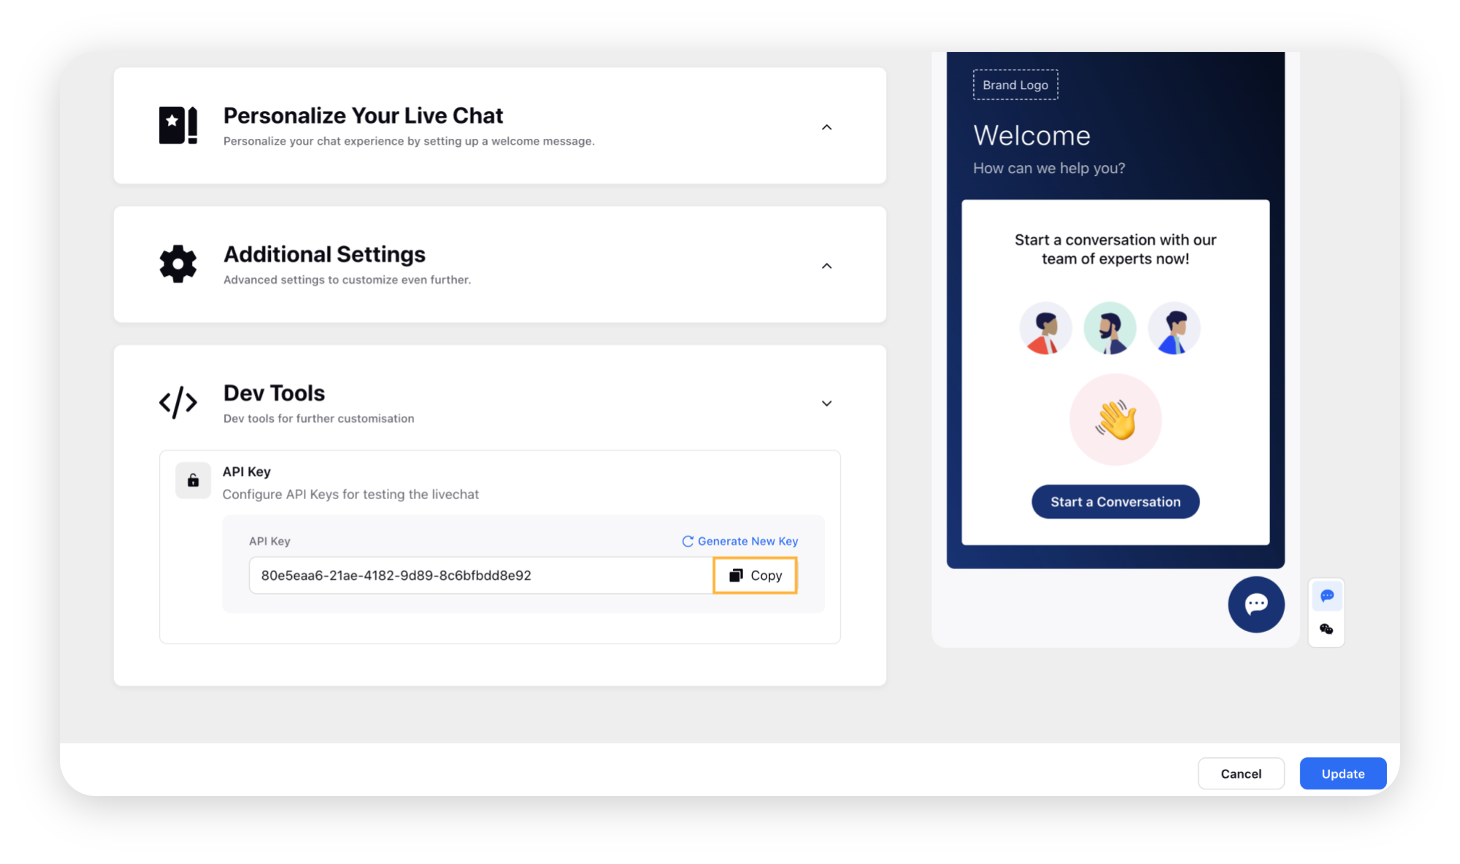
Personalize your Live Chat
Now, move to the Personalize Your Live Chat section, where you can configure the look and feel of your Live Chat widget.
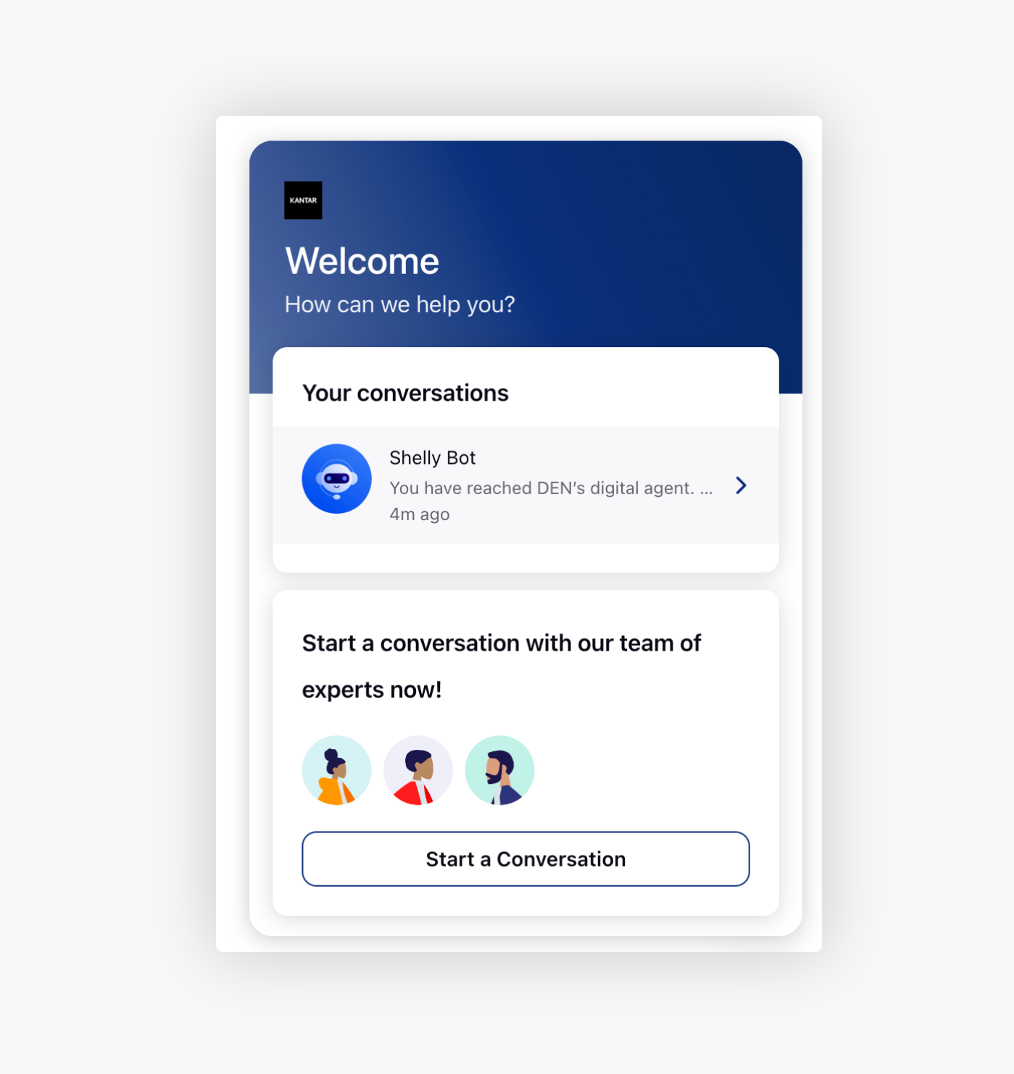
Home Screen
Click Add Logo to add your brand logo to the Live Chat Widget. You can preview all the changes in the right preview section.
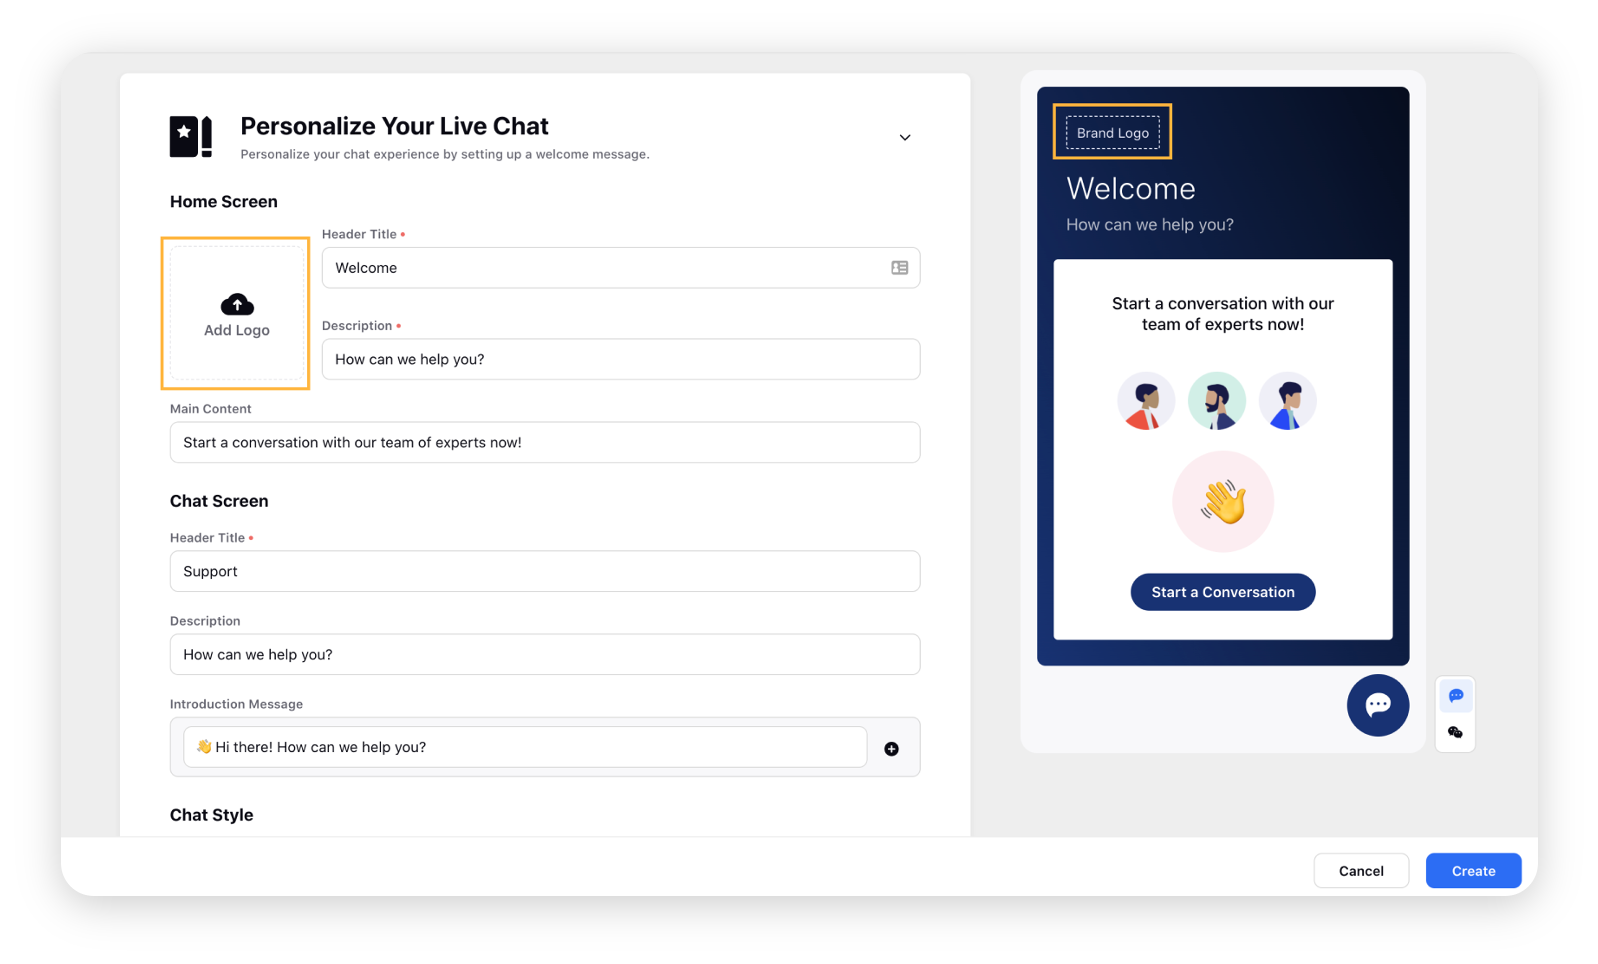
Provide a Header Title and Description for your widget.
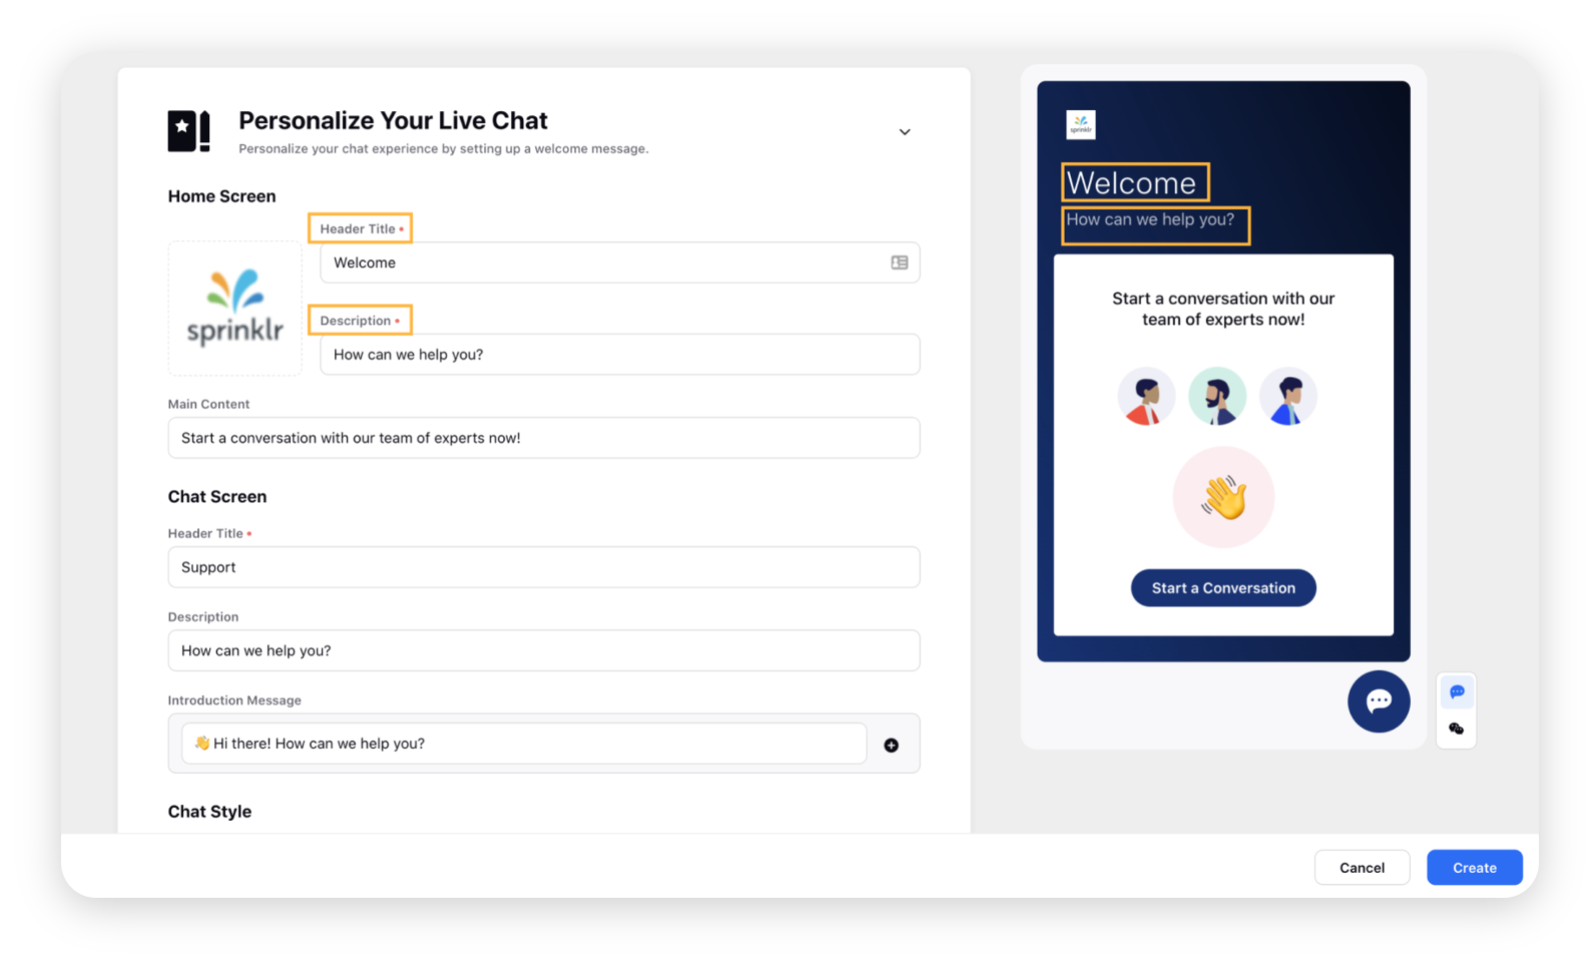
Under the Main Content field, provide a short description of the services you wish to deliver once a customer initiates a conversation.

You can also change the text for Home screen button by editing the Button label field
Chat Screen
In this section, you can configure messages to appear when a user first opens the Live Chat widget on your website.
You can add a chat Header Title, Description, and Introduction Message(s).
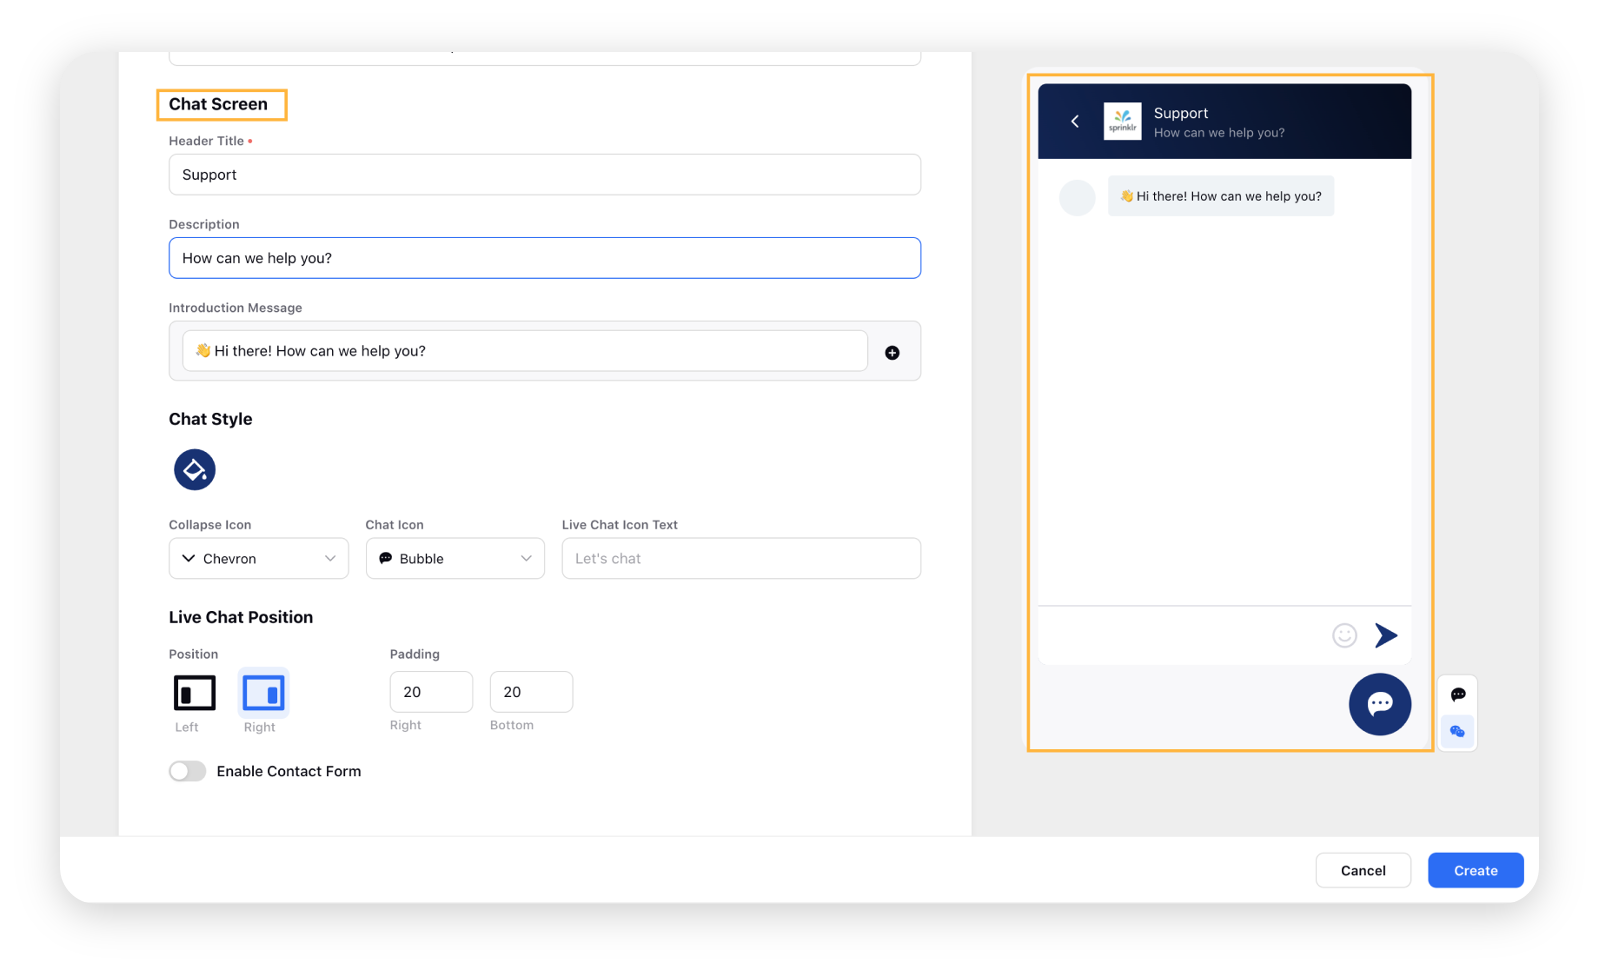
Chat Style
Under the Chat Style section, you can stylize the appearance of your ChatBot to highlight your brand.
Click the Color Fill icon to add a color of your choice to your Chat widget.
Under the Collapse Icon drop-down, select the collapse icon style from Chevron or Close. It will be used to collapse and expand your ChatBots on the website.
Select Live Chat icon Text appearance from the Chat Icon drop-down menu. You can select from the options such as Bubble, Box, Cloud, Mic, Ellipsis, and Ellipsis Stroke.

Provide a text for the Live Chat icon.
Select Live Chat Position and Padding on your website. By default, it will be positioned to the right.
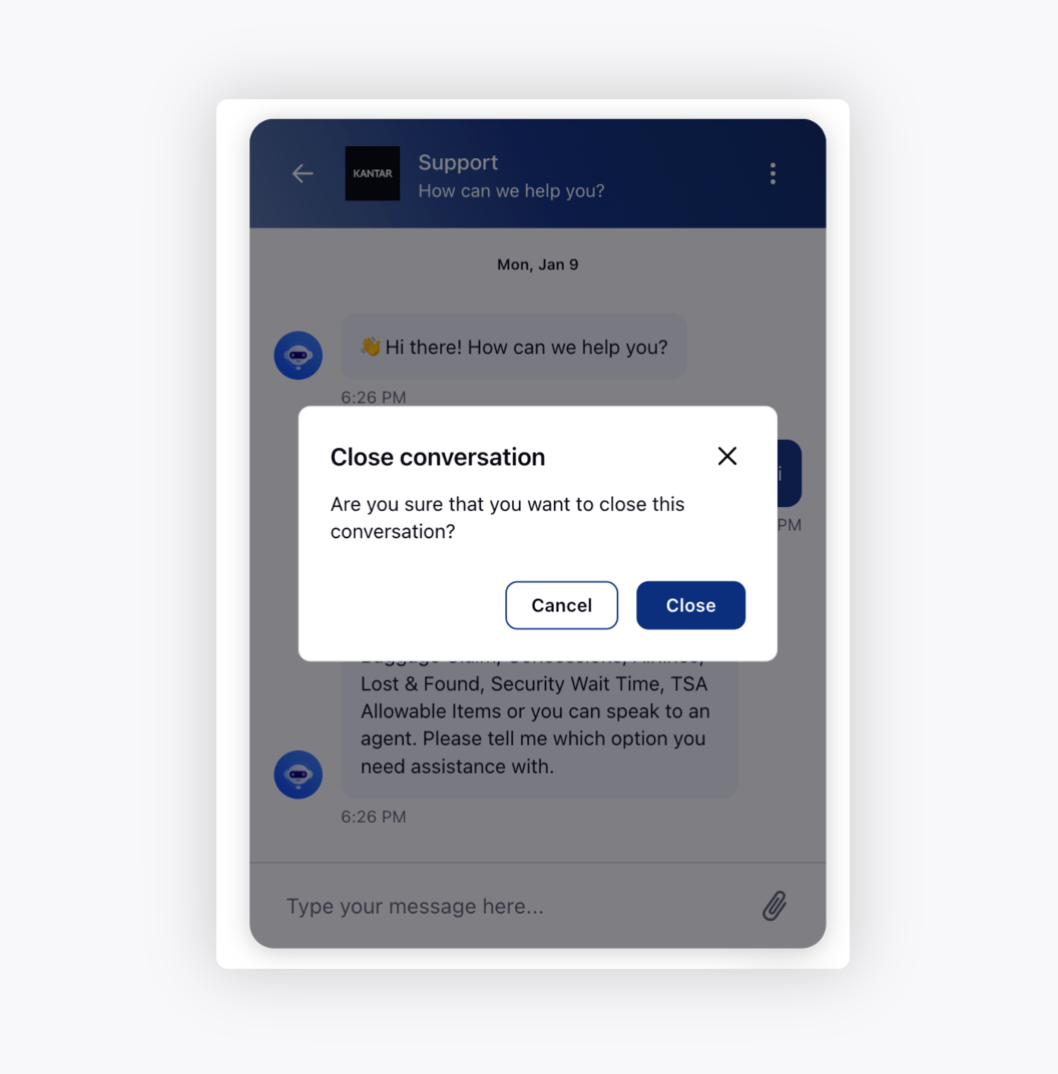
Toggle on Enable Contact Form if you want to capture customer information before starting a conversation. It will help you track the discussion and ensure that the customer can become a potential lead in the future.
You can set the Form Title and select all/any contact field from Field Name, Email Address, and Phone Number to capture customer information. Enter field Placeholder Text as per your desire. You can also check the Mandatory Box to make a particular field mandatory for customers.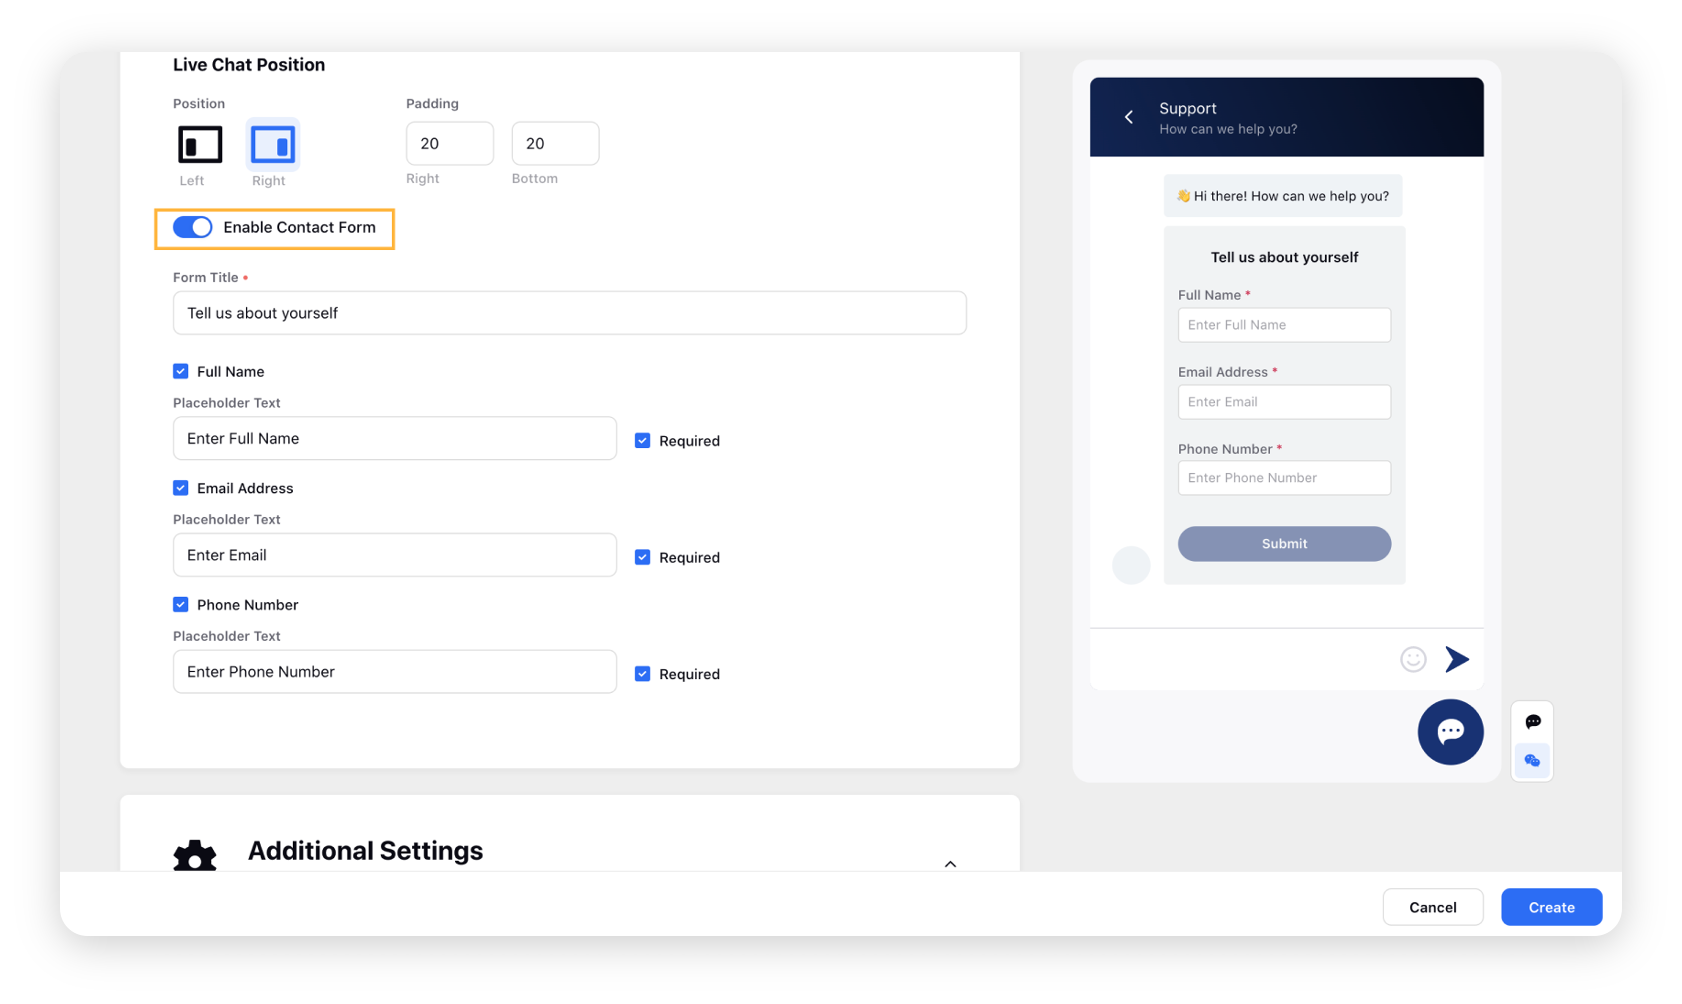
You can also define the advanced settings to customize even further. For more information, refer to this section – Advanced Settings.
Click Create in the bottom right corner.
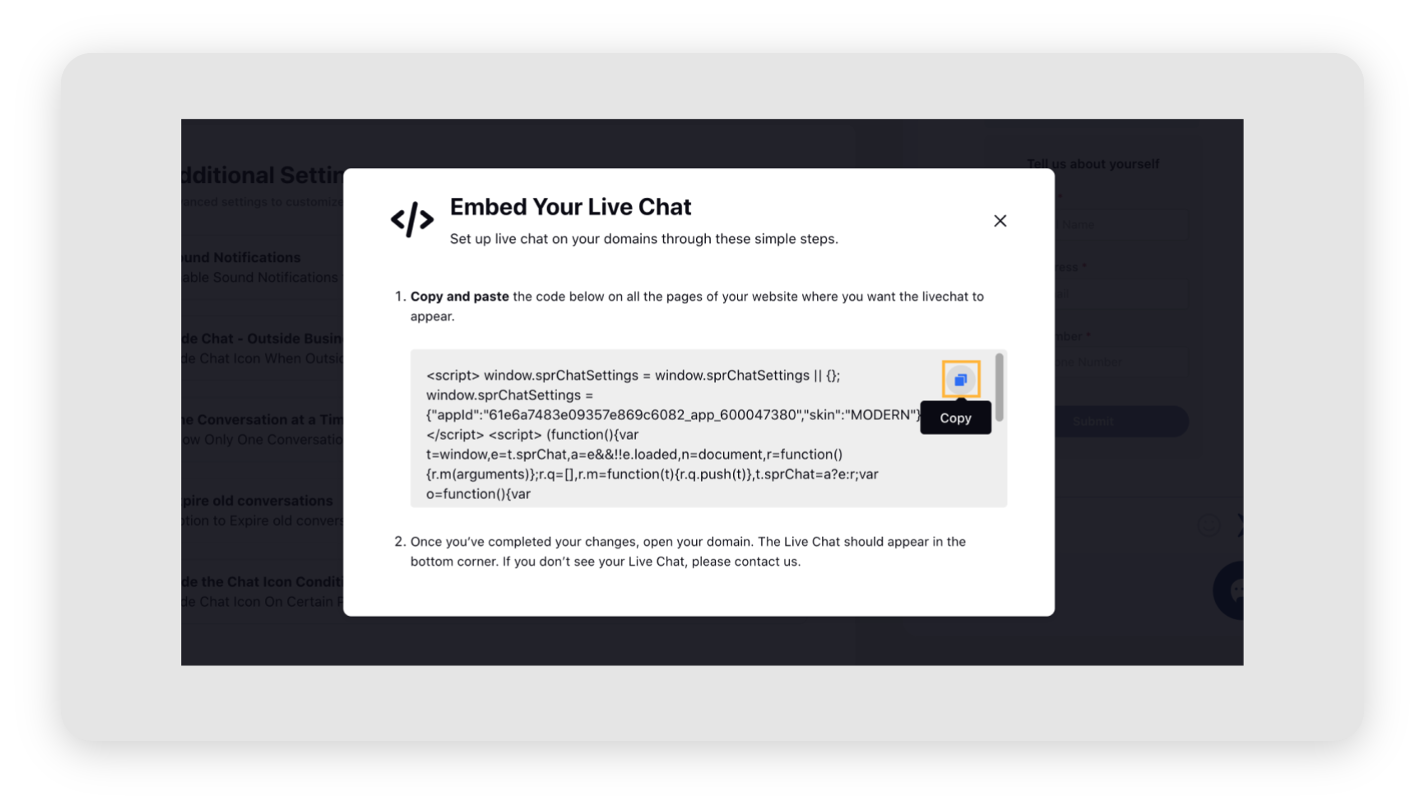
On the Embed Your Live Chat pop-up window, you will view the codes along with the steps that need to be taken to enable Live Chat on your Domain. Click the Copy icon to copy the available code.
Paste the copied code on all the pages of your website where you want the Live Chat to appear.
After successfully implementing the changes, you will see the Live Chat at the bottom corner of your Domain.
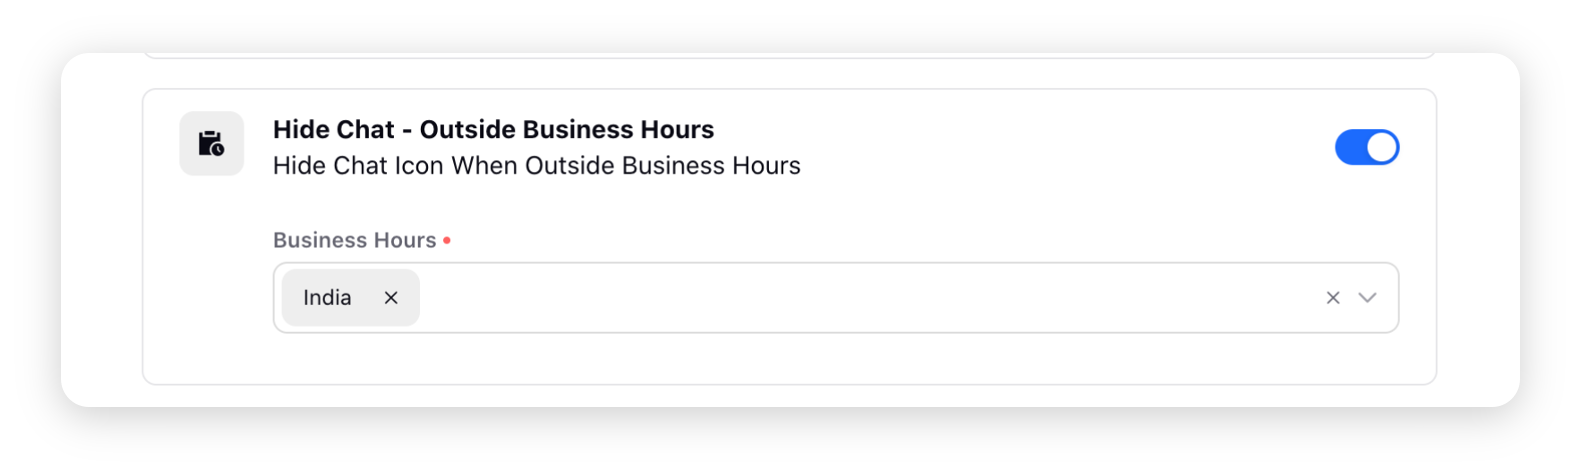
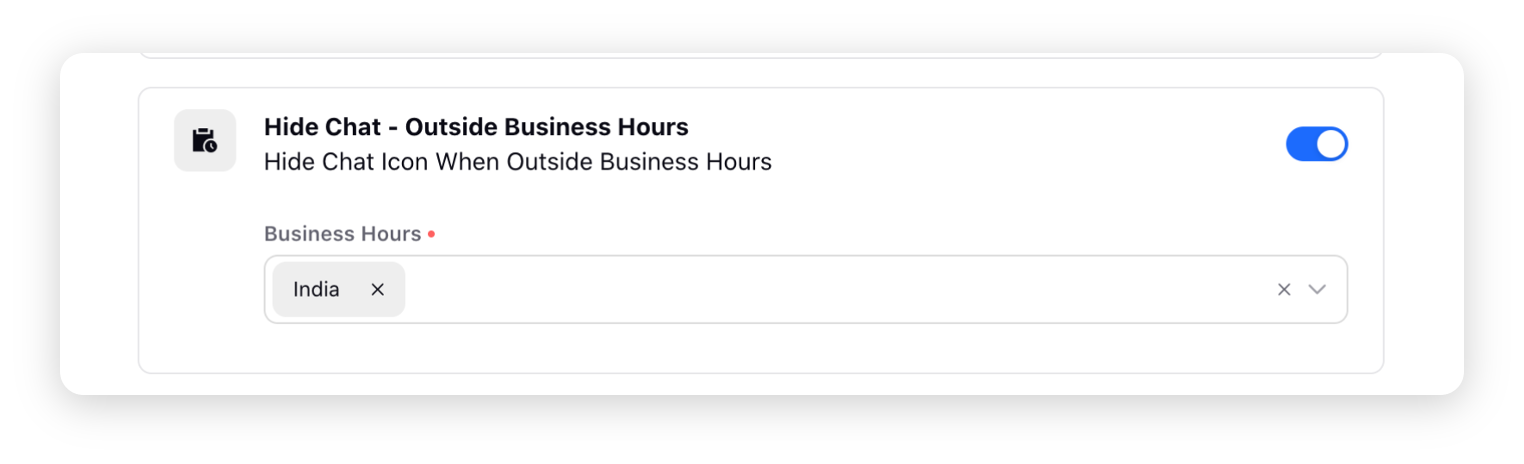
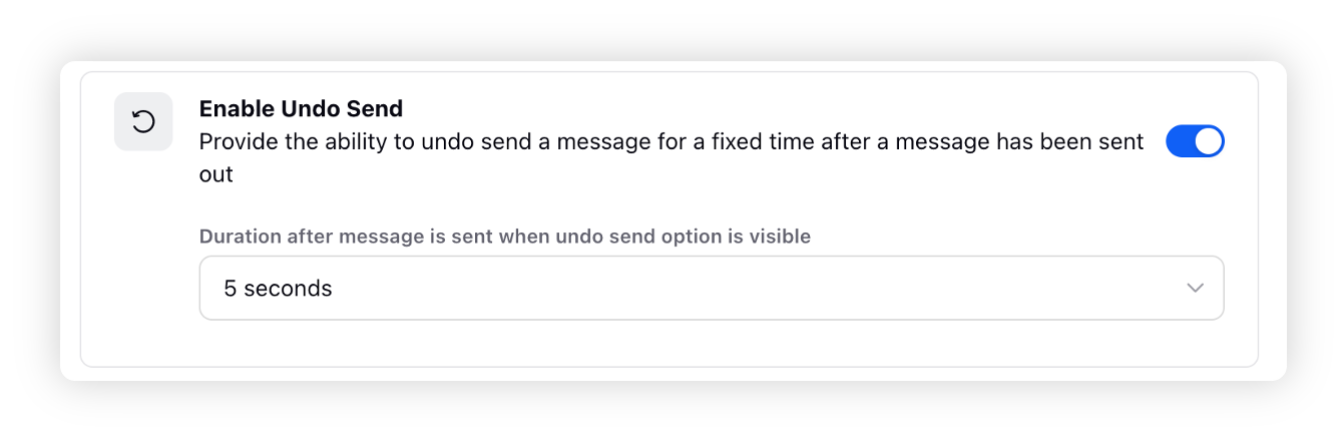
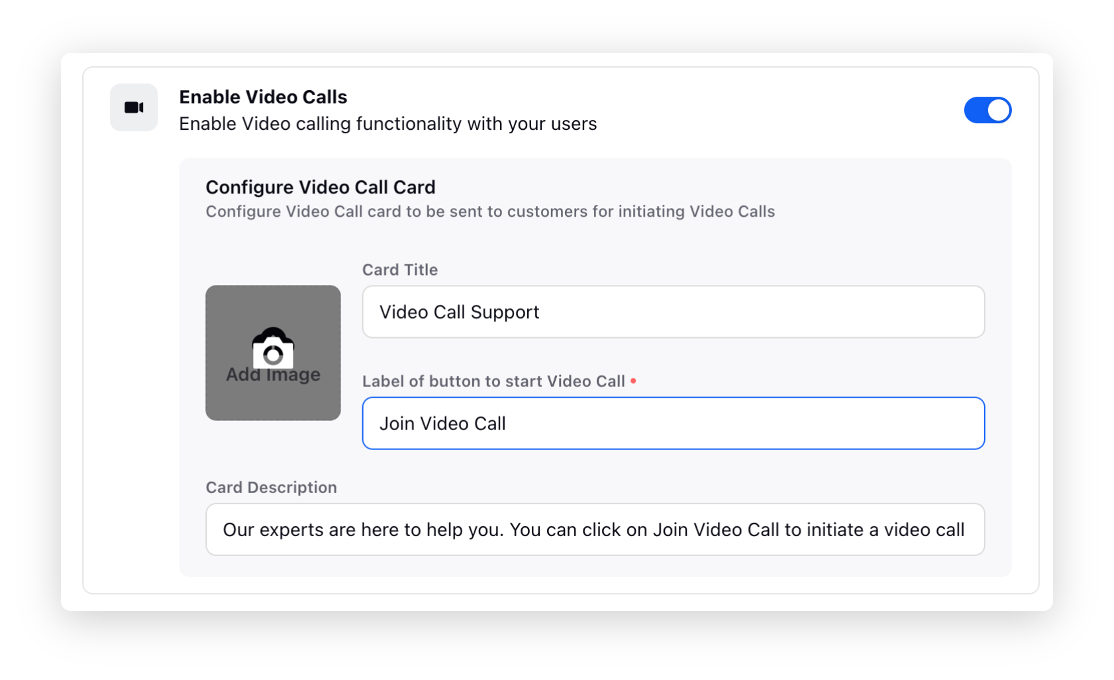
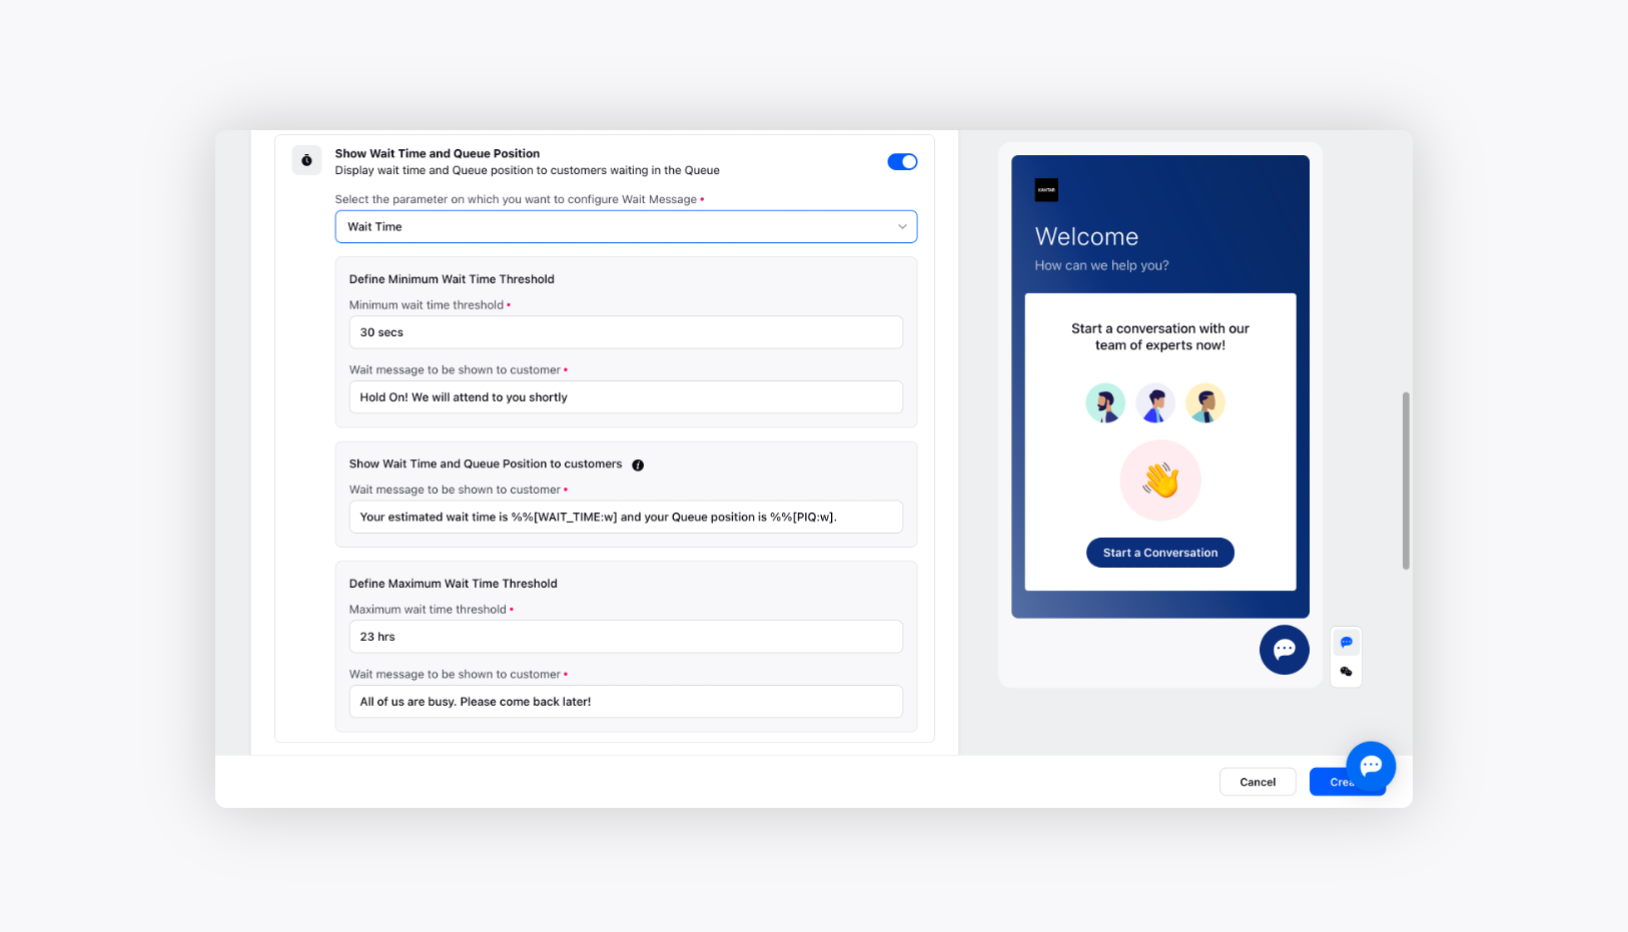
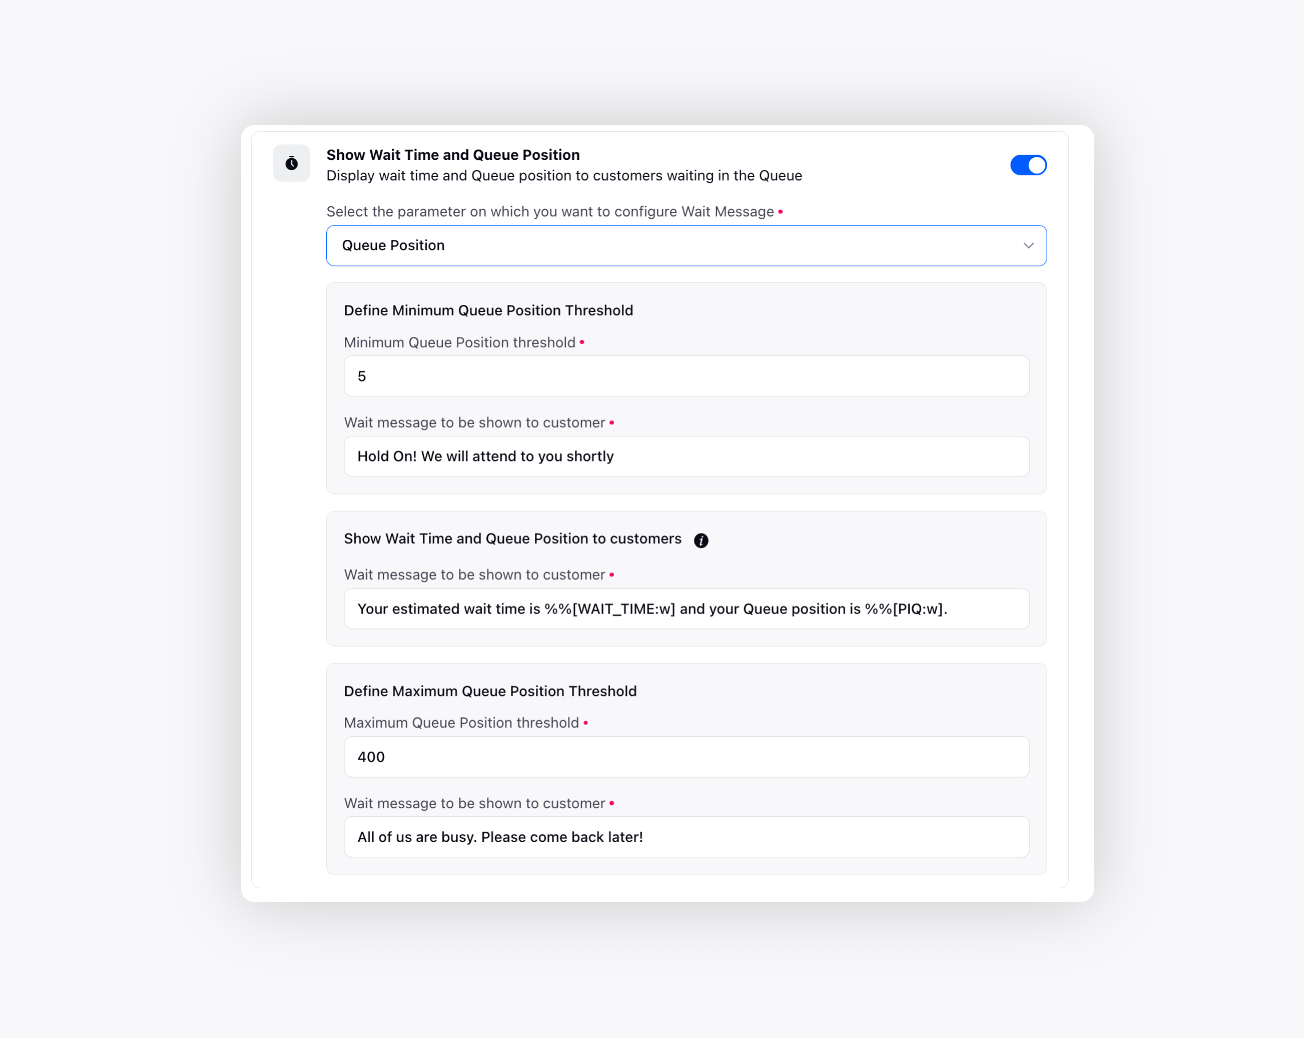
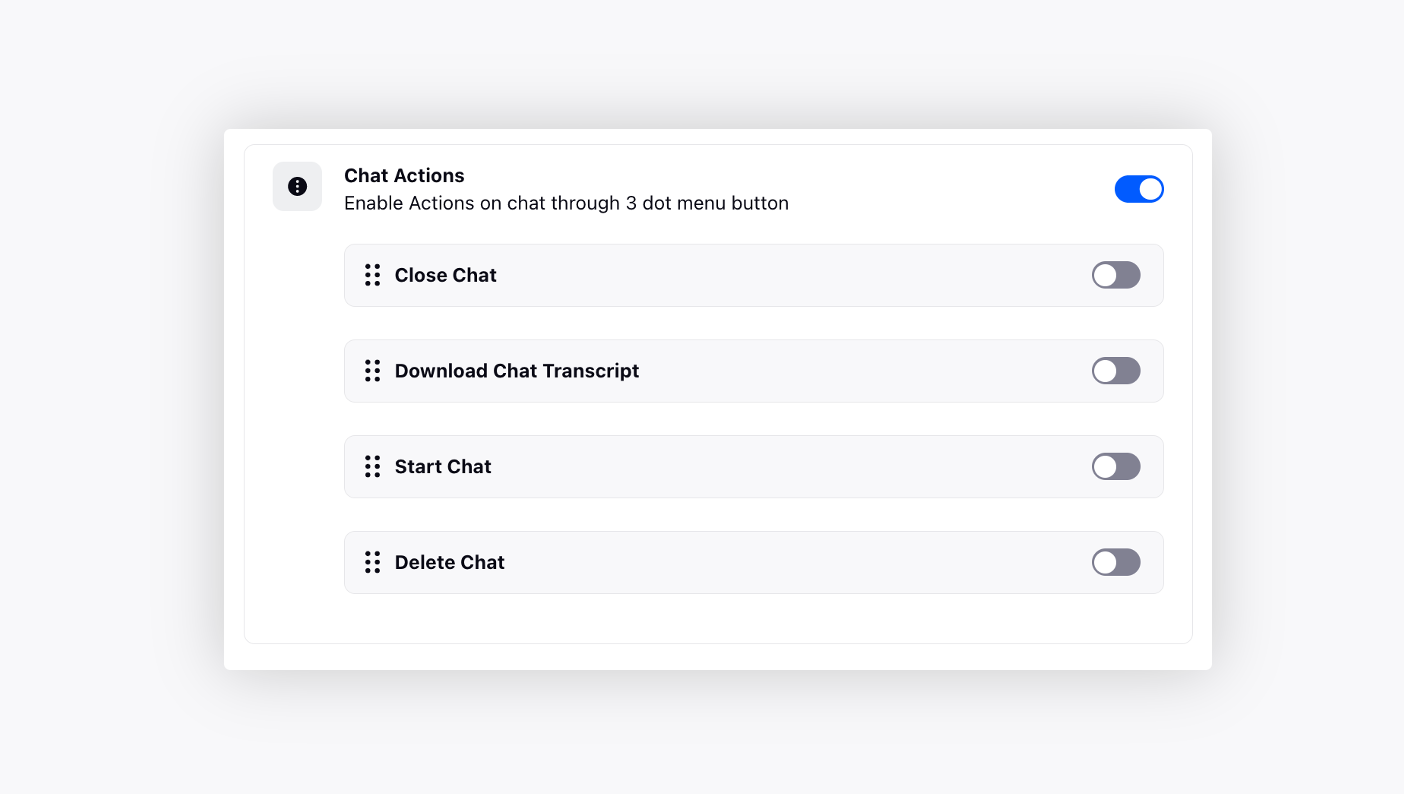
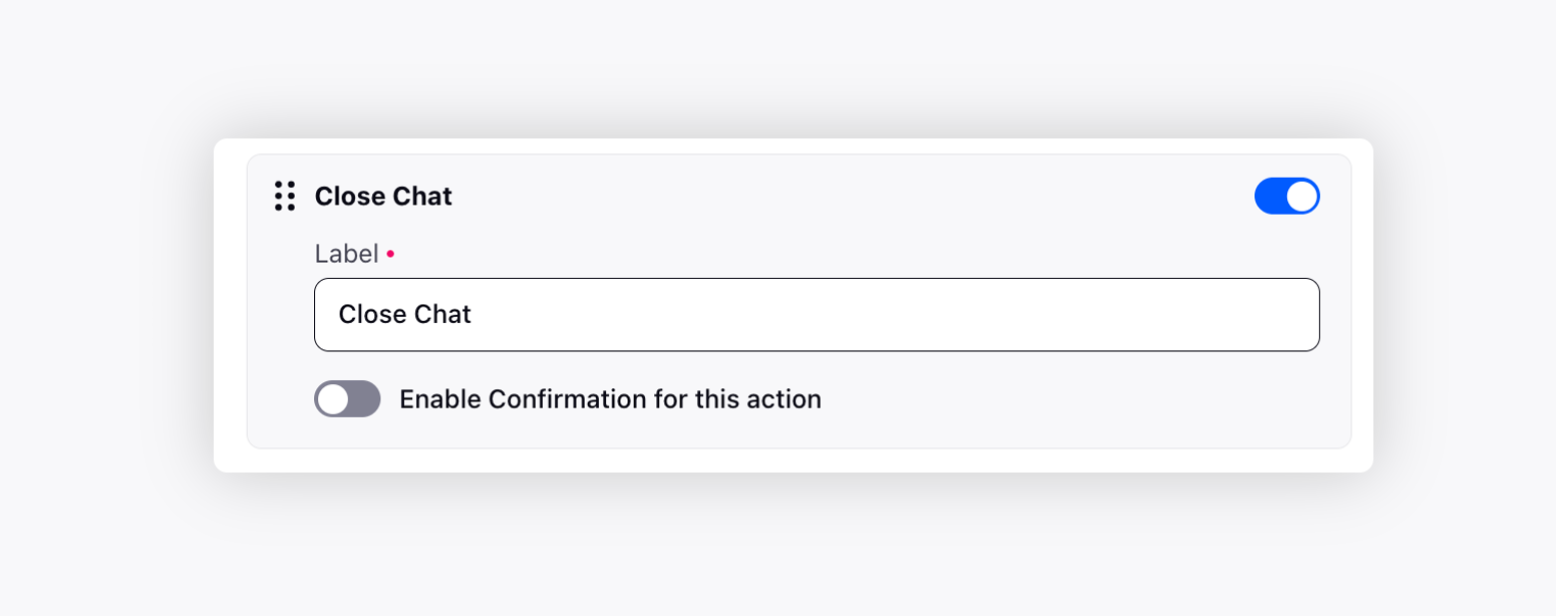
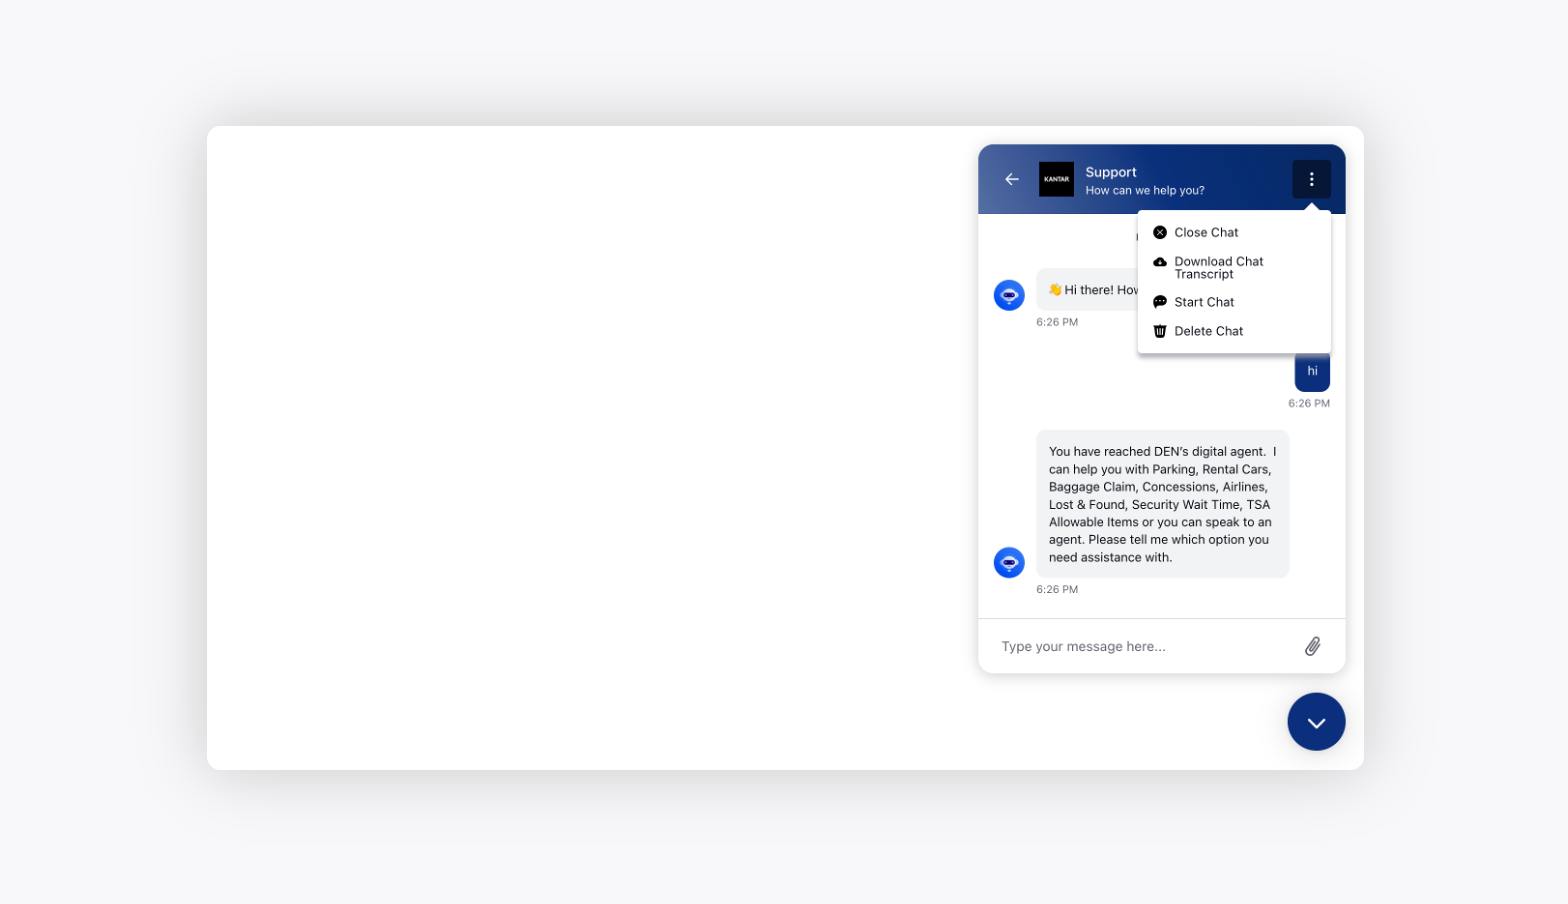
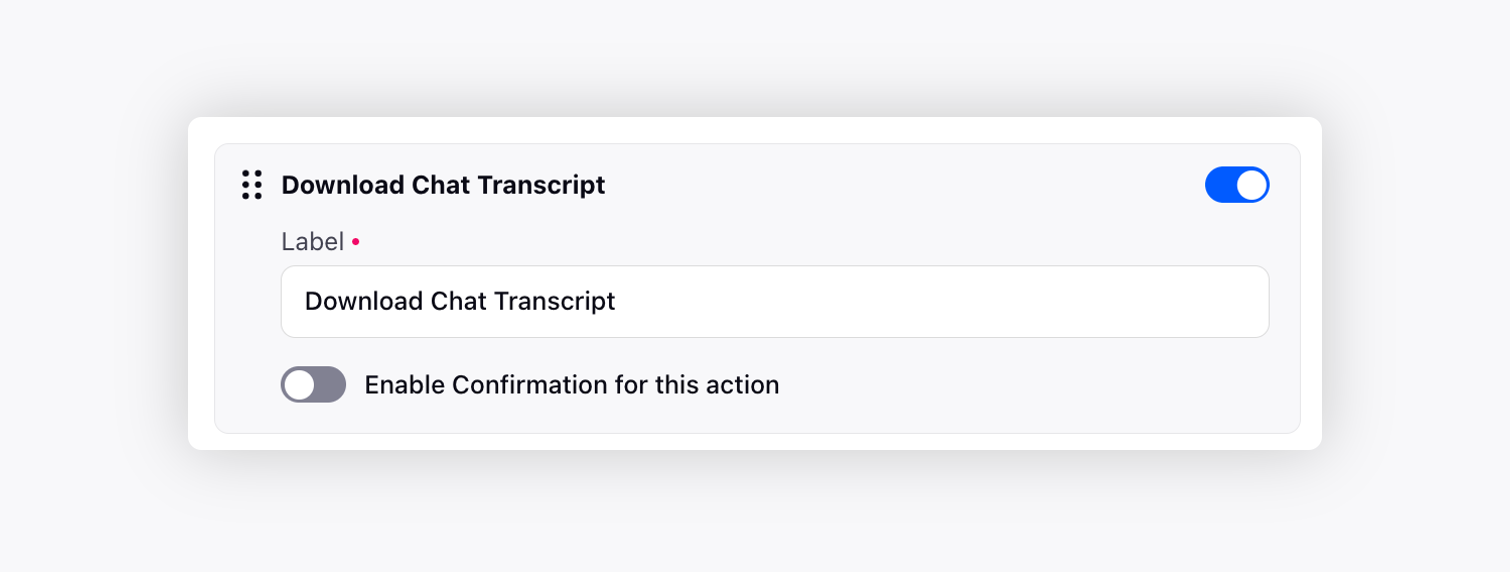
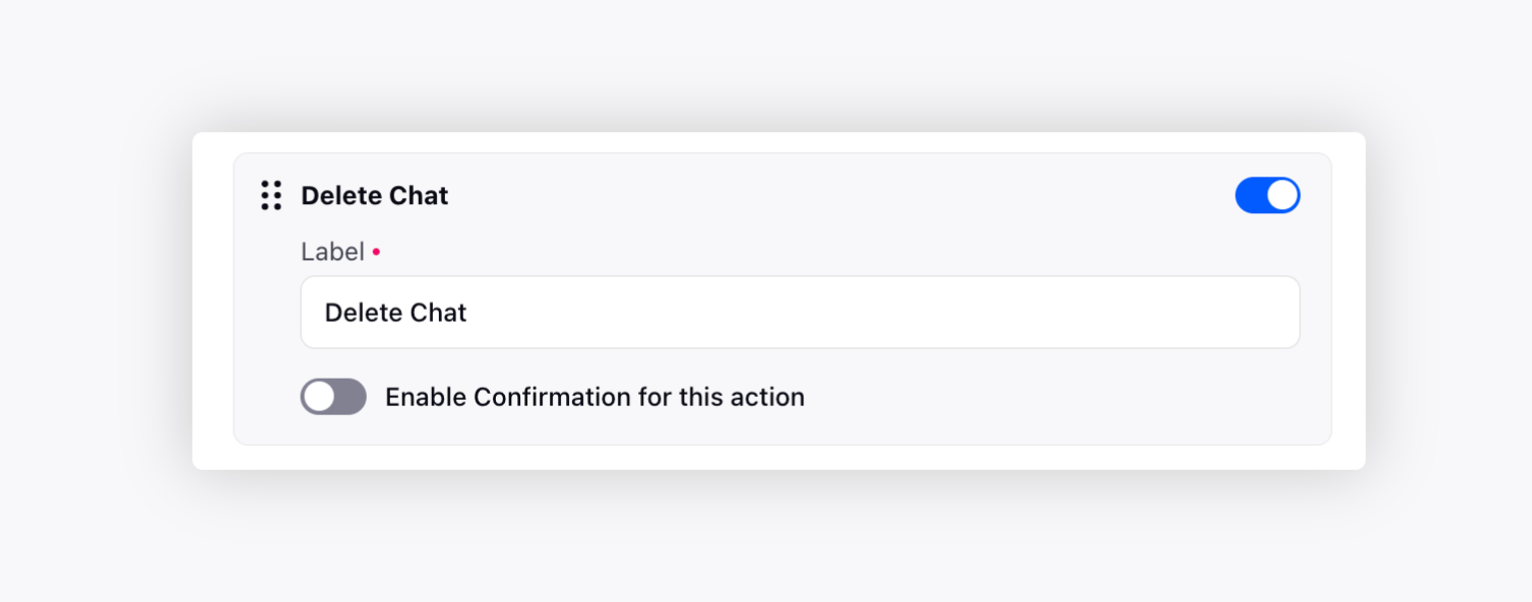
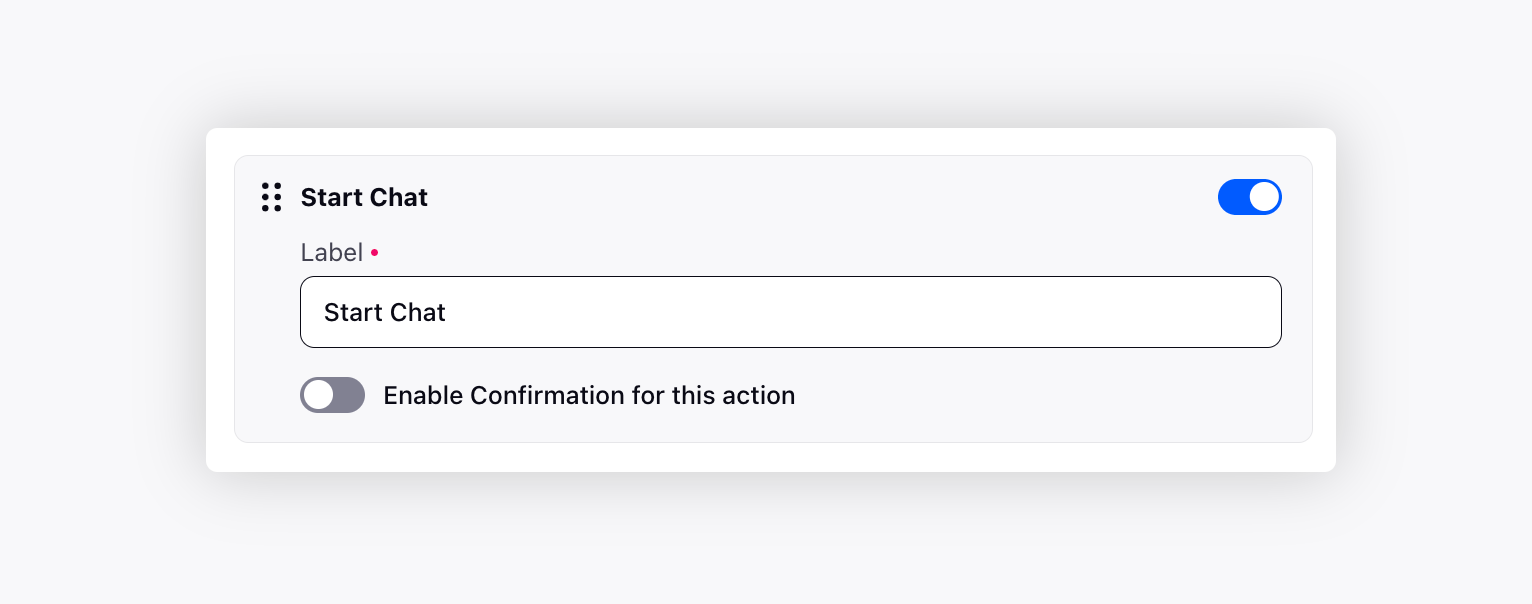
Additional Settings
Additional Settings consists of the following options to further configure your live chat widget and make it more intuitive:
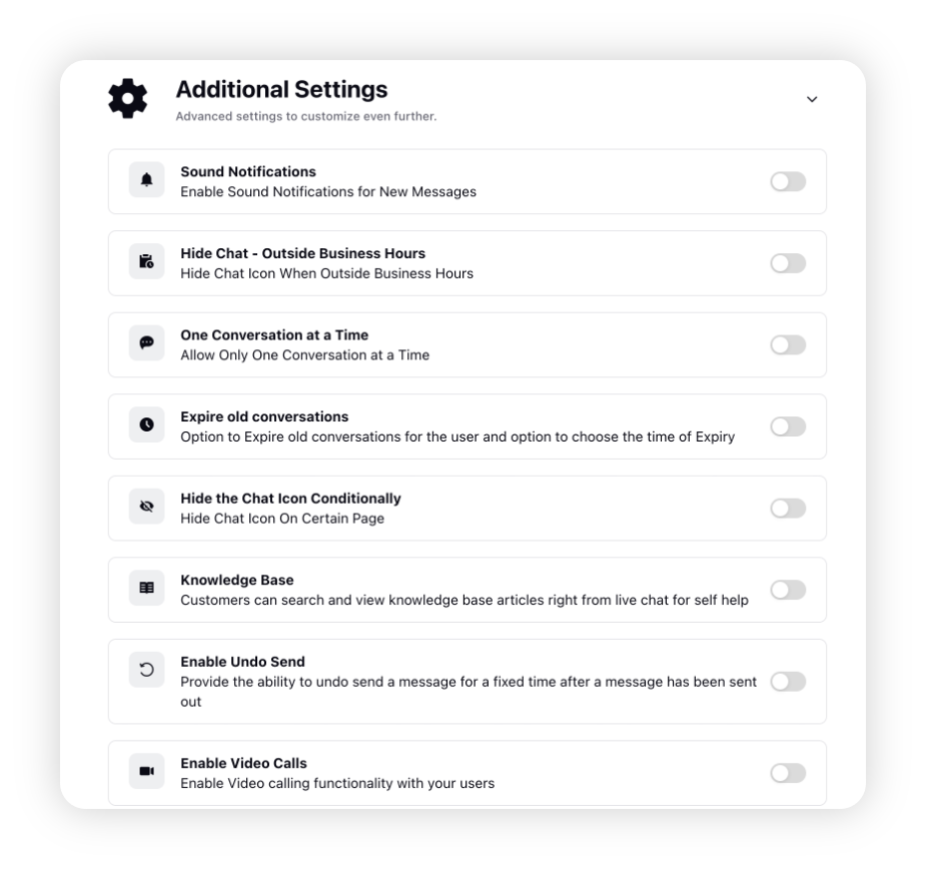
Additional Settings — Description


To access Live Chat Dev Tools
Once you have created your Live Chat widget, you can access the Dev Tools to customise your bot further.
On the Sprinklr Self-Serve window, click the Settings icon on the left-hand side. Under the Platform category, click Live Chat within Messaging.
Hover over the Options icon alongside the desired Live Chat and select Edit.
Scroll down to the Dev Tools section and click Copy to copy the API Key to test your live Chat. You can also click Generate New Key to create a new API key for testing purposes.
To deactivate the Live Chat
On the Sprinklr Self-Serve window, click the Settings icon on the left-hand side. Under the Platform category, click Live Chat within Messaging.
Hover over the Options icon alongside the desired Live Chat and select Deactivate.
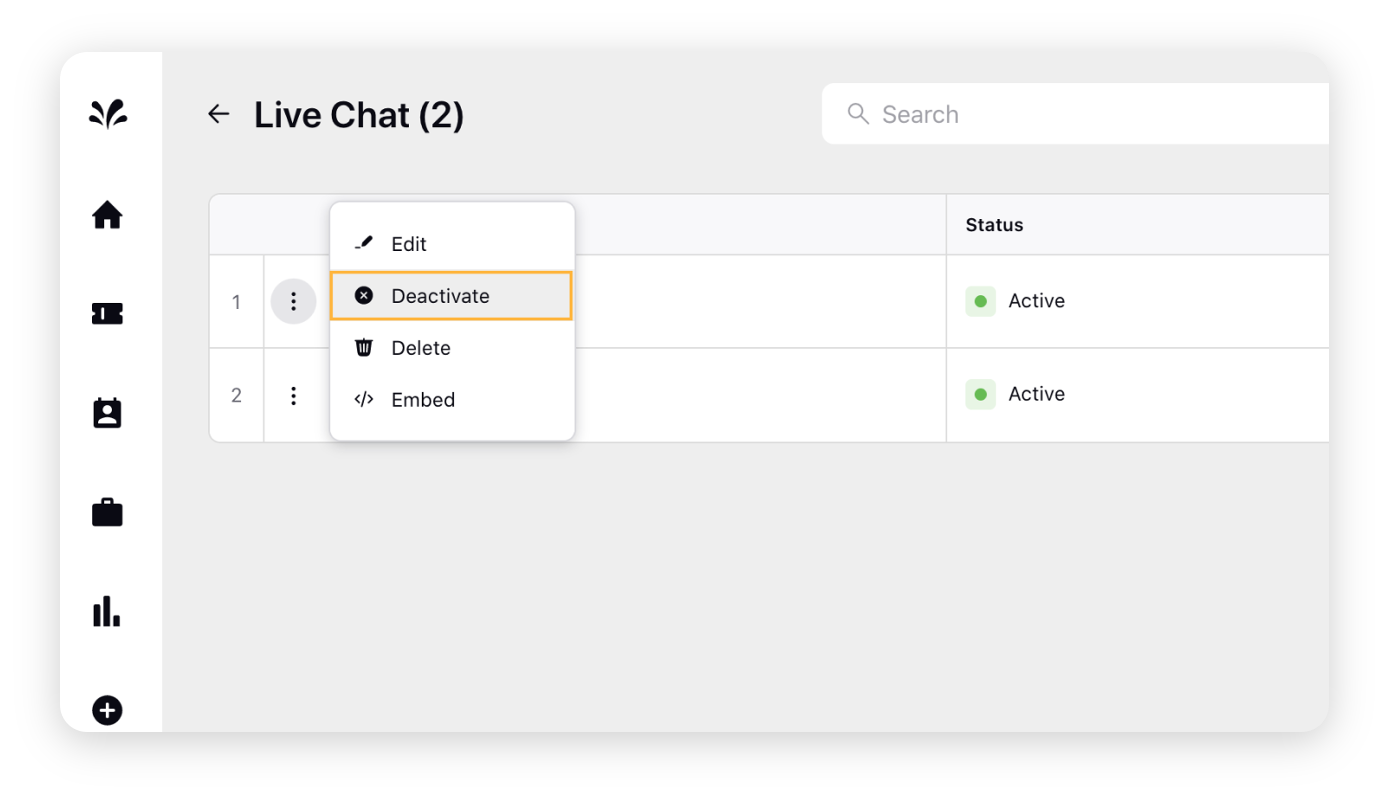
On the Deactivate Account pop-up window, select Deactivate. It will permanently delete the live chat account.
To delete the Live Chat
On the Sprinklr Self-Serve window, click the Settings icon on the left-hand side. Under the Platform category, click Live Chat within Messaging.
Hover over the Options icon alongside the desired Live Chat and select Delete.
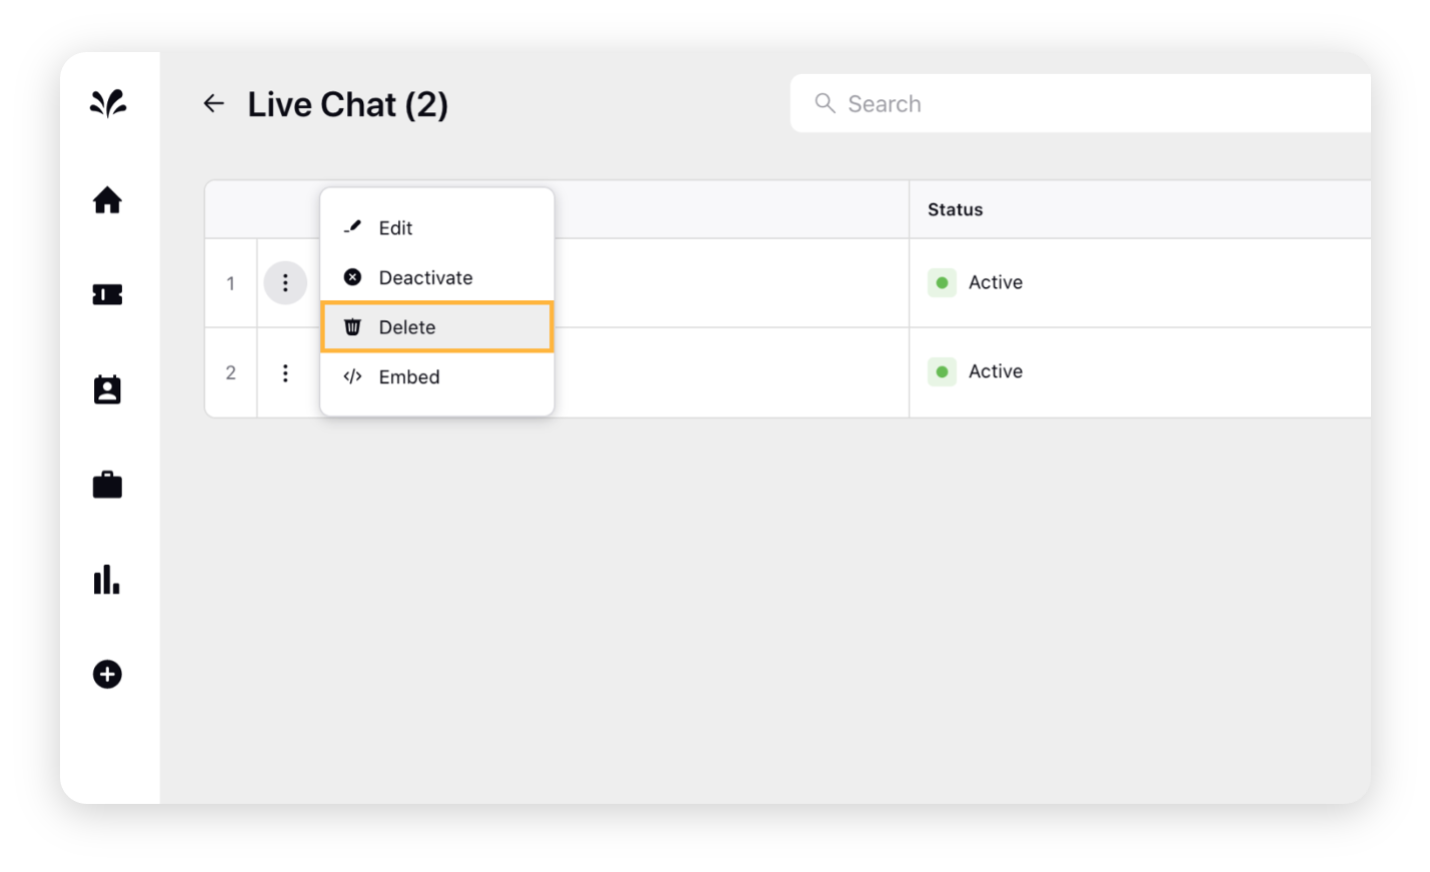
On the Delete Account pop-up window, select Delete. It will permanently delete the live chat account.
To embed the Live Chat
On the Sprinklr Self-Serve window, click the Settings icon on the left-hand side. Under the Platform category, click Live Chat within Messaging.
Hover over the Options icon alongside the desired Live Chat and select Embed.
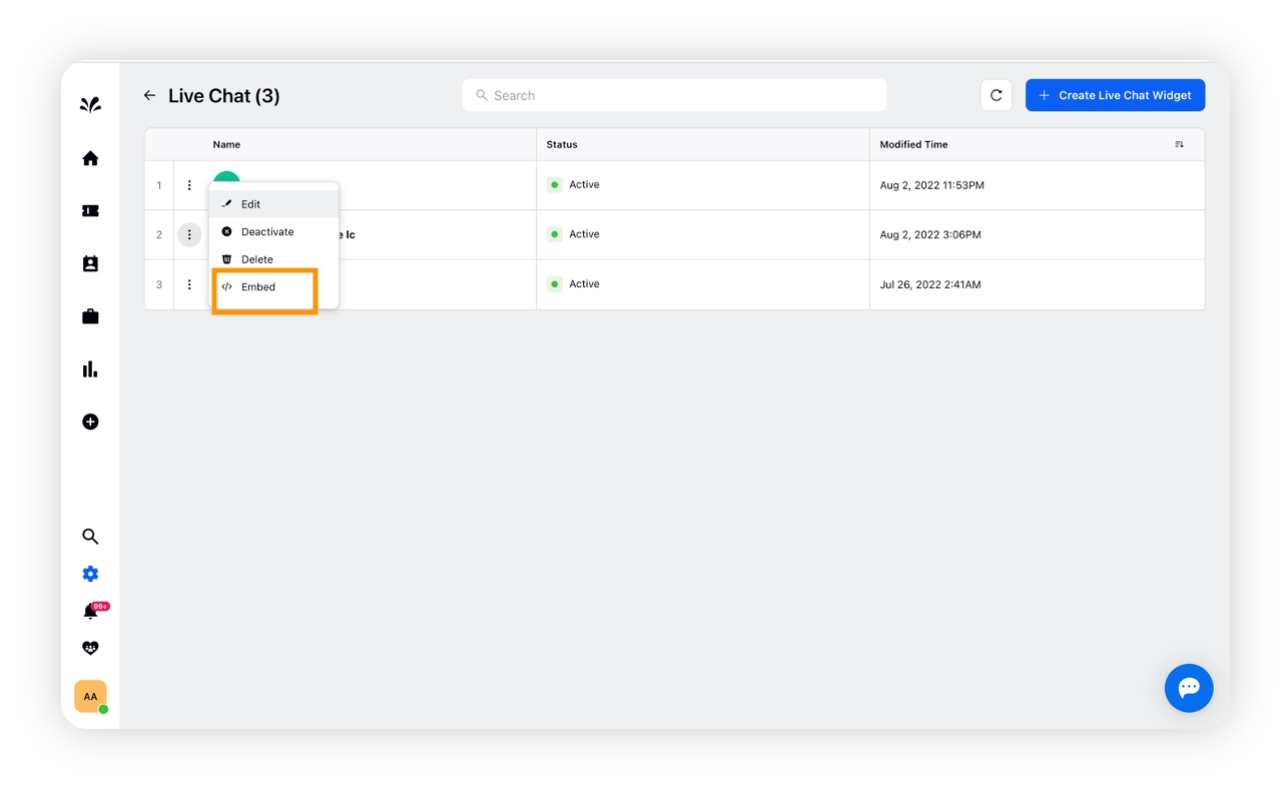
You will view the code along with the steps that need to be taken to enable Live Chat on your domain. Click the Copy icon to copy the available code.
Paste the copied code on all the pages of your website where you want the Live Chat to appear.
After successfully implementing the changes, you will see the Live Chat at the bottom corner of your domain.